
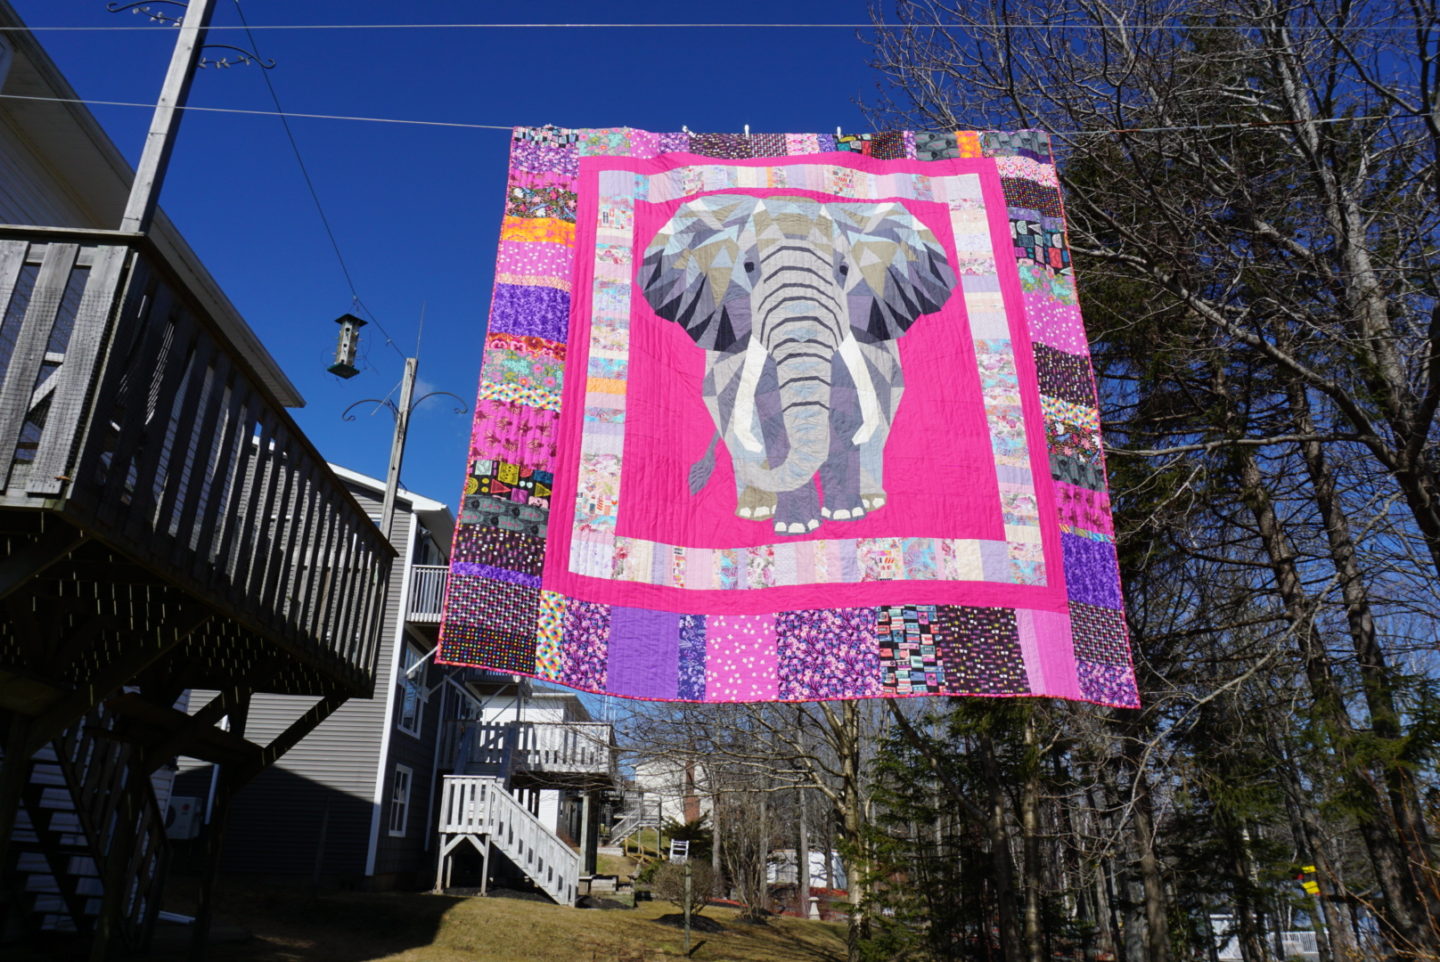
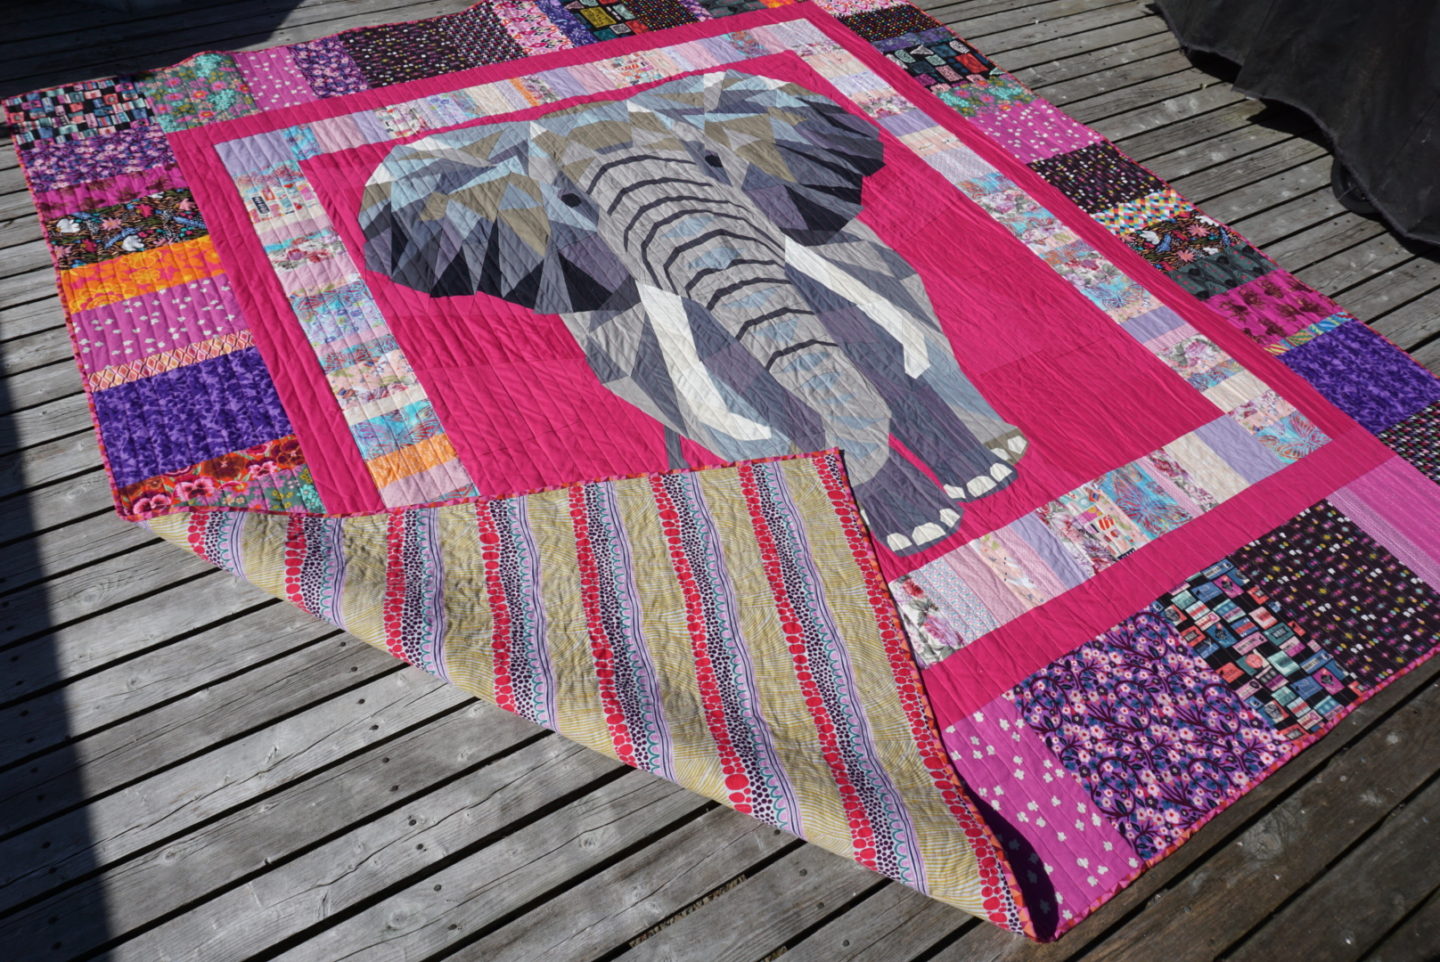
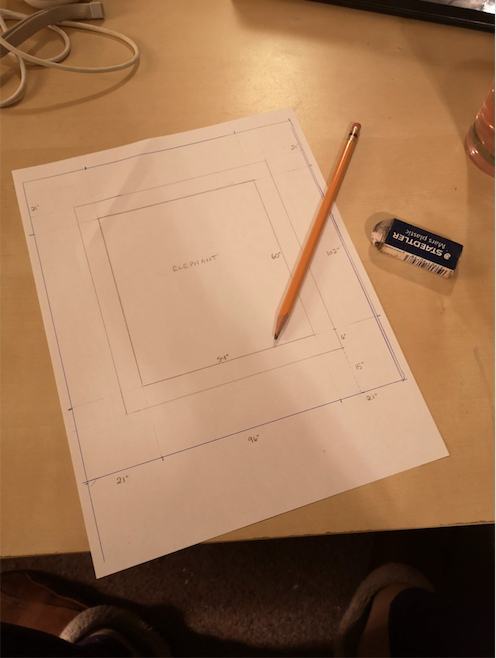
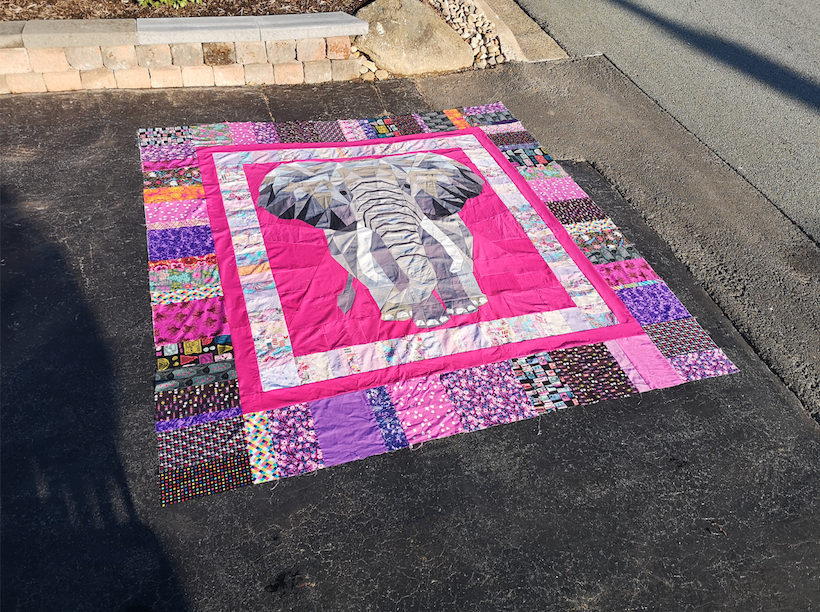
My friends. She’s done. The elephant I started more than a year ago is finished! And she’s pretty majestic. There were a lot of stops and starts on this journey, but I’m really happy I pushed through to get it completely done. The elephant in question is the Elephant Abstractions quilt, designed by Violet Craft. The centre elephant is made using a technique called foundation paper piecing (FPP), which I’ll talk more about below. I actually bought this pattern before I even knew how to do FPP because that’s how I operate: established giant, highly-unrealistic-at-the-moment dreams, and then figure out how to do the thing. The elephant itself ends up being 54″ by 60″, but I wanted it to be queen-ish sized so I added borders and it turned out (I think) 94″ by 100″. And here she is in all her glory! Take a gander!

I mentioned earlier that there was a lot of stopping and starting with this project. One of the biggest Stops, which lasted basically the entire summer, was due to my dread of how the borders were going to look. I had gotten into a Quarantine Mindset, which I’m honestly still kind of in, where I wanted to sew as much as possible with the things I had on hand instead of going out and getting new things. I had purchased the Kona cotton for the elephant itself a while before I actually started because there was a 50% off sale and it seemed like a sign that I should go for the good stuff, be able to get the exact fabric from the pattern, and then not have to worry about colour matching. Other than that, the only other materials I bought for this quilt were the backing fabric and the binding fabric. I actually got backing fabric before I realized that I wanted to make the quilt larger, but luckily my sister came to my rescue with the remaining fabric I needed for my birthday last spring. I even completely pieced the quilt batting from random pieces I had from past quilts and didn’t need any extra, I just attached it together using fusible batting tape which worked great.
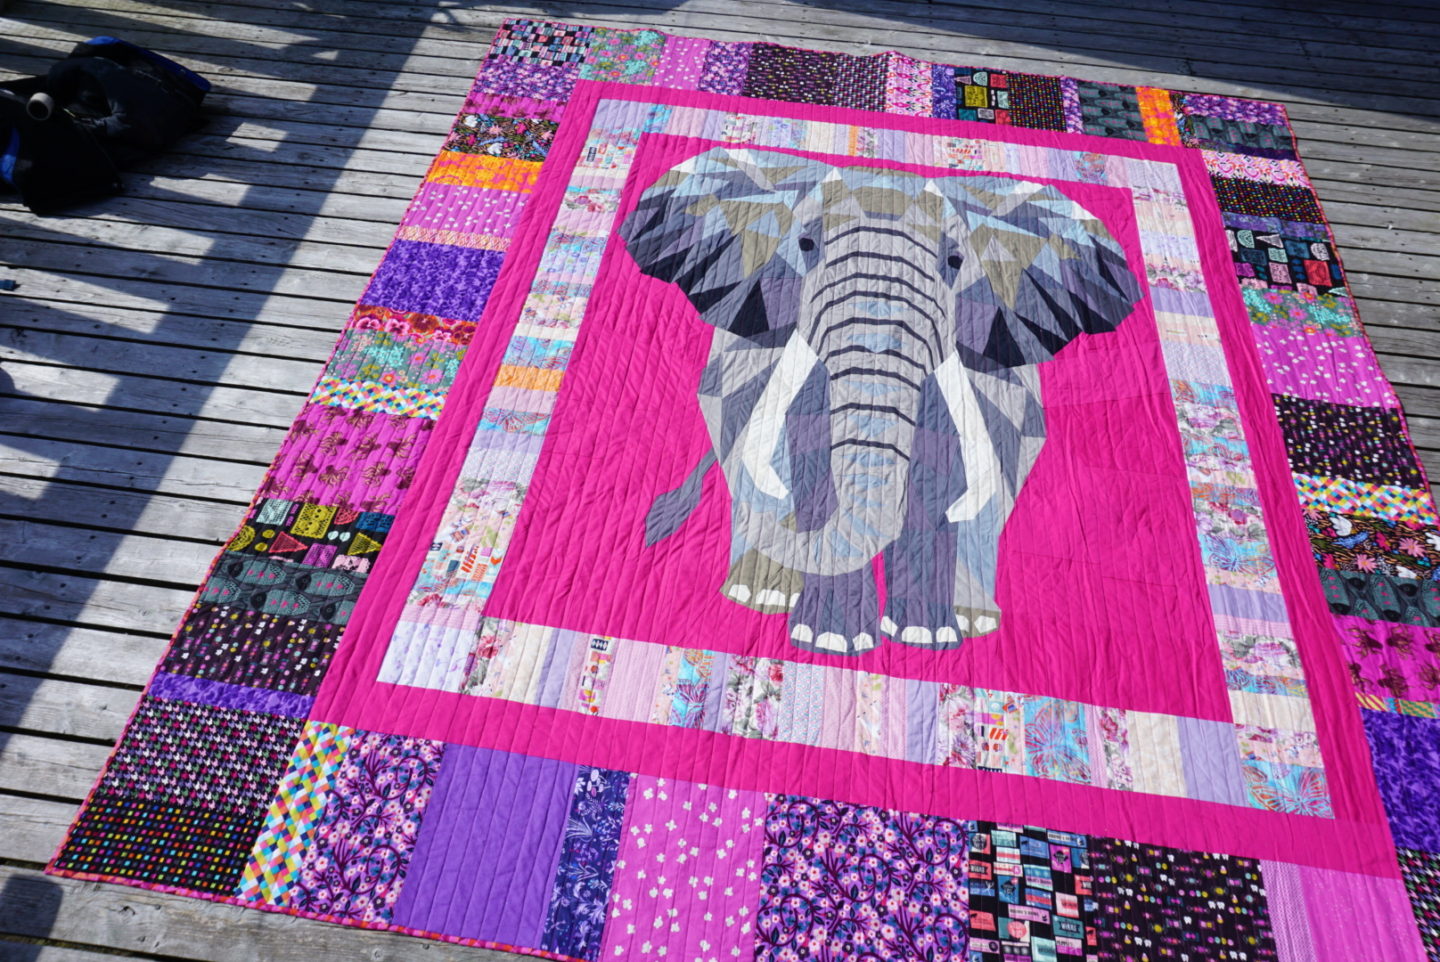
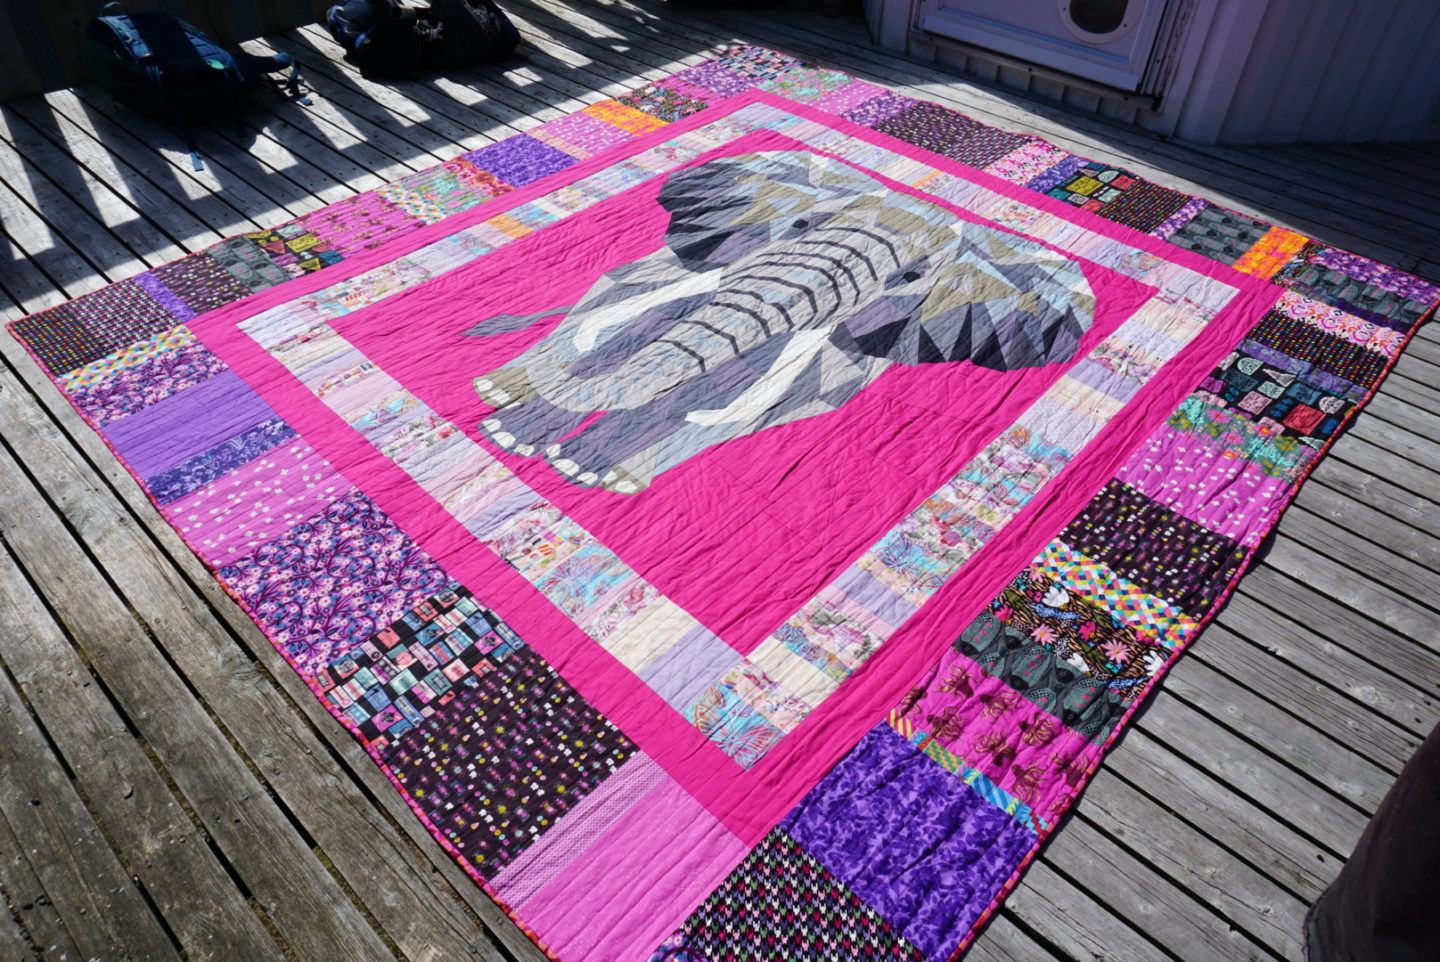
To get back to the borders, all this is to say that I was using all scrap fabric for the borders. I had already been storing my quilting cotton scraps in two bins, one for “warm” scraps and one for “cool”. I sorted through the warm bin to see what was there and further sorted the bits I picked into light and dark because I thought it would make the borders more distinct from each other. The reason I hit a wall when sewing it was because it felt really chaotic and random and I thought it wouldn’t go together or look good with the elephant. The hiatus happened at the point where I had attached the lighter, inner border to 2-3 sides of the elephant and it looked haphazard and not intentional. I think a big part of this was the raw edges and how it looked to me. Once I forced myself back to it to just get it done in the fall and attached the pink inter-border, suddenly the lighter ring looked much nicer and I didn’t hate it. And most of the fabrics in the outer border were ones I loved more anyway so then I suddenly felt a glimmer of hope that it wouldn’t be a complete trainwreck. And in the end it’s the opposite – I love how it looks all together, and it’s really nice to be able to look at all the fabrics from past projects and remember those too.
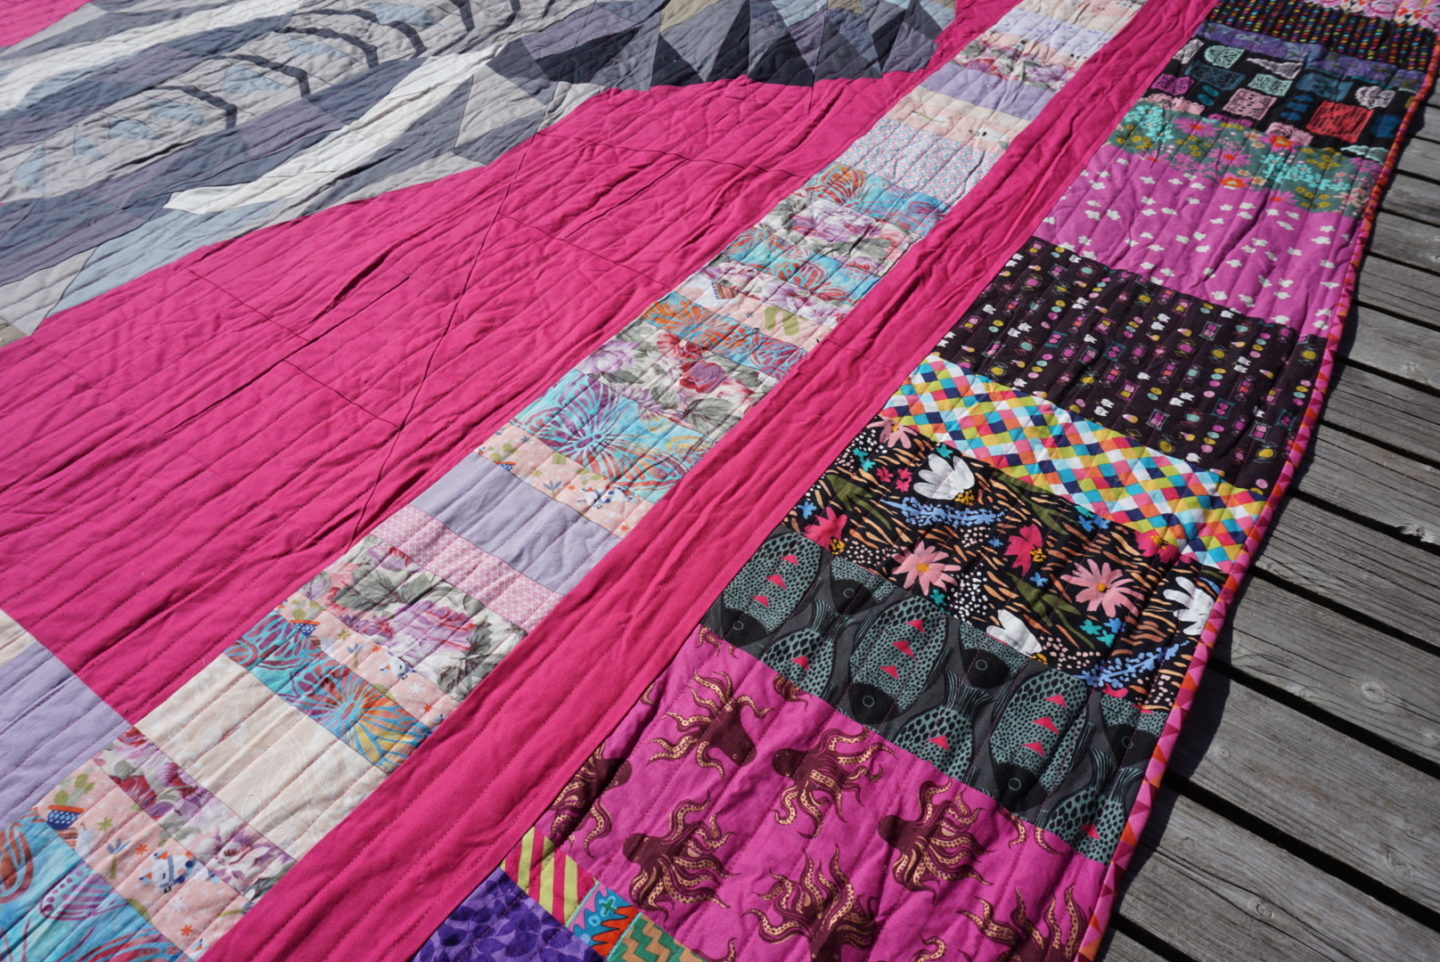
The dark purple with leaves is from a quilt I made for my friend Georgina (all diamonds and bias-cut pieces for one of my very first quilts, WHAT WAS I THINKING?!). The pink popcorns were from a colour-blocked Archer shirt I made, and also has turned up in the pocket bags for one of my pairs of Ginger jeans. The fabric with the dark grey and hot pink fish was a Granville shirt that I out-grew when I started climbing. The fabric with the candy and sore teeth on it was a Halloween fabric I turned into a Zinnia skirt (and I still wear it in the summer). A couple of the fabrics were used to make a quilted case for my iPad and BlueTooth page-turning pedal. In the inner ring, one of the fabrics was from a thrifted dress that I cut the skirt off of and attached my own (it was very bad and I never wore it). The peach llamas were extra fabric from a bundle I was given by a friend to make masks with. The pink octopuses were the only new fat quarter I used in the border, and I had been holding onto it for ages, waiting for a special occasion – I decided this was the right time. The flamboyant orange and hot pink floral is from a halter dress I made ages ago that was blinding and never got worn. And a bunch of them are from previous quilts I’ve made but never blogged about (they may even have been pre-Instagram!). It’s nice to see all these bits of my sewing history inside this newly finished project!
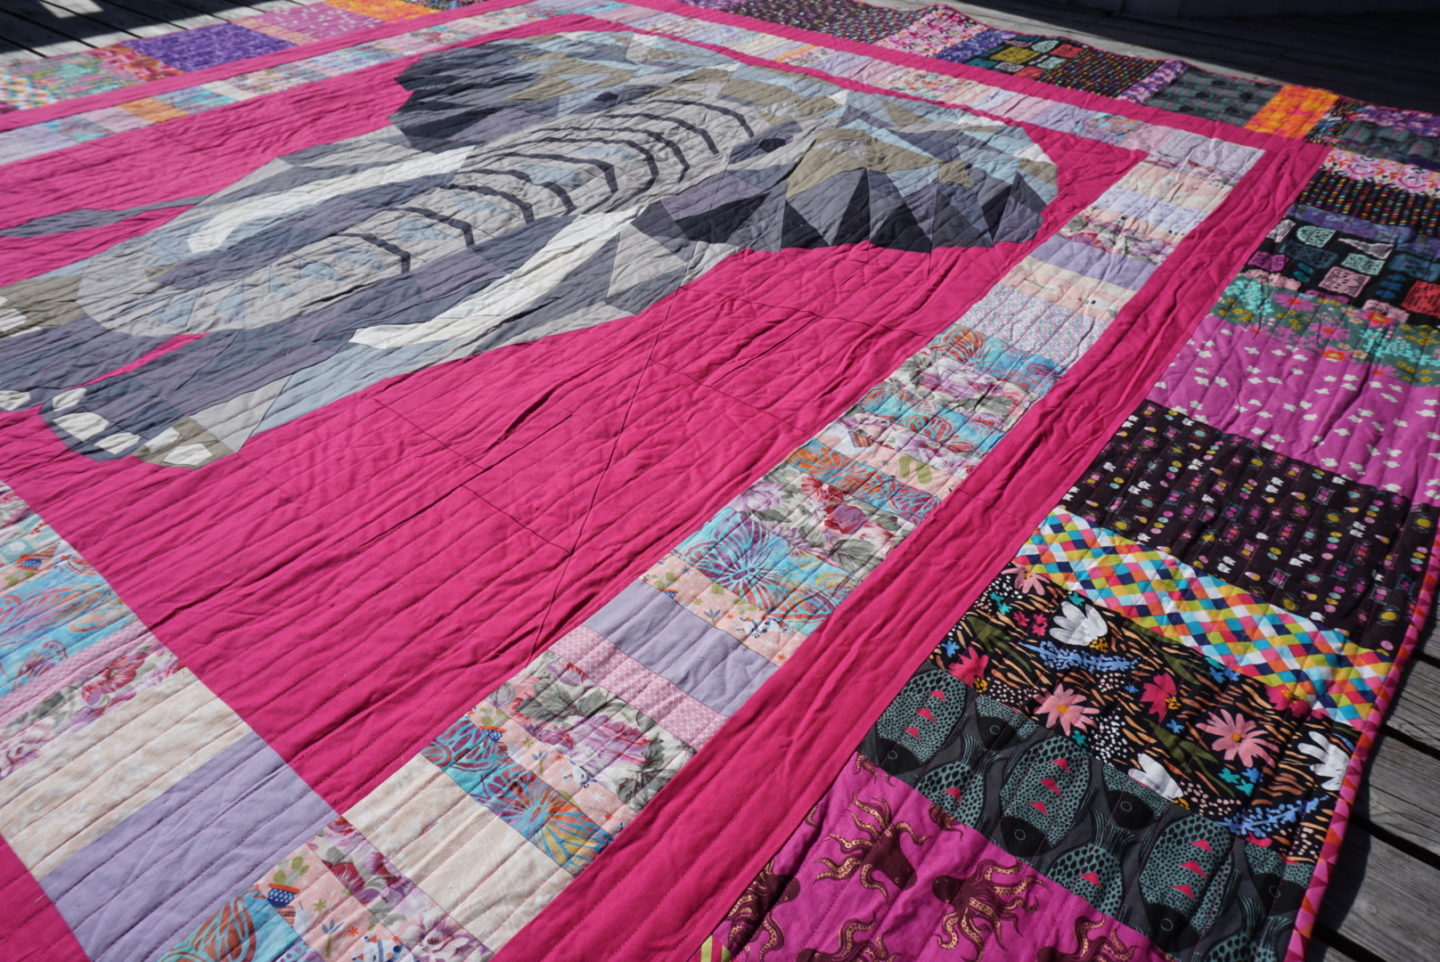


I decided to do straight-line quilting on my elephant. I was inspired by the ones in the mustard sample in the pattern listing, although those ones run horizontally. I decided I wanted mine to be vertical. I also thought they would avoid distracting from the elephant, as well as being achievable to do on my home sewing machine. The last 3-4 quilts I’ve made (like this one and this one), I quilted on the longarm sewing machine at the workroom in Toronto, at first when I lived there, and after I moved away, during my post-Christmas trips to Toronto to visit friends. I’d usually drag a quilt along and spend an afternoon longarming it. I used my walking foot for the entire thing, and started in the middle with the right side of the quilt rolled up inside the arm of the machine. I decided to quilt out to the left edge first, since it would be the most cumbersome side with the amount of rolled up quilt increasing as I went. It’s important with line quilting to always sew in the same direction to avoid conflicting shifting of the fabric (you can end up with bad diagonal draglines between the stitching lines). It was a LOT of physical work to do it, even with my rubber grippy quilt gloves. I did 4-5 lines at a time, and as I got closer to being finished, I committed to doing 3-5 lines every day after work just so I wouldn’t lose momentum. The last quarter was done in a marathon sewing session at the beginning of my week off from work. I think I watched an entire season of Schitt’s Creek while finishing the quilting, and stayed up WAY too late considering I had a dentist appointment the next day. Ooooops. I did my lines 1″ apart, although had to course correct every 5-10 lines or so to make sure I wasn’t drifting too much. It’s one of those things where up close I thought it was looking really trash and then I’d step back and be pleasantly surprised by how clean it looked.
I attached the binding by machine in the middle of the night after finishing the quilting so that I could be done with the machine sewing portion and move on to the hand binding. I was weirdly looking forward to the hand sewing part. I’ve been knitting a lot lately, and I think I’ve gotten into that groove of sitting on a couch with my partner watching a movie and crafting, so this was in that same realm. It took me two days of hand sewing the binding to finish it, which I thought was pretty quick considering it’s ~400″ of binding, and I’m not the speediest hand-sew-er. I’ve definitely machine-sewn bindings down before, so don’t get the impression that I’m some sort of binding snob, but I do like the look of it better when it’s done by hand, and I thought my lovely elephant deserved the effort.


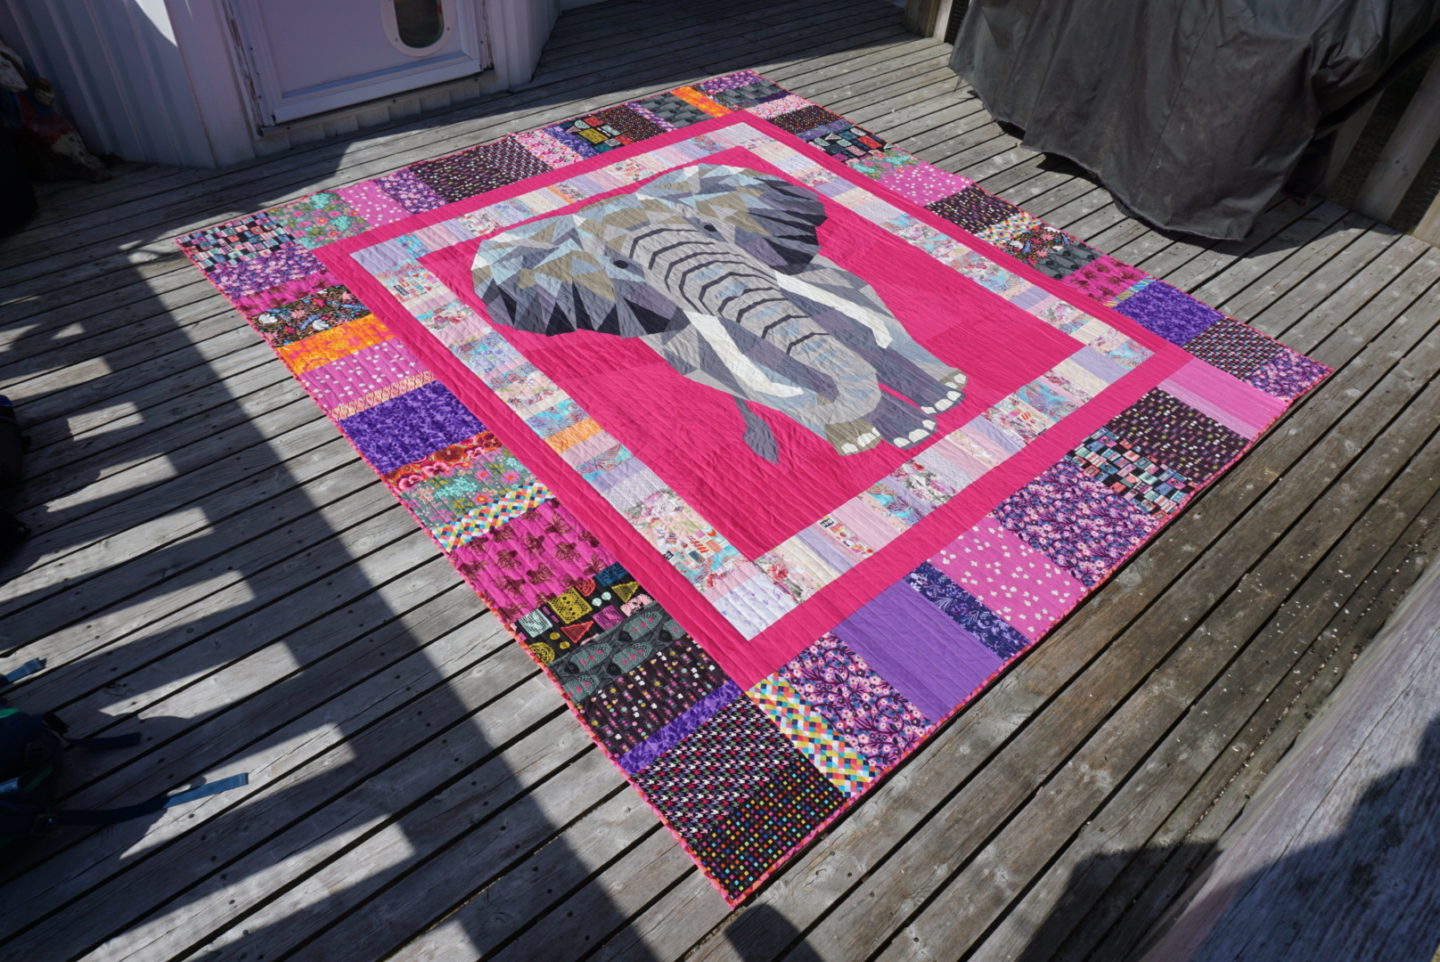
In case you were wondering how I got the heavy giant quilt to not fall off the clothesline when I was taking photos of it… I used jumper cables from my garage. They were honestly pretty rusty so I used random scraps of white fabric from my scrap bin to go between the quilt and the clips so they didn’t get rust stains all over my new quilt. Also, it was very difficult to find a place to photograph a quilt this big. The fences at the school by my house were either too short or too tall. The trellis in my backyard was too short. The lighting in my house was too dim. So I ended up in aforementioned Georgina’s parents’ backyard, spreading the quilt out on their deck and then borrowing their clothesline. Turned out pretty good, if you ask me!
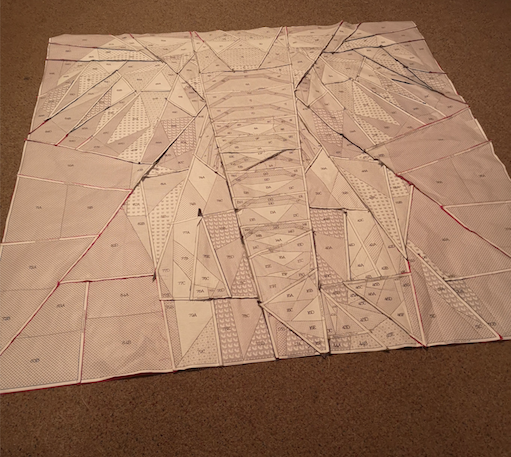
Let’s talk about the process of sewing the elephant a bit more. I don’t have a done of photos in terms of showing you how to do the thing, but there’s lots of videos on YouTube explaining how to do it so I’ll just give an overview. The way foundation paper piecing works, you need paper templates. The ones for this pattern printed on 11″ by 17″ paper, which I had printed at a copy shop. During the sewing process, I messed up a couple and it’s hard to recover them, but Adobe has a function where you can print PART of a bigger page, so I was able to print lone replacements for those at home without having to go back to the copy shop. On the templates, there are patterns/icons covering the shapes inside, along with numbers and letters. The number refers to the template unit in context of the larger design. For example, below you see template number 59. That makes that it gets sewn after 58 other ones have been sewn. The instructions tell you when to combine these smaller templates with other ones to make bigger units. The letters on the templates refer to the order in which you sew that piece of fabric. The pattern on the paper tells you which colour you should be using. There’s a legend, and I wrote my colour names in the squares provided on the paper, plus I pinned labels to each piece of fabric telling me which colour it was and what shapes belonged to it (cherries, cats, lines, etc.). This was crucial, because in this quilt, you have so many very similar shades of grey and light browns that it’s easy to mix up, but they’re distinctive enough to make your pattern look really weird if you get them wrong.
The reason it’s called foundation paper piecing is because you use the paper as a foundation for the fabric and sew directly onto it along the lines. This perforates the paper (which is why it’s better to use a slightly shorter stitch length), making it easier to pull out later. I left all my paper in until the very end at the recommendation of Andrea Tsang Jackson, who I took a one-evening class with at Patch. No matter how much I read and how many videos I watched, I just could not figure out what was happening with this technique or how to do it. I can normally figure out stuff on my own, and really enjoy doing that, but this just did not click. It wasn’t until I saw Andrea do it once that my brain went, “OHHHHH” and I was off to the races. One of the cool things about sewing to the paper is that it stabilizes the fabric so grain direction is completely irrelevant. It can’t distort because it’s attached to the paper. I think preventing distortion is one of the reasons why Andrea recommended leaving in as much paper as possible as long as possible. Sewing on the paper feels like paint-by-number. It’s so meditative, and I found it really easy to get into a flow with it because it’s very repetitive but requires you to pay attention enough to use the right fabric colour and sew along the correct lines, so it’s not mindless.
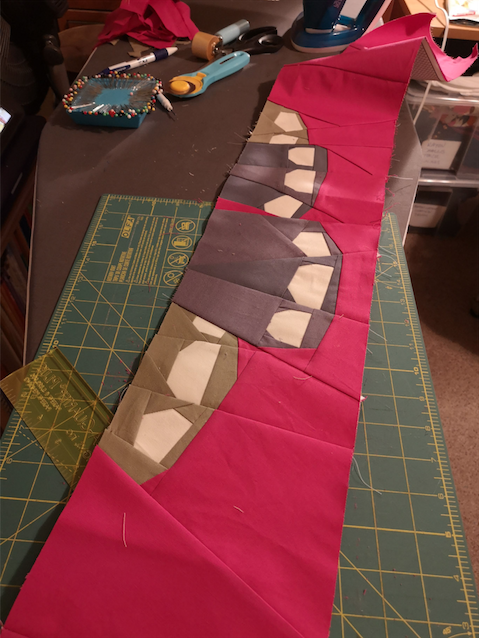
You can see some in-progress photos below, with the second pictures showing the elephant with one of its big units missing, and sans toes. There are also photos showing the back of the quilt, with all of the paper still attached, as well as partway through paper removal. That part was really finicky. I had to use tweezers and both hands, and I’m sure there were still teeny paper fluffs left behind anyway.

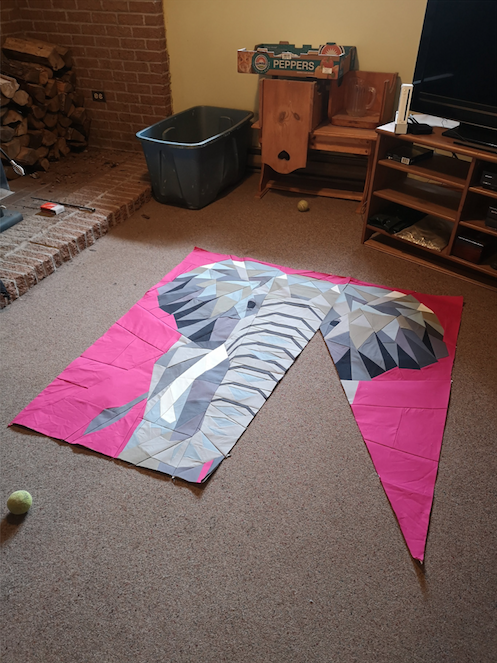


Above you can see the quilt top before I sandwiched it and quilted it. It was a huge undertaking, but I’m so happy that it’s finished and really pleased with how it turned out. I’m excited to have it on my bed. It feels weird for it to be done though, since it was something I had in my mind for months before I even got to start it. I think my next quilt projects will be a couple overdue wedding quilts for two friends of mine who have gotten married in the time since I started the elephant. I’m trying not to be a typical quilter or knitter who has many projects on the go at once, because with both crafts I’m definitely a slow and steady gal, and would be easily overwhelmed by unfinished things. (She says this while scandalously having two sweaters on the go at once…) What do you do when you finish a big projects like this? Do you sit and look at it for three hours? Do you immediately use it? With this one I’m an immediate use person – I just want it near me and surrounding me!