
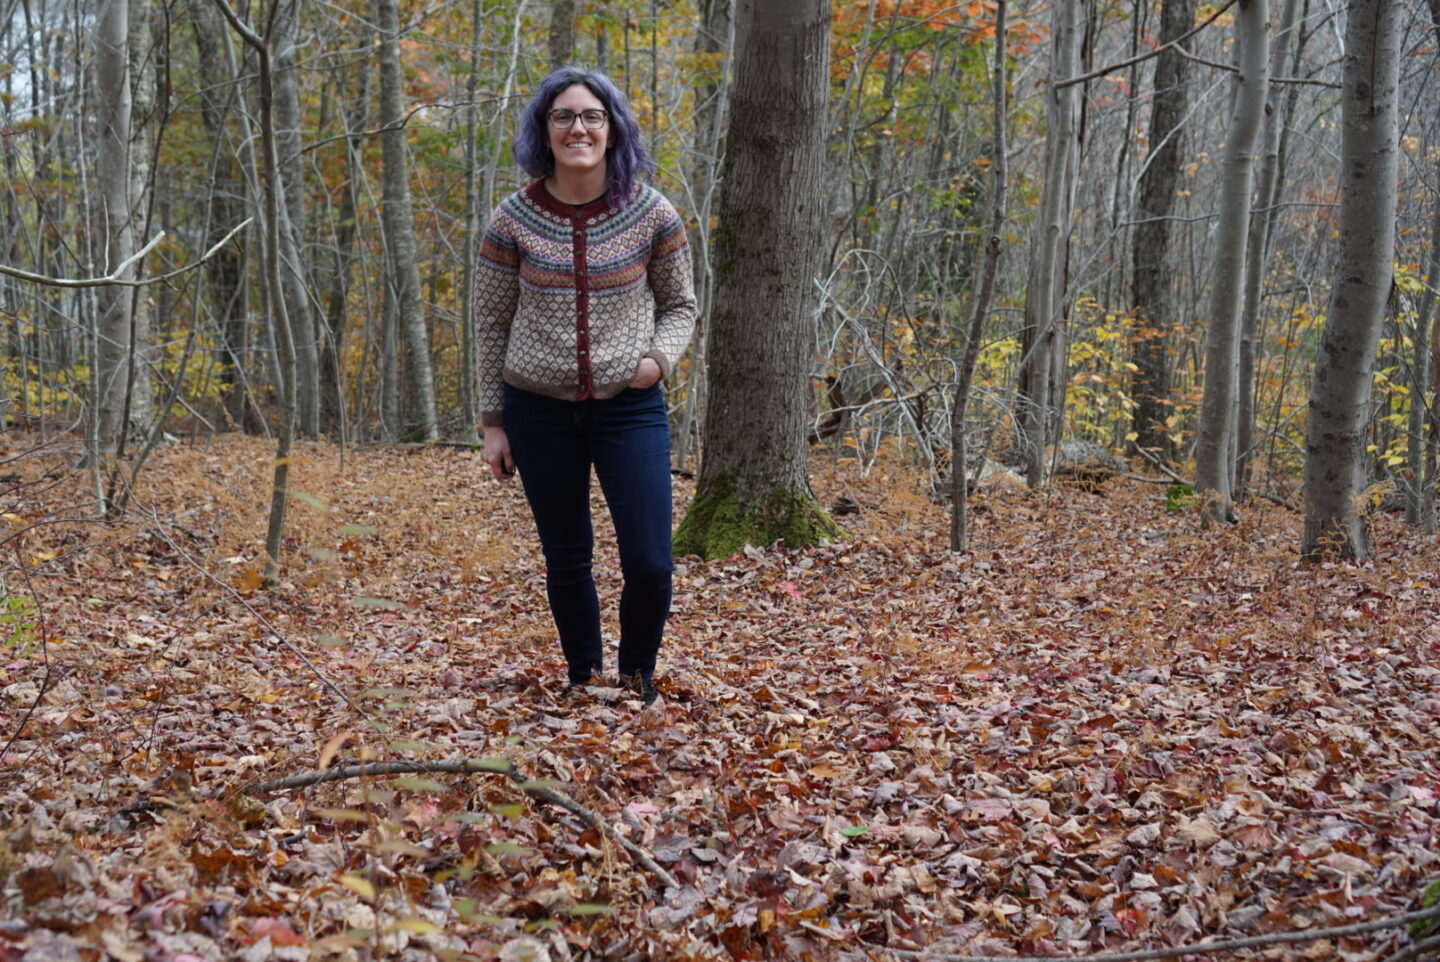
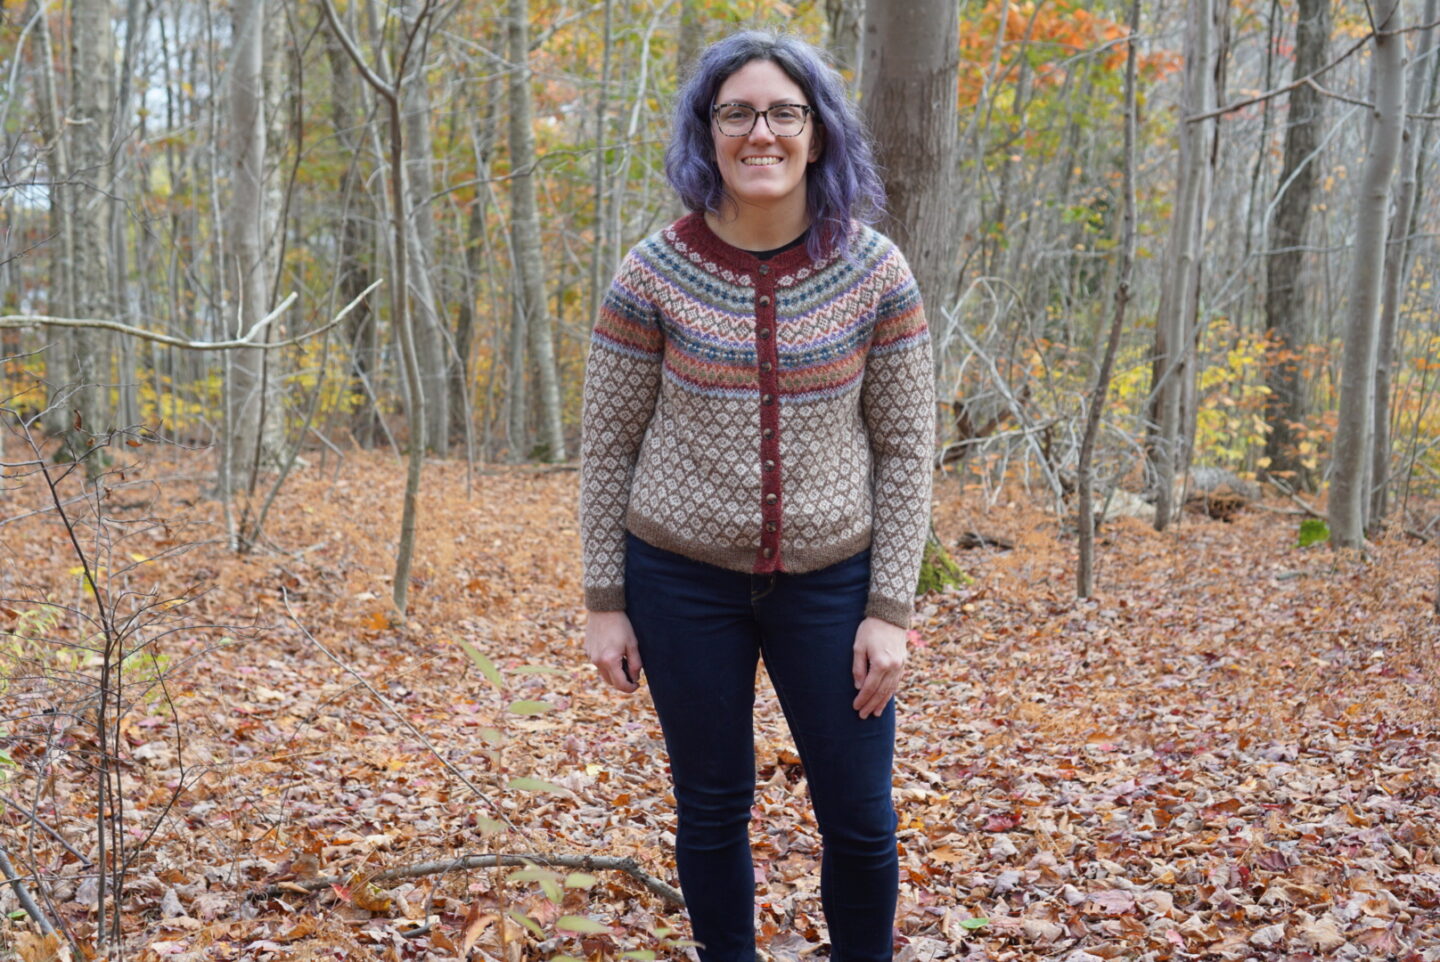
I knit my first all-over colourwork sweater! I successfully picked 13 coordinating colours for the same project! I STEEKED! This project feels like a huge level up in my knitting game, and I learned so much. Let me tell you all about it! I want to say up front that I’ve decided not to say what pattern it is. The main reason for this is that the pattern (and the other patterns from the e-book it came from) are very much not size-inclusive. I didn’t realize this until after I purchased the pattern and all of the yarn. If you really want to know, you can get in touch with me on Instagram (@doublebassgirl) but I won’t be giving free advertising to a designer who can’t bother to grade/design their patterns for people with larger bodies.
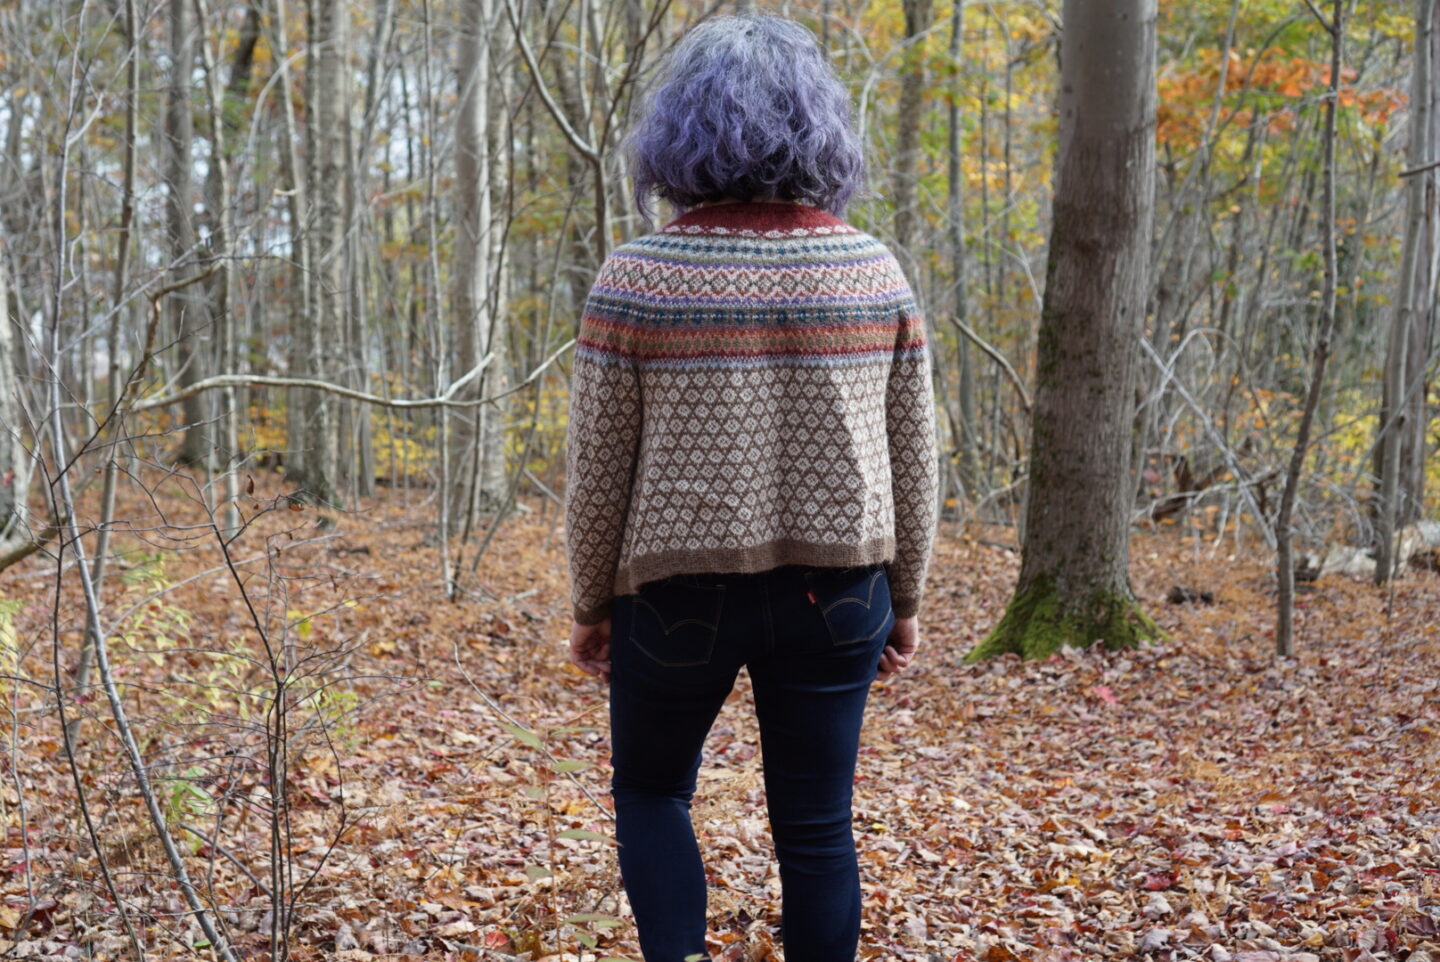
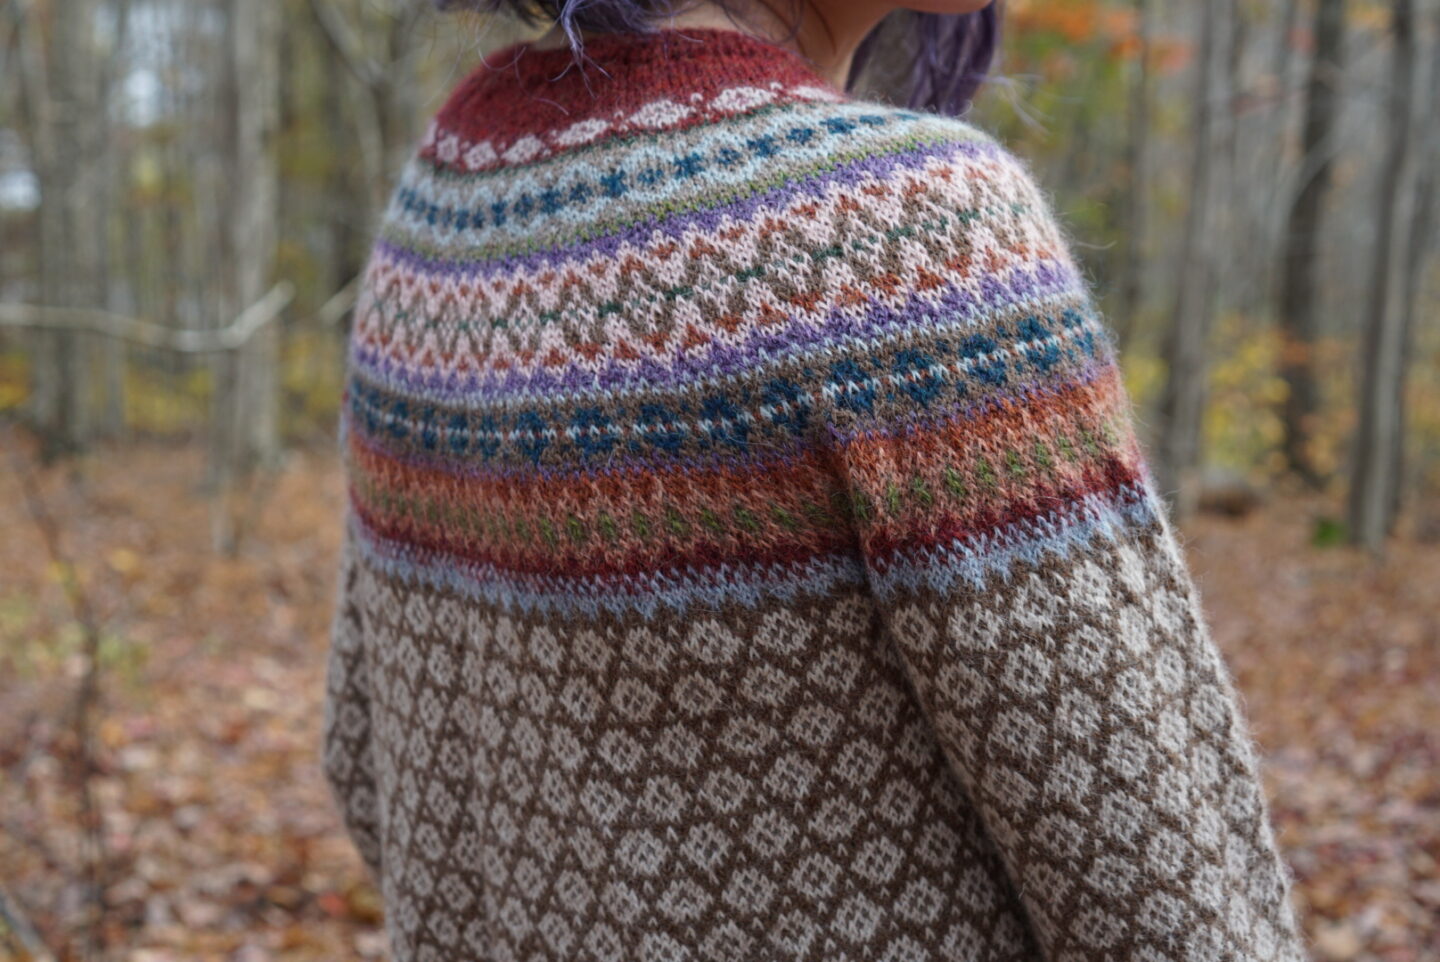
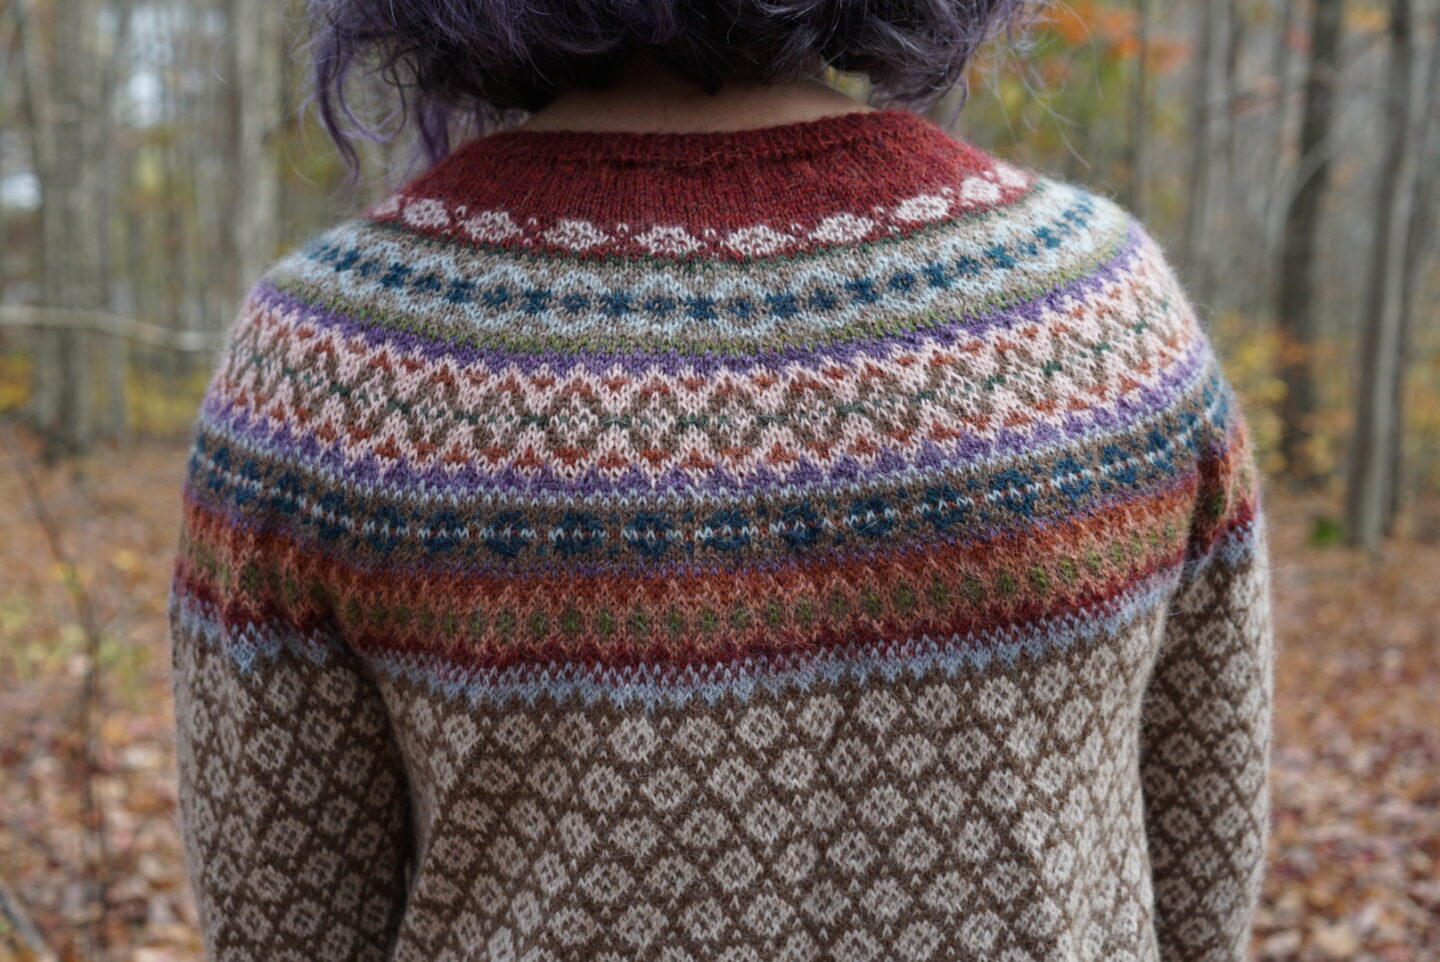
I cast on this project in January of this year as part of the Bucket List Knit-Along hosted by Tim and Mckenzie on their Sibling Energy podcast! If you haven’t watched their podcast (yes, watched, because if you didn’t know already, a quirk of the knitting community is that knitting YouTube channels are usually referred to as podcasts), I highly recommend it! It is a delight! The Bucket List KAL was very open-ended in terms of projects. Anyone who was participating just needed to pick a project that was something that felt suited the spirit of a “bucket list” project – something you’d been putting off because it was too expensive, too intimidating, too complicated, etc. I picked this project for a few reasons. I’d never done an all-over colourwork project, and really wanted to give it a try. I’d never had to pick so many colours for a project at the same time. I’d never done Fair Isle knitting – I’d done stranded colourwork but nothing that was made up of shorter recurring motifs with short floats. I’d also never steeked. Steeking is when you CUT your knitting in order to make an opening. It’s very common in colourwork/Fair Isle knitting since those projects are traditionally knit in the round, and then you would need to create an opening to turn it into a cardigan, or in some instances to create armholes. I’ll talk more about that later on in this post. For now, here are some photos of the finished cardigan!
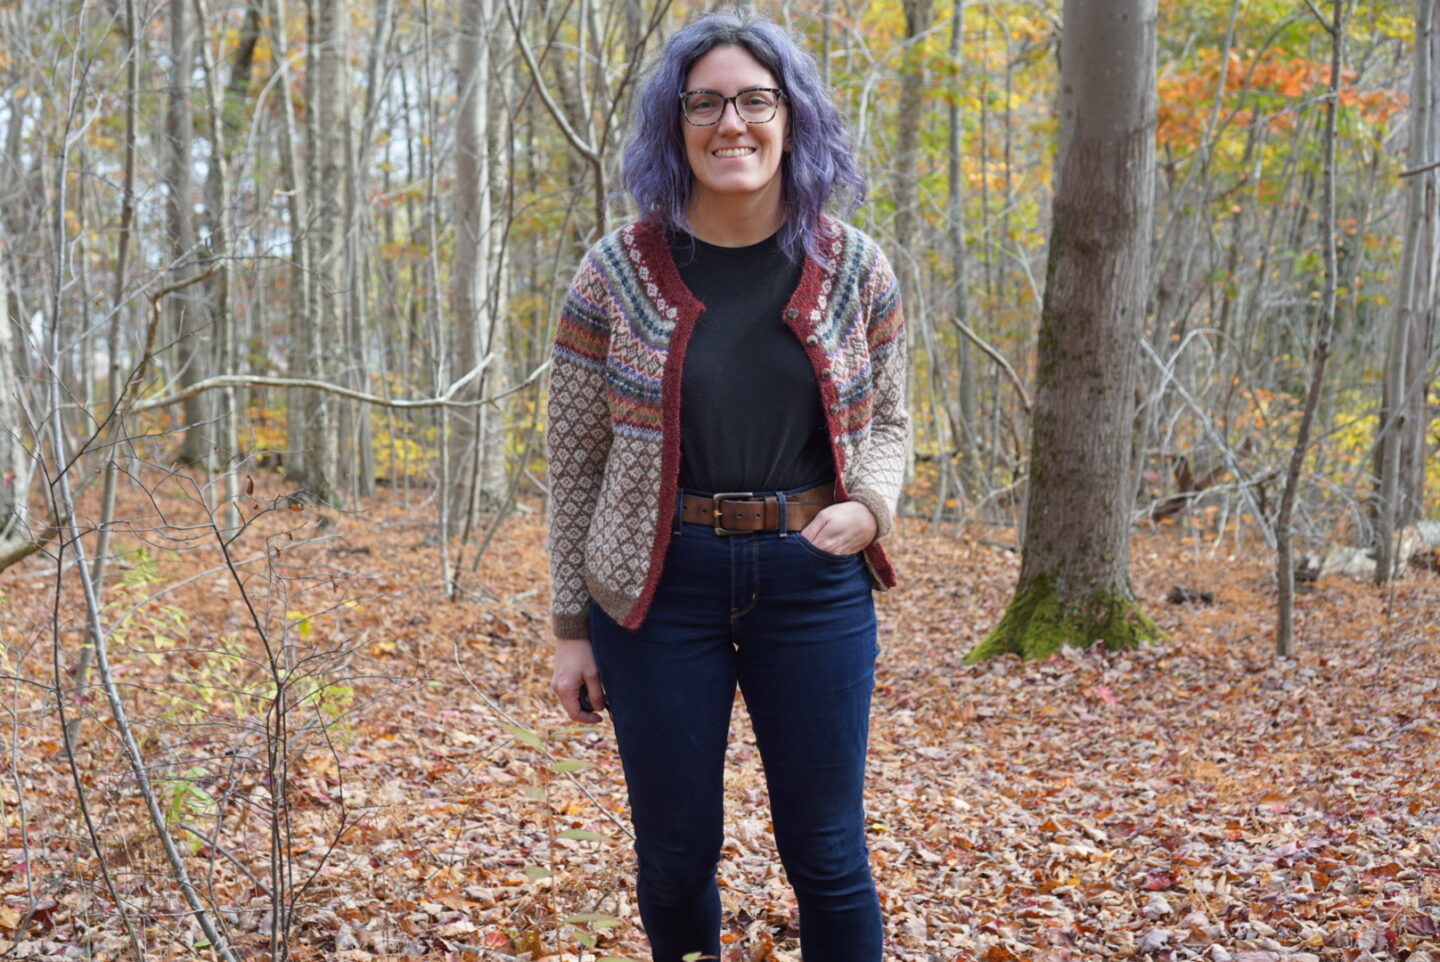
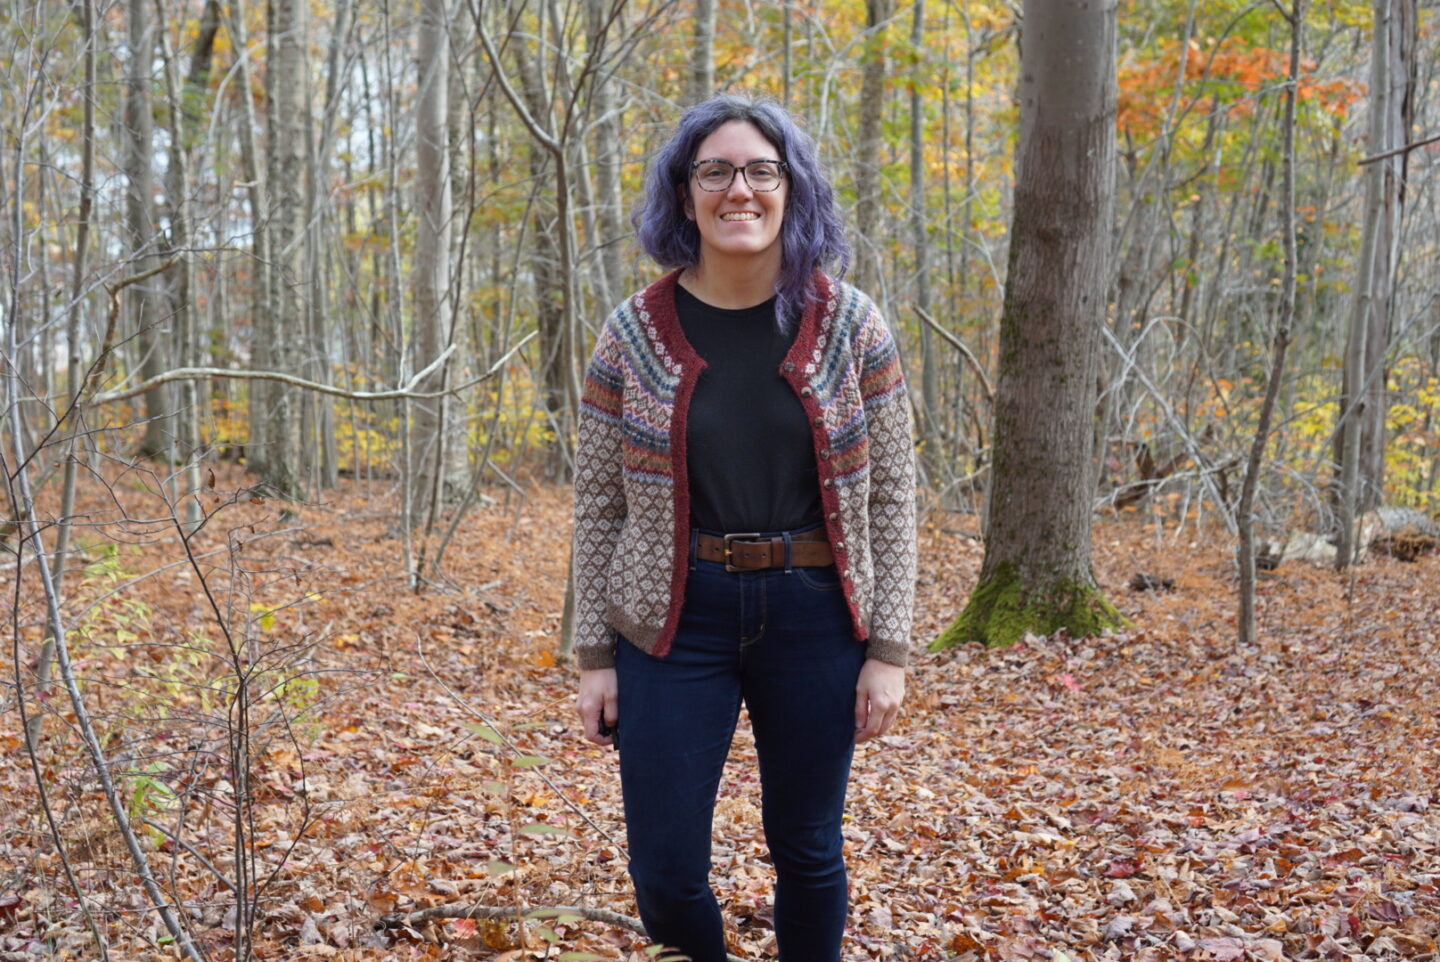
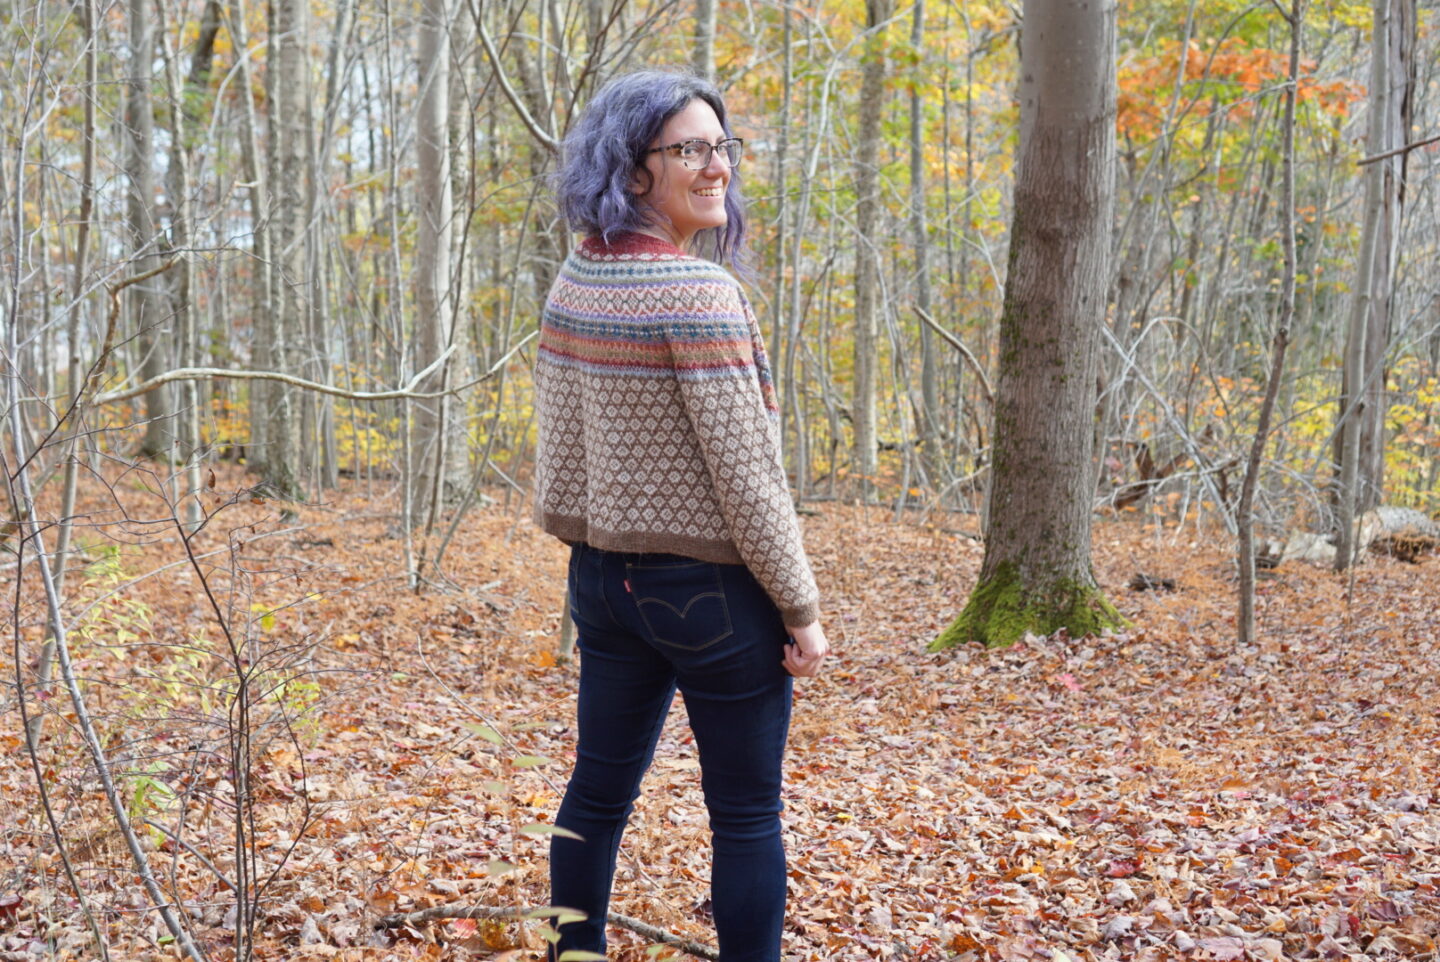
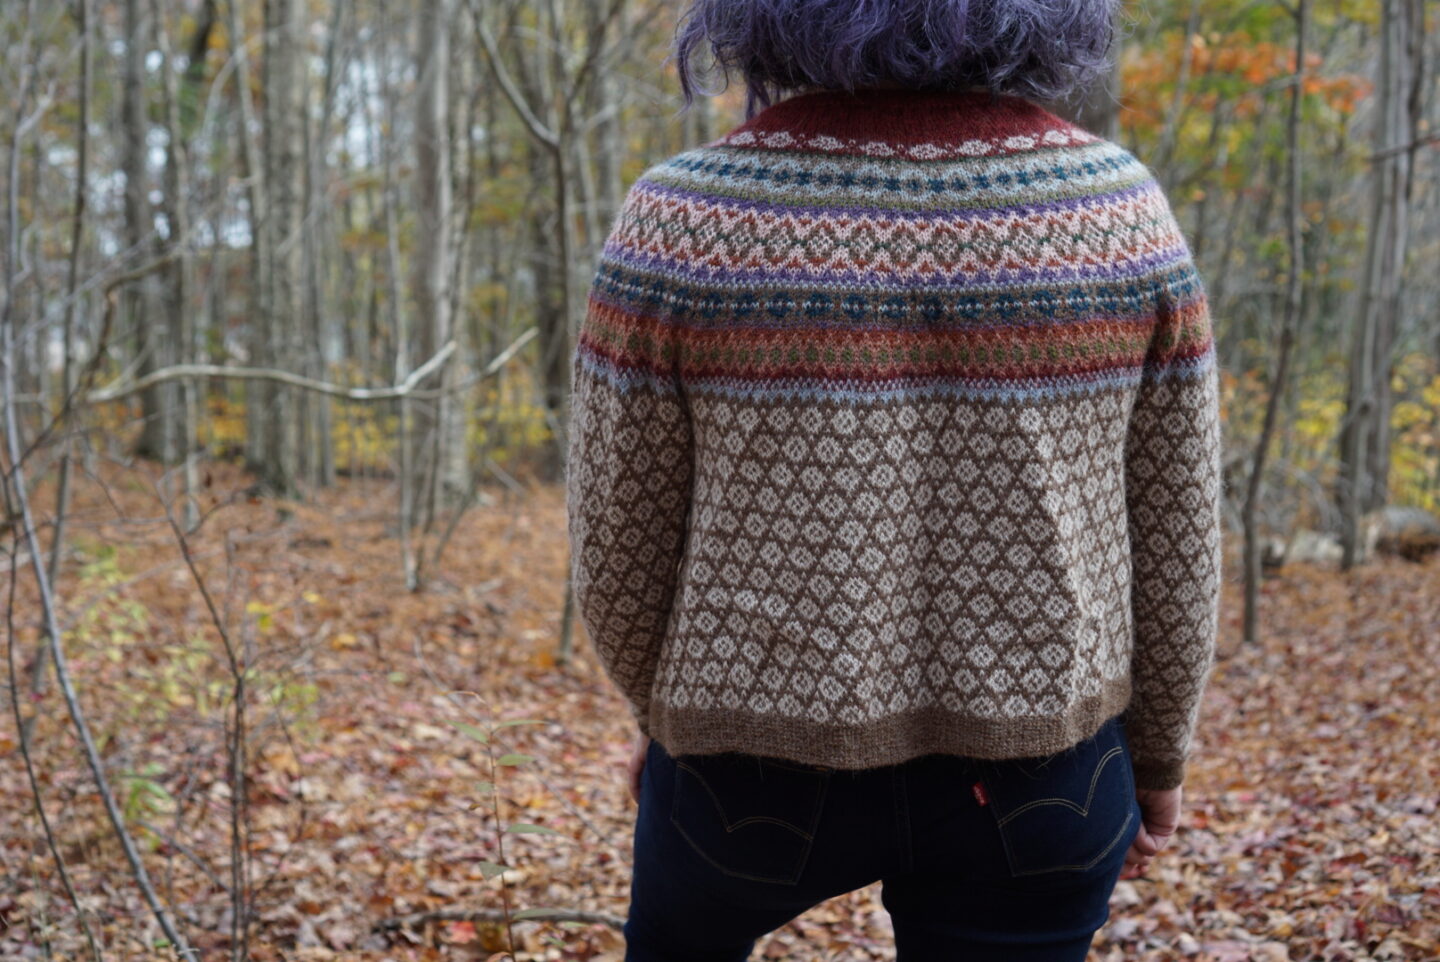
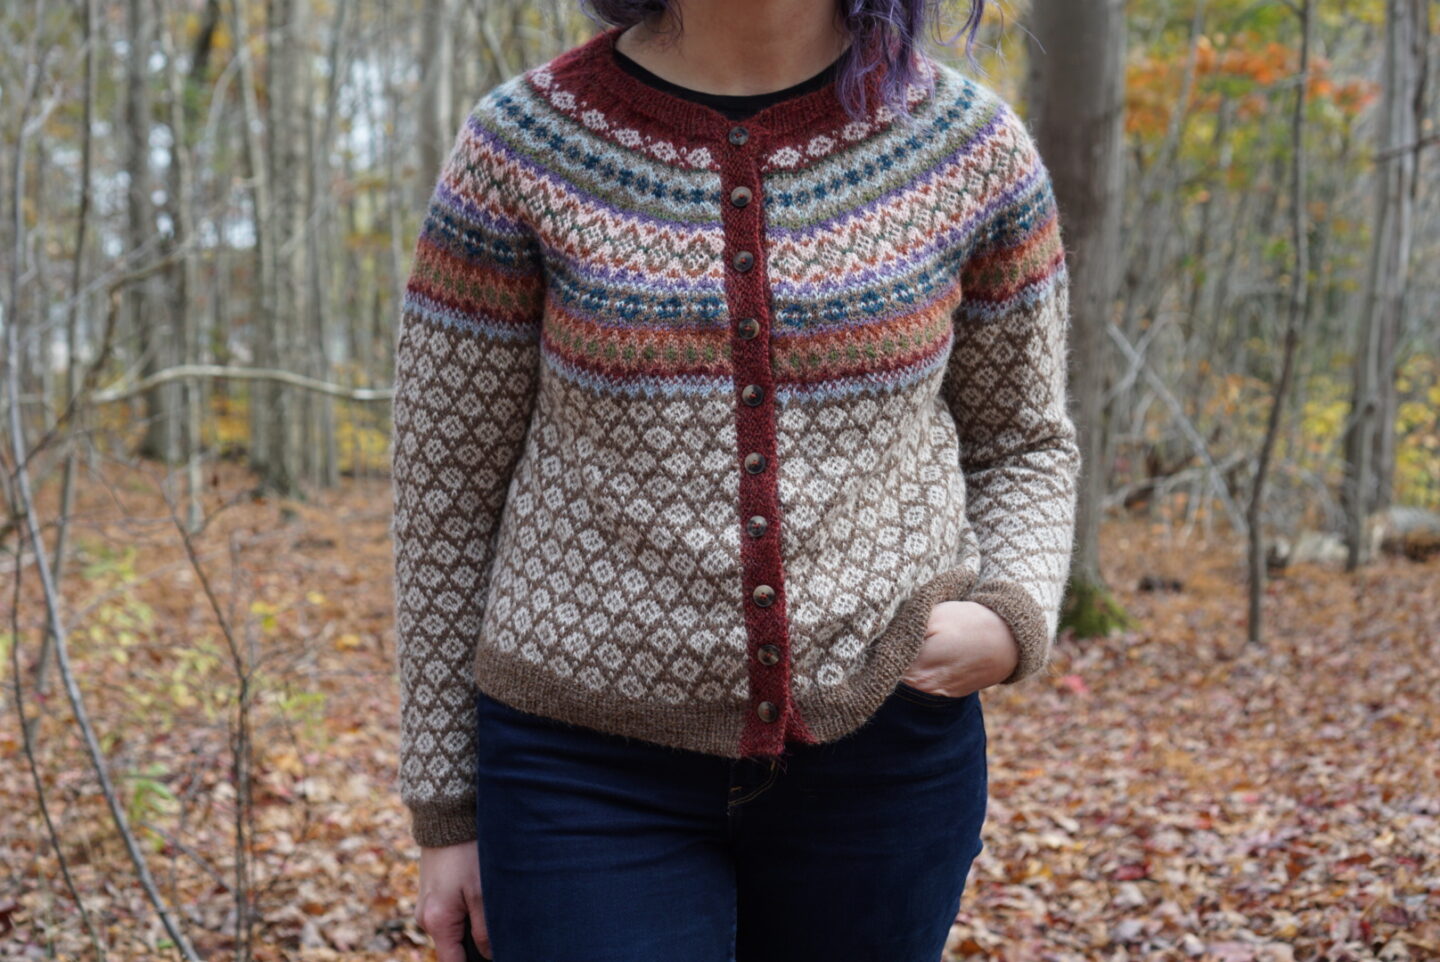
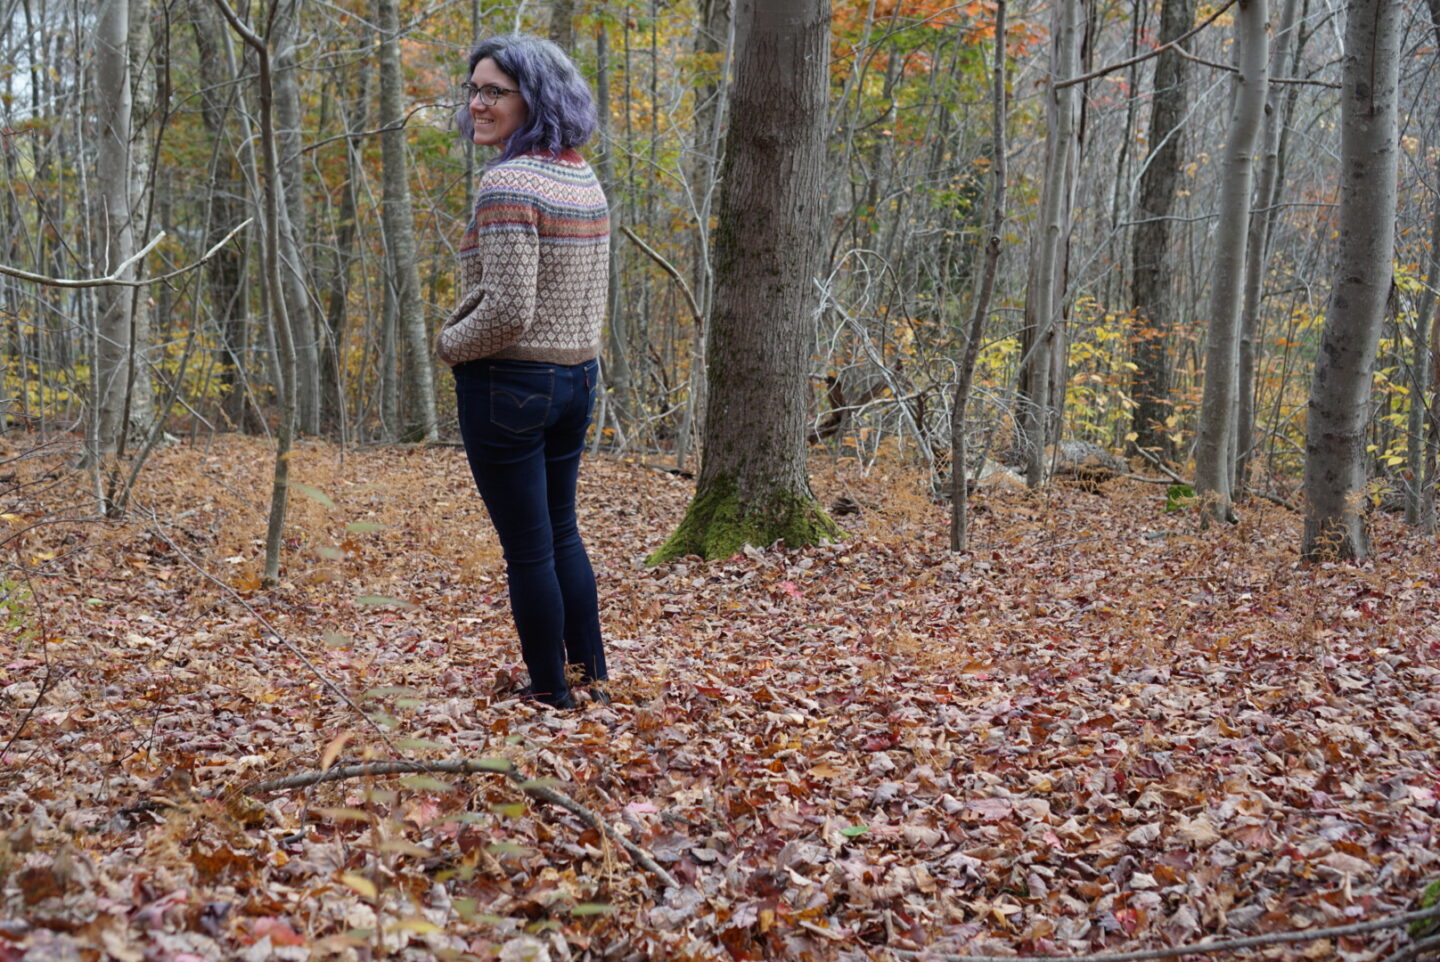
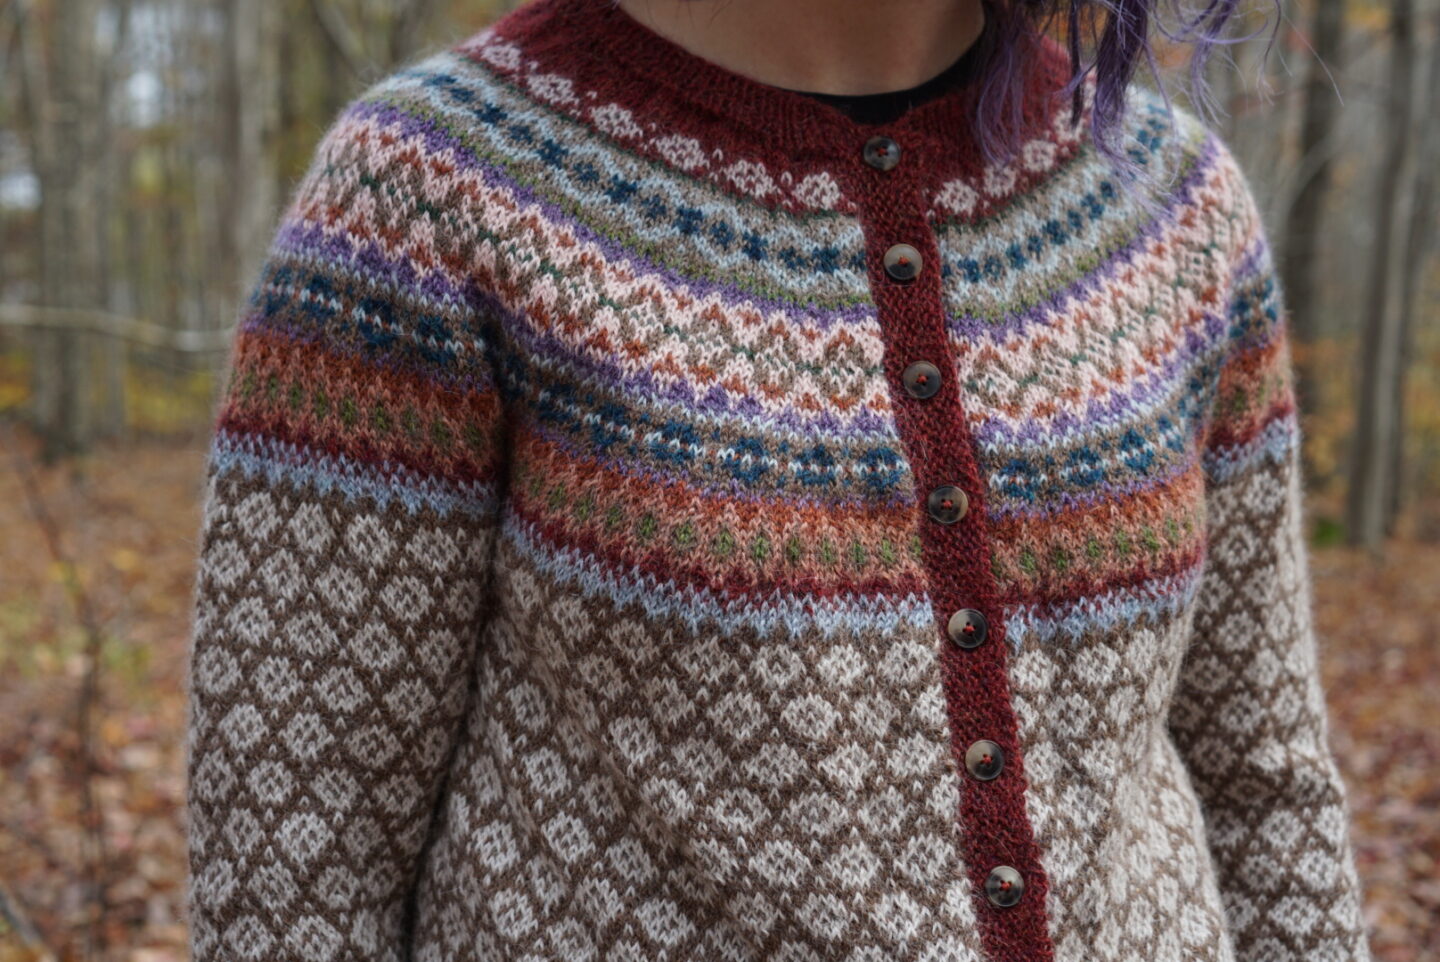
I’m so happy with how it turned out, how it fits, the colours I chose, and the photos themselves! I was motivated to get out and take photos because we are supposed to get a huge amount of rain tomorrow, as well as high winds. I have a feeling that all of the remaining fall leaves are going to get blown off the trees! Since this is such a special project, I was willing to make a journey to the woods to get the fall background colours, and the weather forecast gave me a good push to actually do it. The yarn I used is Drops Alpaca, which is 100% superfine alpaca. I got most of it from Fia Fia, but a few colours I ordered on Etsy. With having to pick so many colours (I’m pretty sure it was 13!) at once, and this project being a special one, I wanted to get exactly the colours I envisioned and not all of them were available in person locally. I used the app ProCreate on my iPad and a screenshot of the colour options from the Drops website in order to test out different colour combinations on the chart for the cardigan. This helped me a lot, especially with being able to test out all of the side-by-side colour combinations that occur throughout the motifs of the design. There’s probably a few combinations that could’ve had better contrast, but overall I’m very happy with how the colours turned out. The yarn itself is very fuzzy and soft! The pattern recommended Rauma Garn for the yarn, and Fia Fia carries that now, so I’m excited to try it out on a future project.

Usually, I am a very tight knitter. This project was such a helpful exercise in getting me to loosen up! I actually had a false start on it because I knit a good portion of the yoke with slightly different colours. I hated that first colour combo! I considered just continuing, but I didn’t want to go to all of that effort to make something I already wasn’t loving. So I rearranged the colours and how they were assigned in the chart, and swapped out 2-3 of them. That’s when I got the iPad involved – it probably would have prevented this if I’d used that strategy from the get-go! My tension on the first yoke attempt was not very good at all. The knitting was rippled and uneven, and wouldn’t lay flat even after blocking. It was definitely for the best that I ripped it all out and restarted, because my tension is WAY better on the finished project. It felt in a way like making a sewing toile, since it was good practice and improved the quality of my finished project.
I got a bit bored with the body of this cardigan. The good thing is that the pattern is very easily memorized, since it’s symmetrical both vertically and horizontally. The repeats in the yoke were also easy to memorize. The amount of repetition in the body did make me set the cardigan aside for a bit, but the October deadline for the KAL pulled me back to it in order to finish on time. I knew if I didn’t finish it on the KAL timeline, it would likely languish for ages due to my fear of steeking!
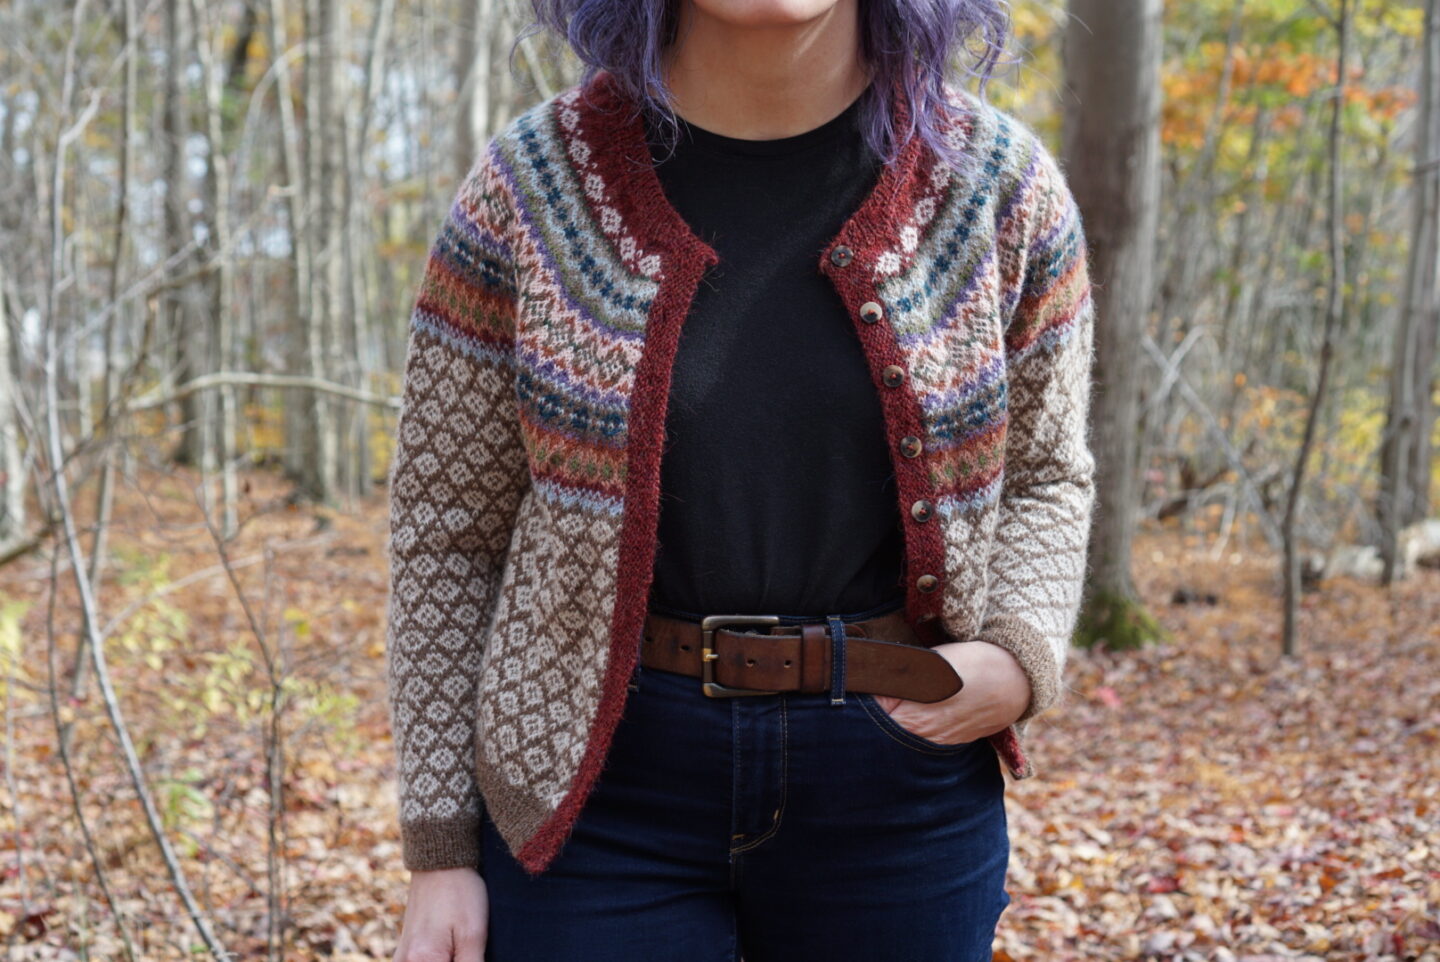
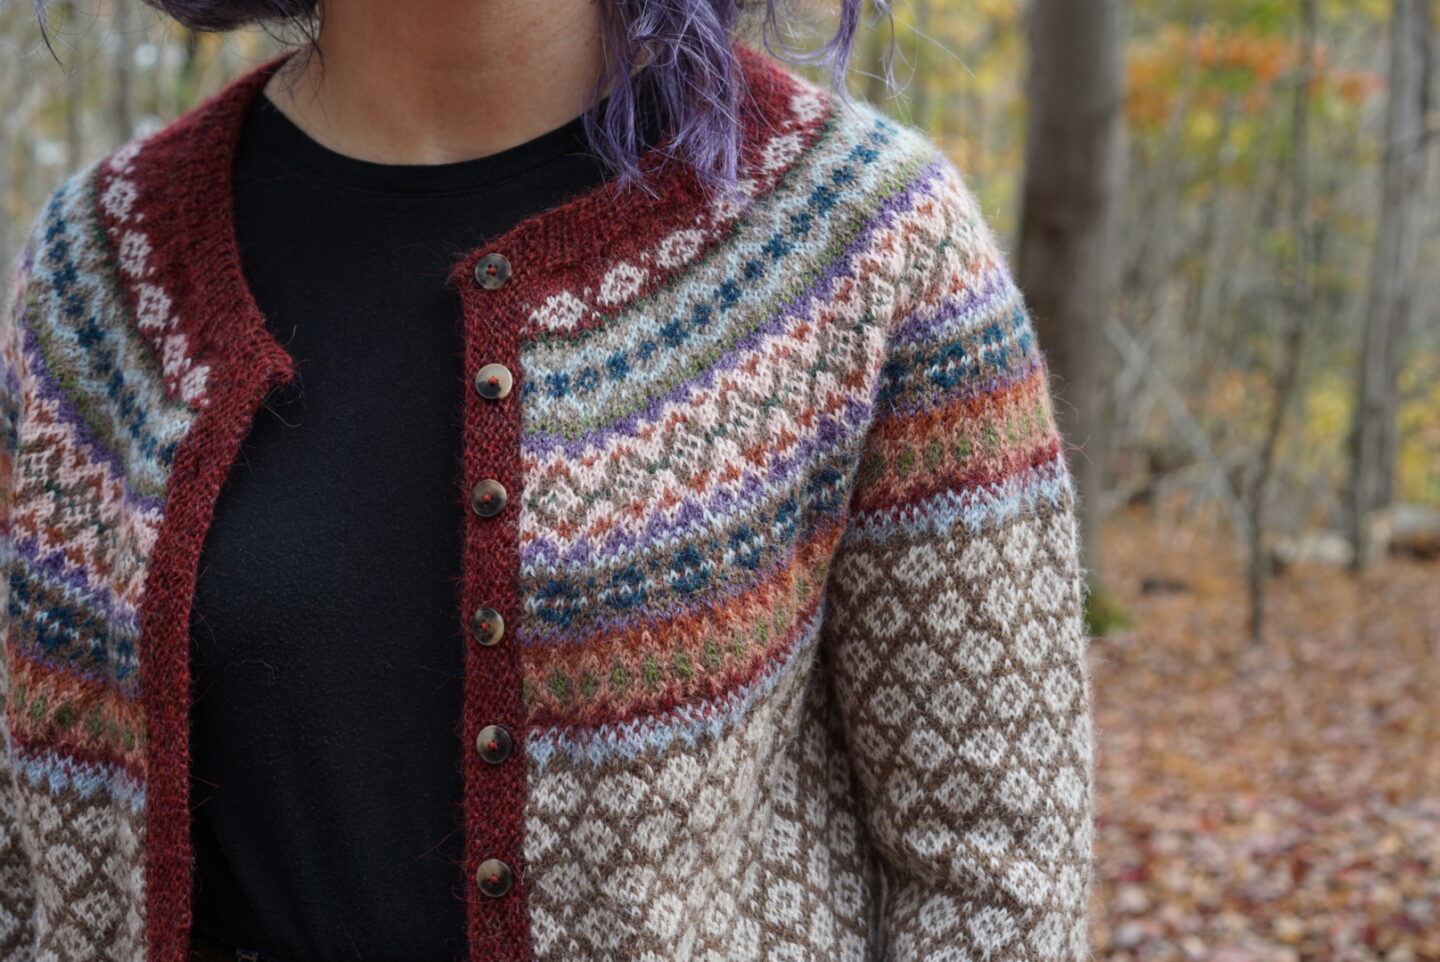
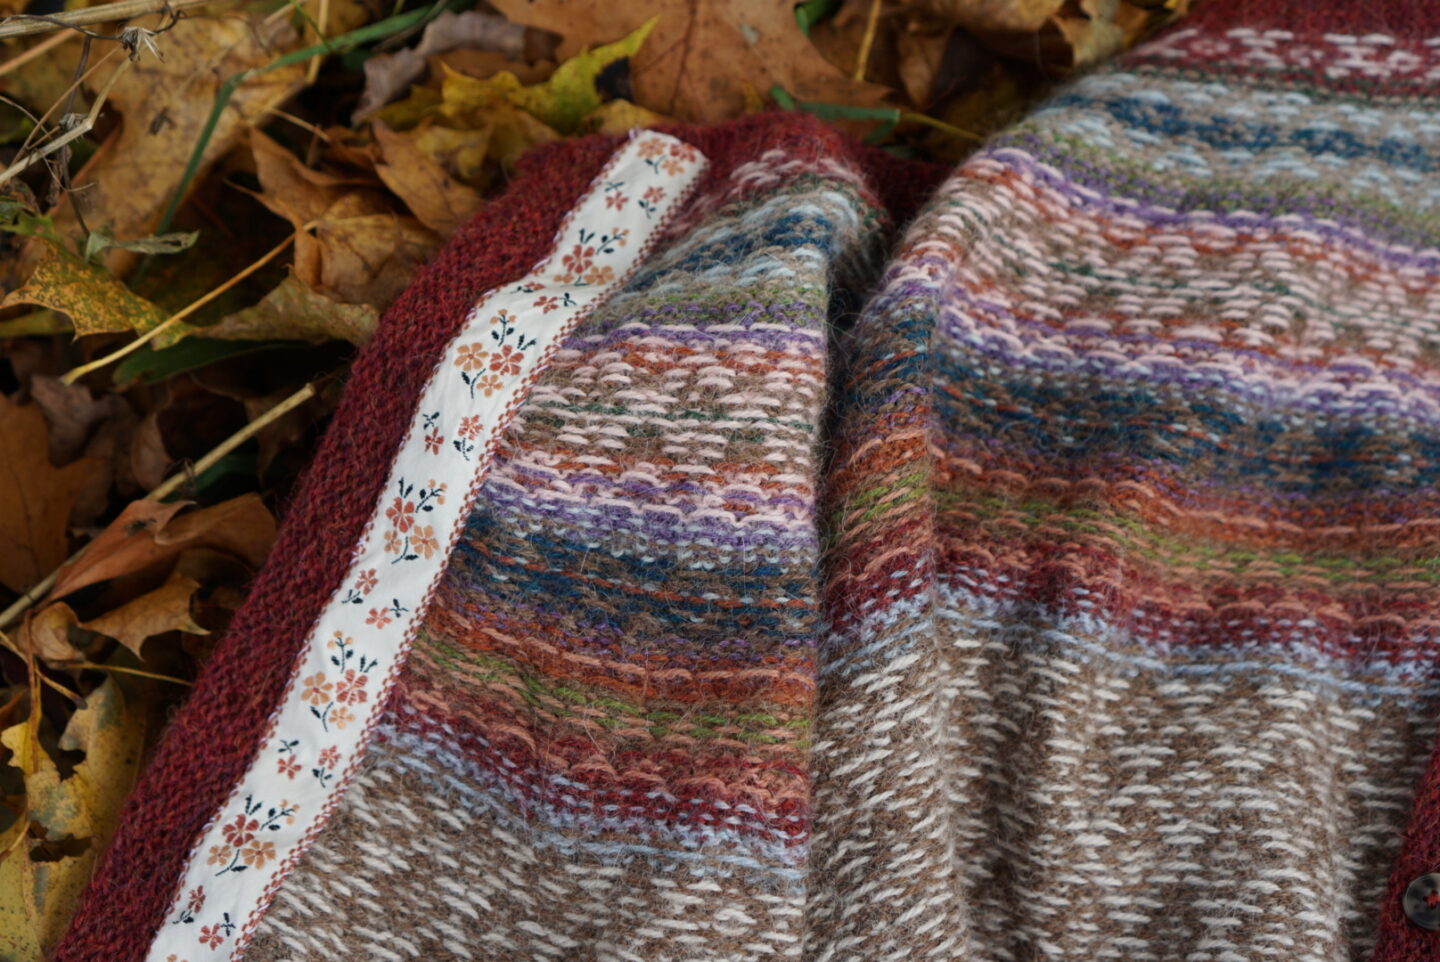
Let’s talk about the steeking. I am obviously not a steeking expert. You are looking at my one and only steek. But here’s what I learned. When you are knitting a project that will be steeked, you have extra steeking stitches that end up getting cut later. While it’s in progress, this looks like a random stripe of knitting running up the center of the cardigan, interrupting the design. From what I’ve read, I think different regions/traditions have different amounts of steek stitches that are typically present. Some traditions only have 2-3, whereas this pattern had me use 7 stitches. I was grateful for the larger amount, as it felt less scary to have a bit more of a buffer zone when cutting. When the whole project is finished, you secure each side of the steek before you cut it. I think in Fair Isle knitting, a lot of traditional knitters wouldn’t do anything extra to secure it because the traditional yarn was so toothy that it interlocked with itself enough already. Some traditions have you do a vertical line of crochet on either side of the steek. Some traditions have you felt the stitches before cutting. This pattern instructed me to use a sewing machine to sew lines of narrow zig zag stitches on either side of the steek stitch (the vertical line that will eventually get cut). I did that because I have a sewing machine, and because after doing the stitching, it felt secure enough for me to feel comfortable with cutting. It’s important to use a short stitch length on the sewing machine so that you don’t miss any of the strands. Then, you use some sharp scissors and cut right up the middle! This was terrifying, but I knit a small swatch first to use as my test steek, so I was less scared by the time it got to the real project. I read that sometimes people pick up and knit their button bands after securing the steek but prior to cutting. That felt annoying to me when I attempted it, so I just cut first and did the button bands after. One magical thing about steeking is that all of the colour changes are done in the middle of the steek, so when you are done the steek, you have NO ENDS to weave in from the yoke. There were a few in the body and elsewhere from the construction and from balls of yarn running out, but there would’ve been SO MANY ends if they weren’t taken care of in the steek. What a gift!
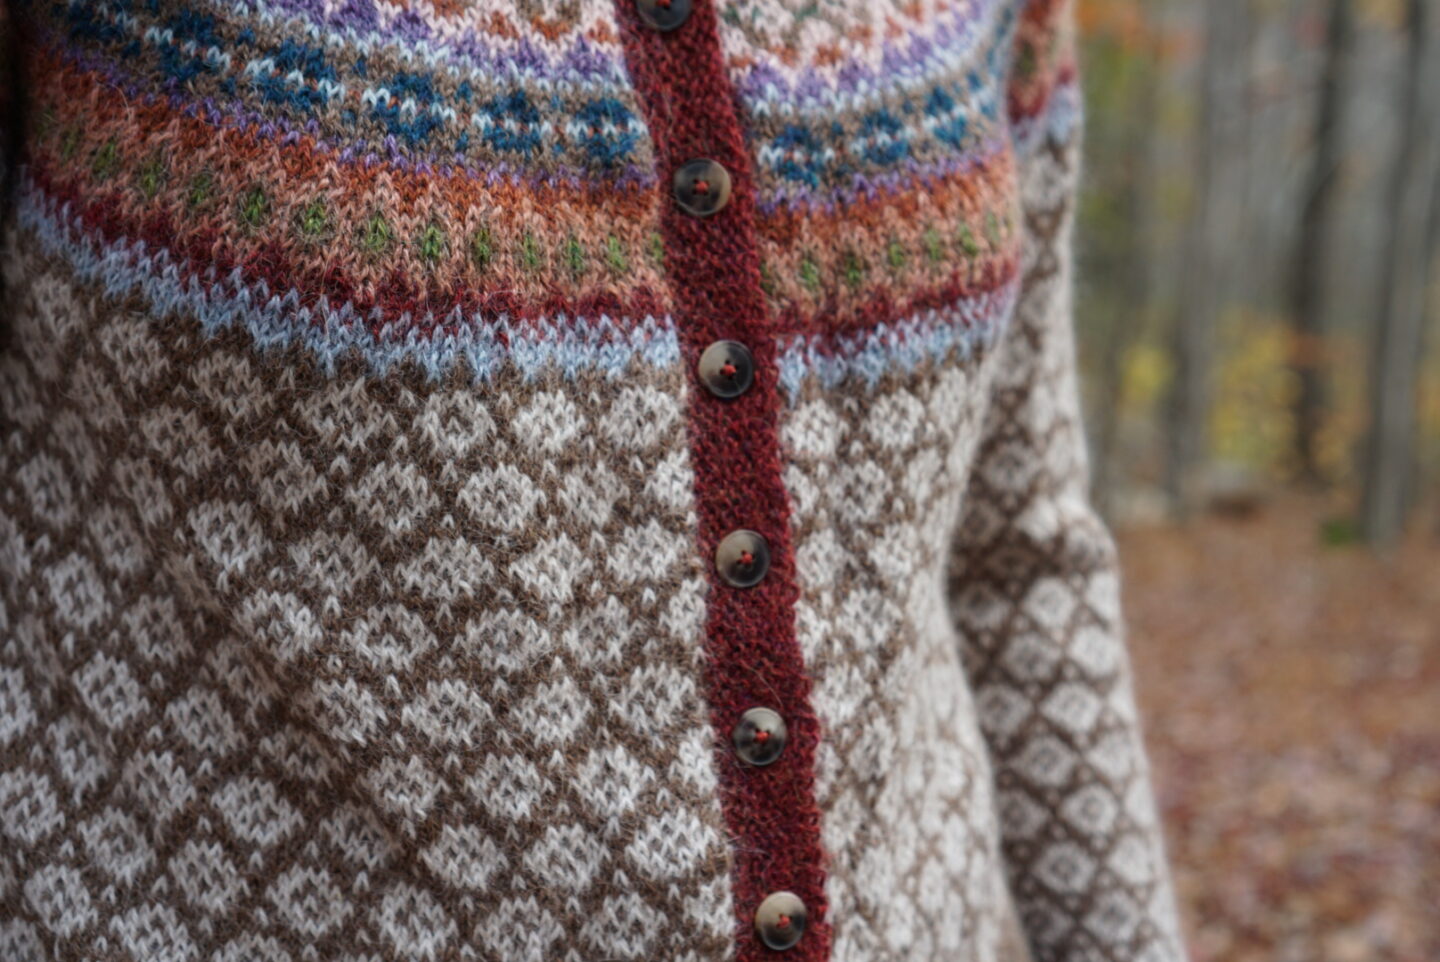
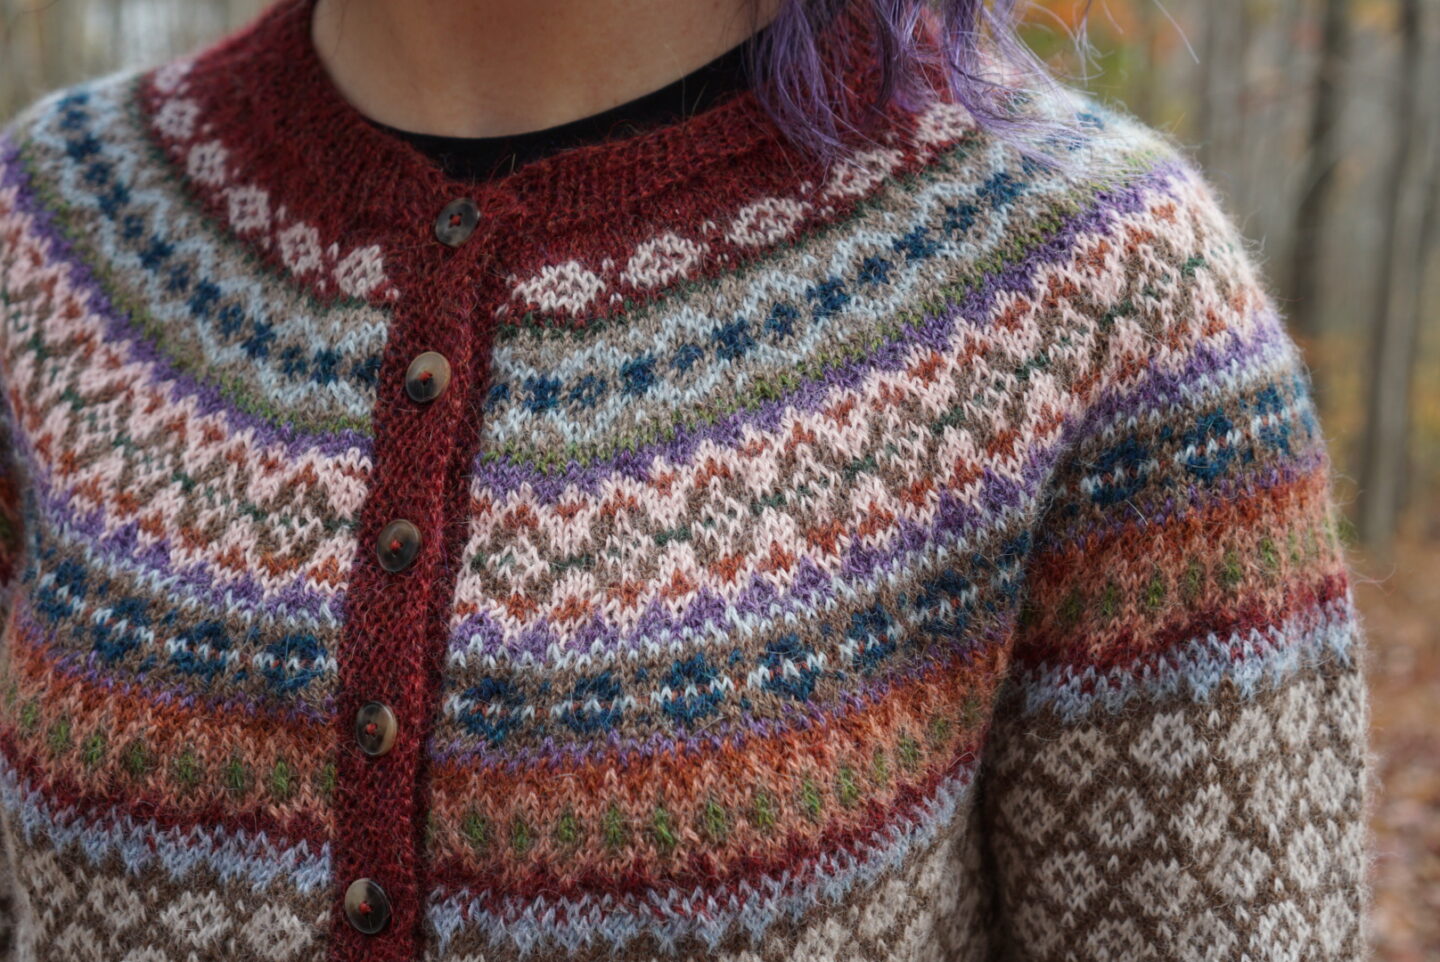
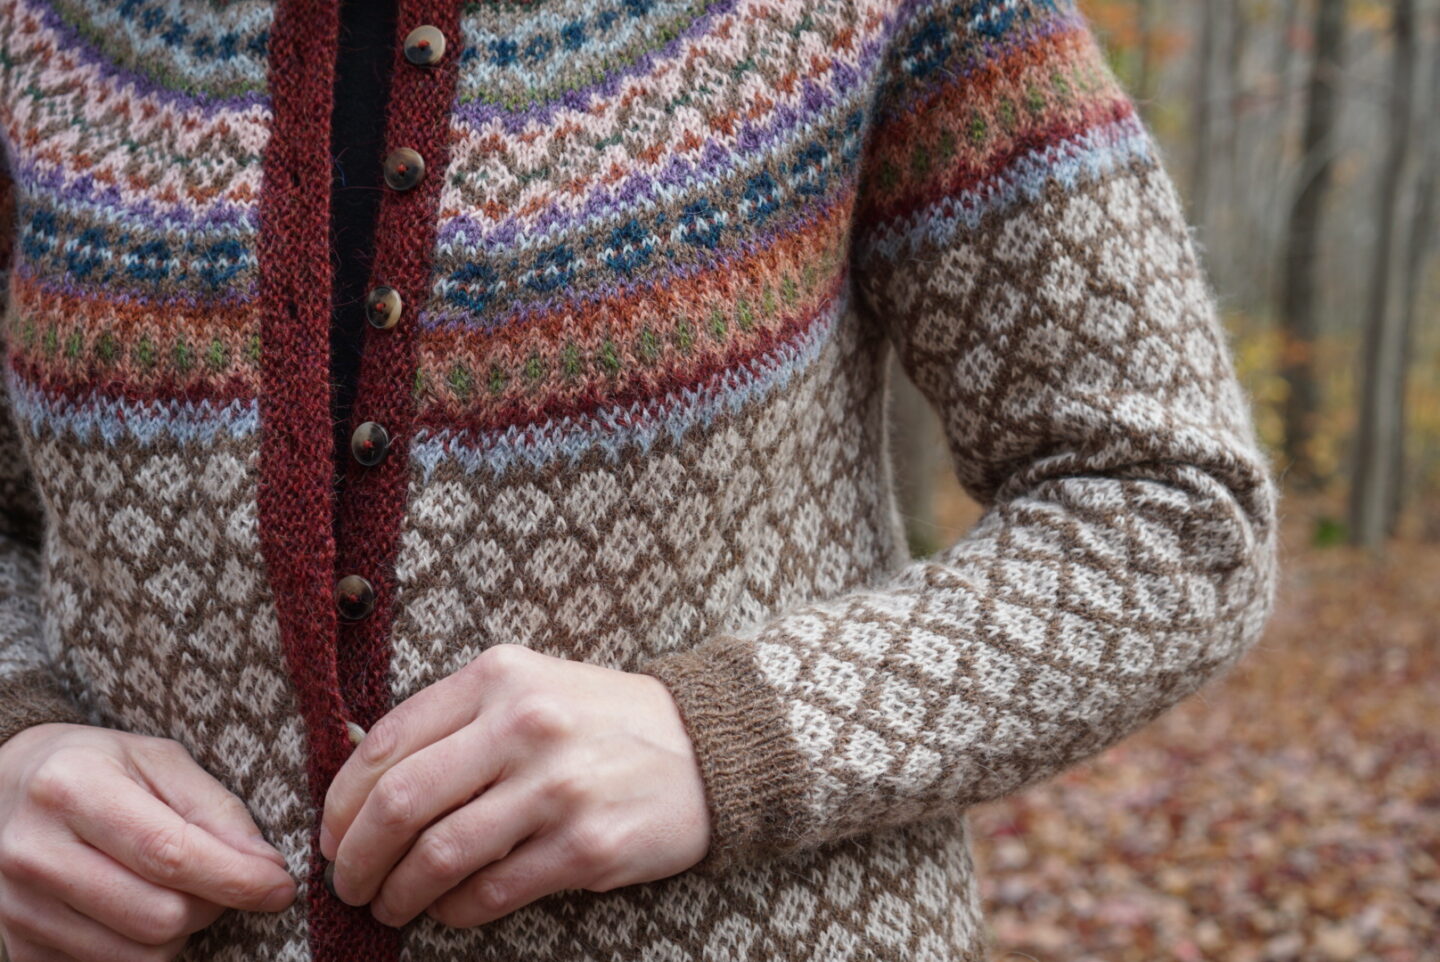
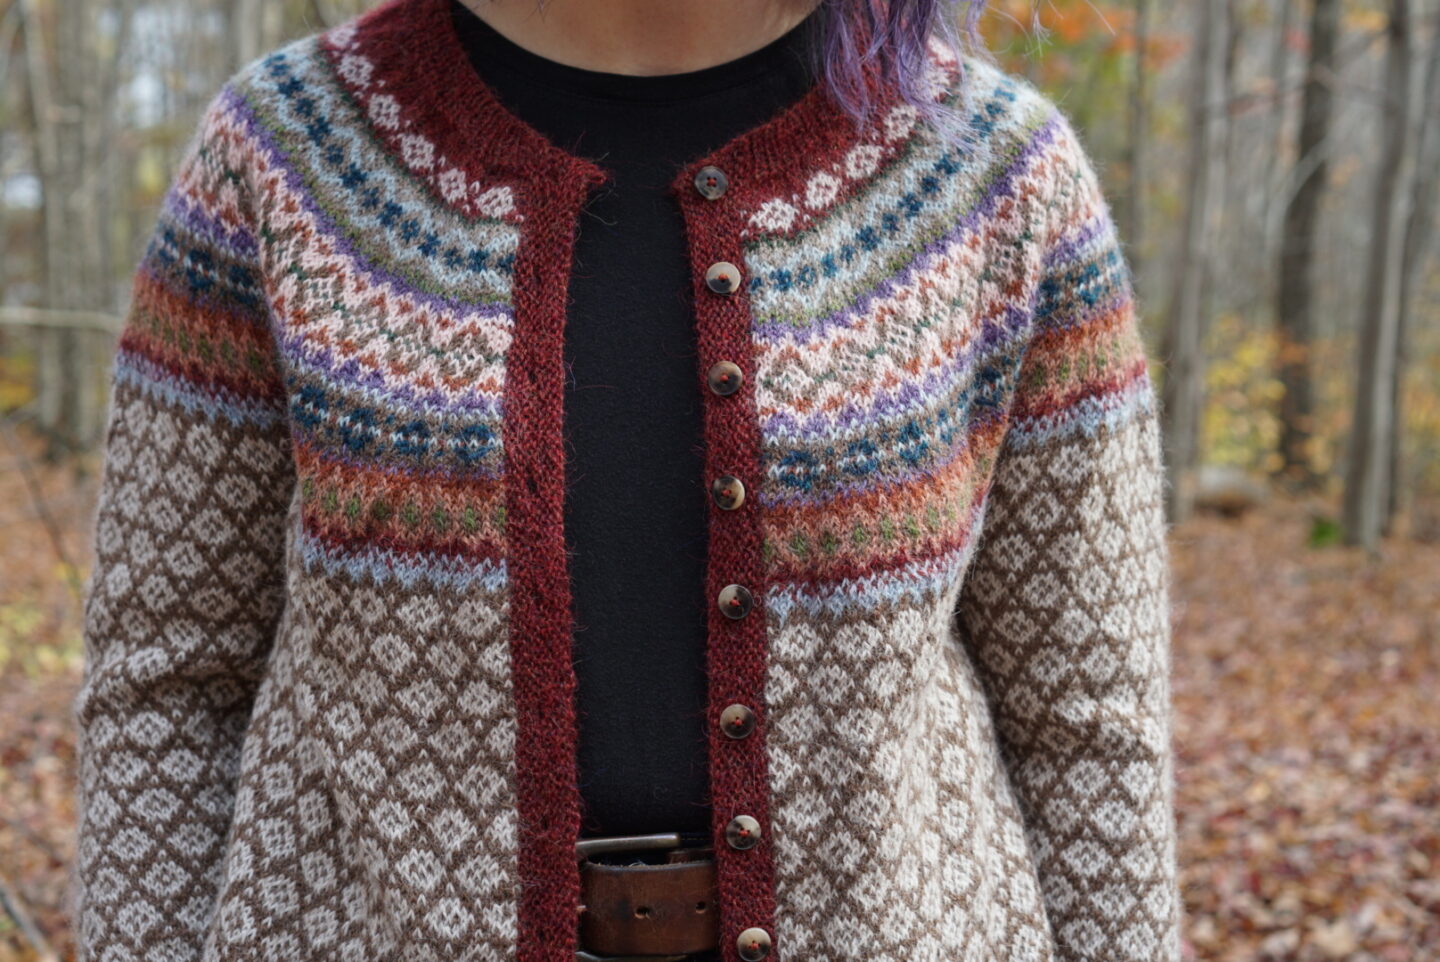
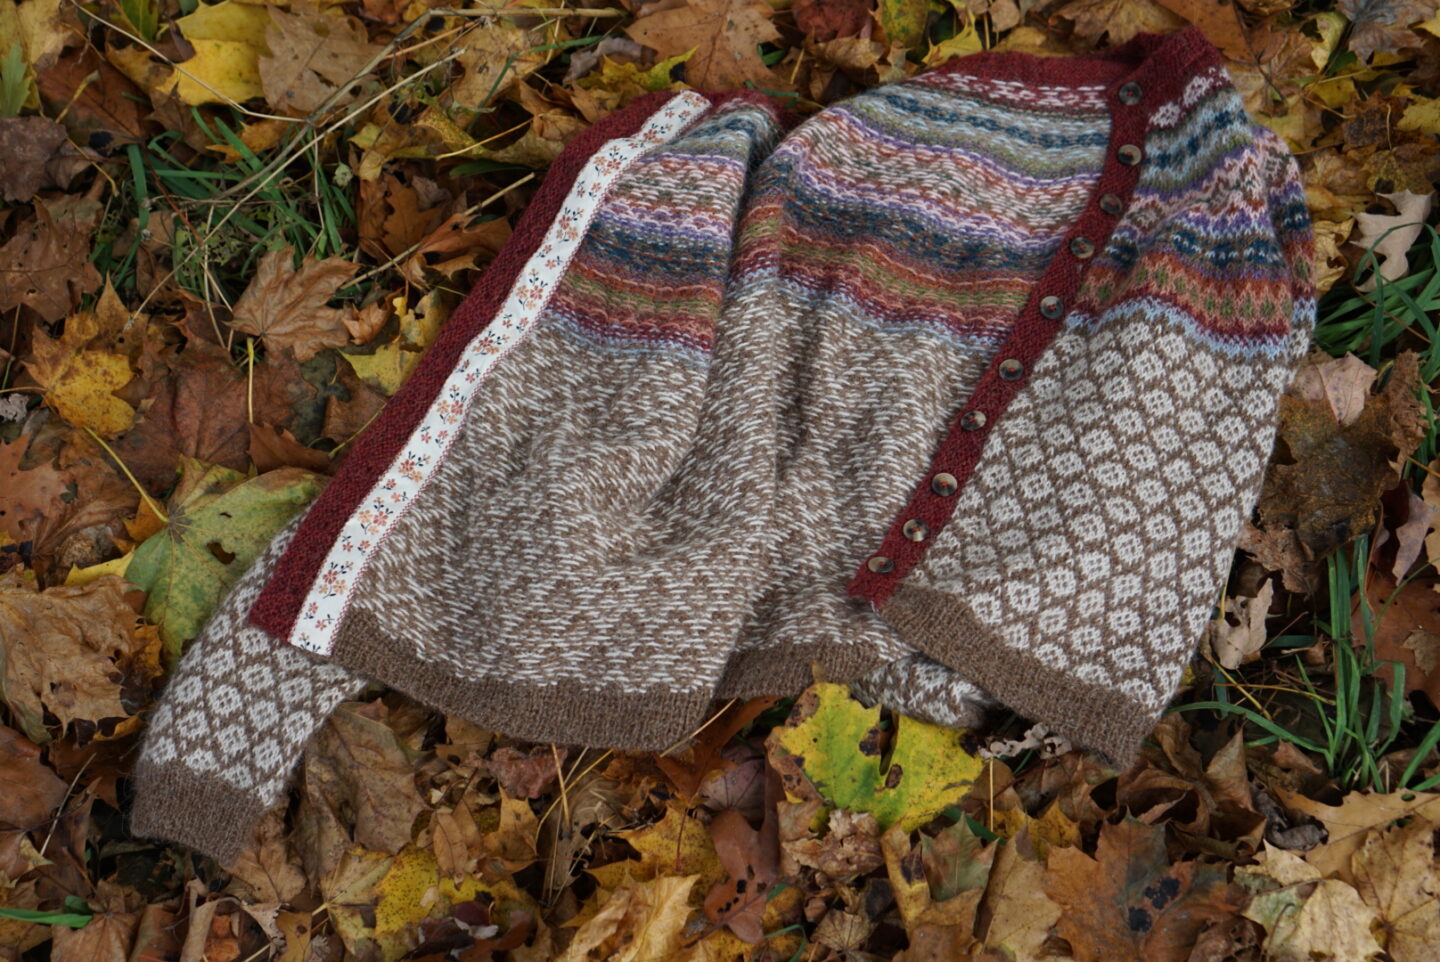
Once I did the steek, I picked up and knit the button bands on either side using garter stitch and one-stitch button holes. This went so quickly! I got slowed down by the bind-off because nothing was stretchy enough and kept making it really puckered. I think I tried four different times. I don’t even remember what method I ultimately used that worked, but I’m happy with it in the end. I sewed the buttons on with sewing thread, because I didn’t have any needles that were simultaneously big enough to fit the yarn through the eye but small enough to fit through the holes in the buttons. I got these horn buttons from Fia Fia. They really fit my vision! In my best friend’s house growing up, there was a cardigan very similar to this one that hung on the back of an office chair in their basement. I never saw anyone wear it, but I was really inspired by it when making this one in terms of colours and the buttons. As you can see below, the raw edge of the steek gets enclosed with a cute ribbon! I got this ribbon on Etsy, and found it by searching for “steeking ribbon”. It’s a woven ribbon with a floral motif, and I hand-sewed it in place on each side of the opening. Having that there and not being able to see the raw edges of where I cut the knitting has really helped me feel more confident that my cardigan isn’t going to suddenly unravel without warning, even though the ribbon isn’t actually doing anything structural to prevent that.
This was such a huge project, and I’m so happy with how it turned out! I learned so much, especially that steeking is not nearly as bad as I thought it would be. I want to make another Fair Isle sweater in the future! At the moment I have a bunch of WIPs that I need to finish since they are weighing on me, but maybe once they are all done, I can start brainstorming another colourwork project as a treat!

Wow it looks great! Steeking is very intimidating, definitely a level up. I like how the colourwork pattern is Echinacea in the floats on the inside.
My autocorrect is out to get me. By “Echinacea” I clearly mean “echoed” 🙄
Of course that was super obvious, haha. Steeking was not nearly as scary as I thought, especially after I got to test it on my swatch to convince myself that it wasn’t going to be the end of the world. I have to say as well – I learned recently that apparently alpaca is a bit slippery/not toothy and I’ll have an easier time in future if I use a toothy yarn that’s more traditional for stranded colourwork and steeking!
Love the button band and ribbon detail on the inside! 💕 Wonderful job!
Thanks, Serena! 🙂
Oo I like this a lot! The colours are absolutely perfect. Very glad your steek went well, it’s always nerve wracking and last time I tried a crochet finish it started to unravel… argh!
Thank you! 🙂 That was my biggest fear! I was so scared that I was going to just immediately destroy the thing I’d spent so much time on. I hope your future steeks go better than your last!