
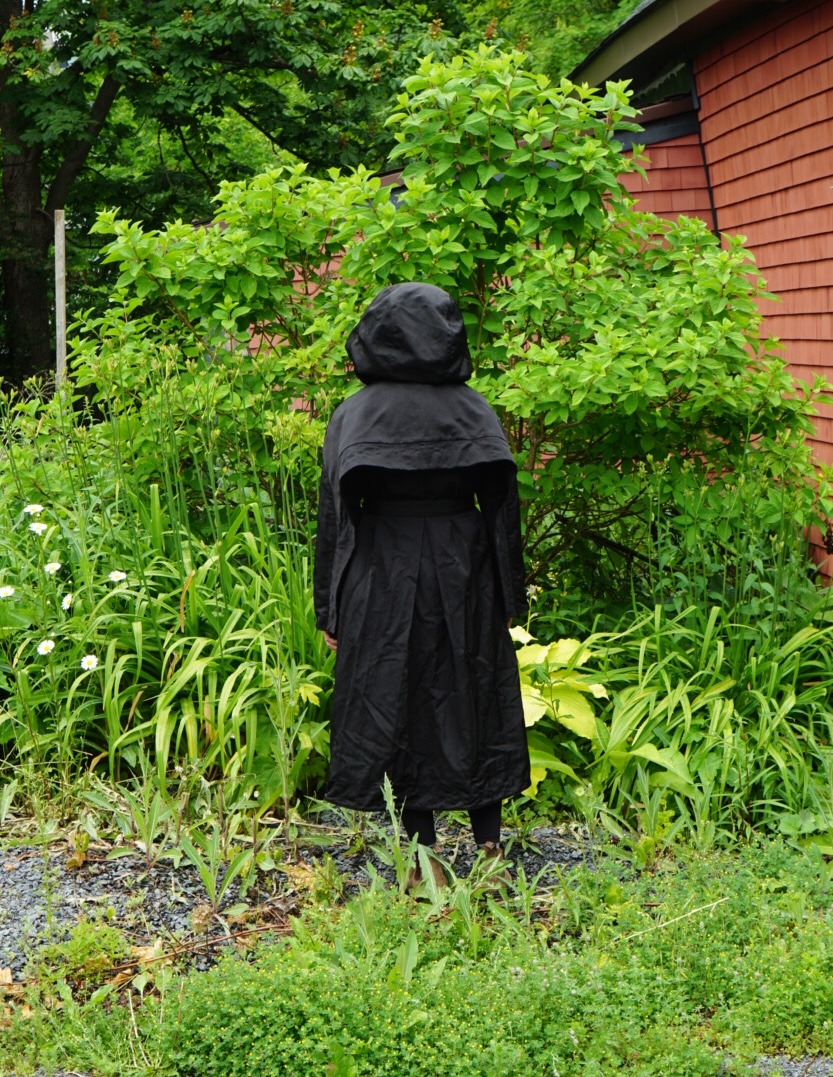
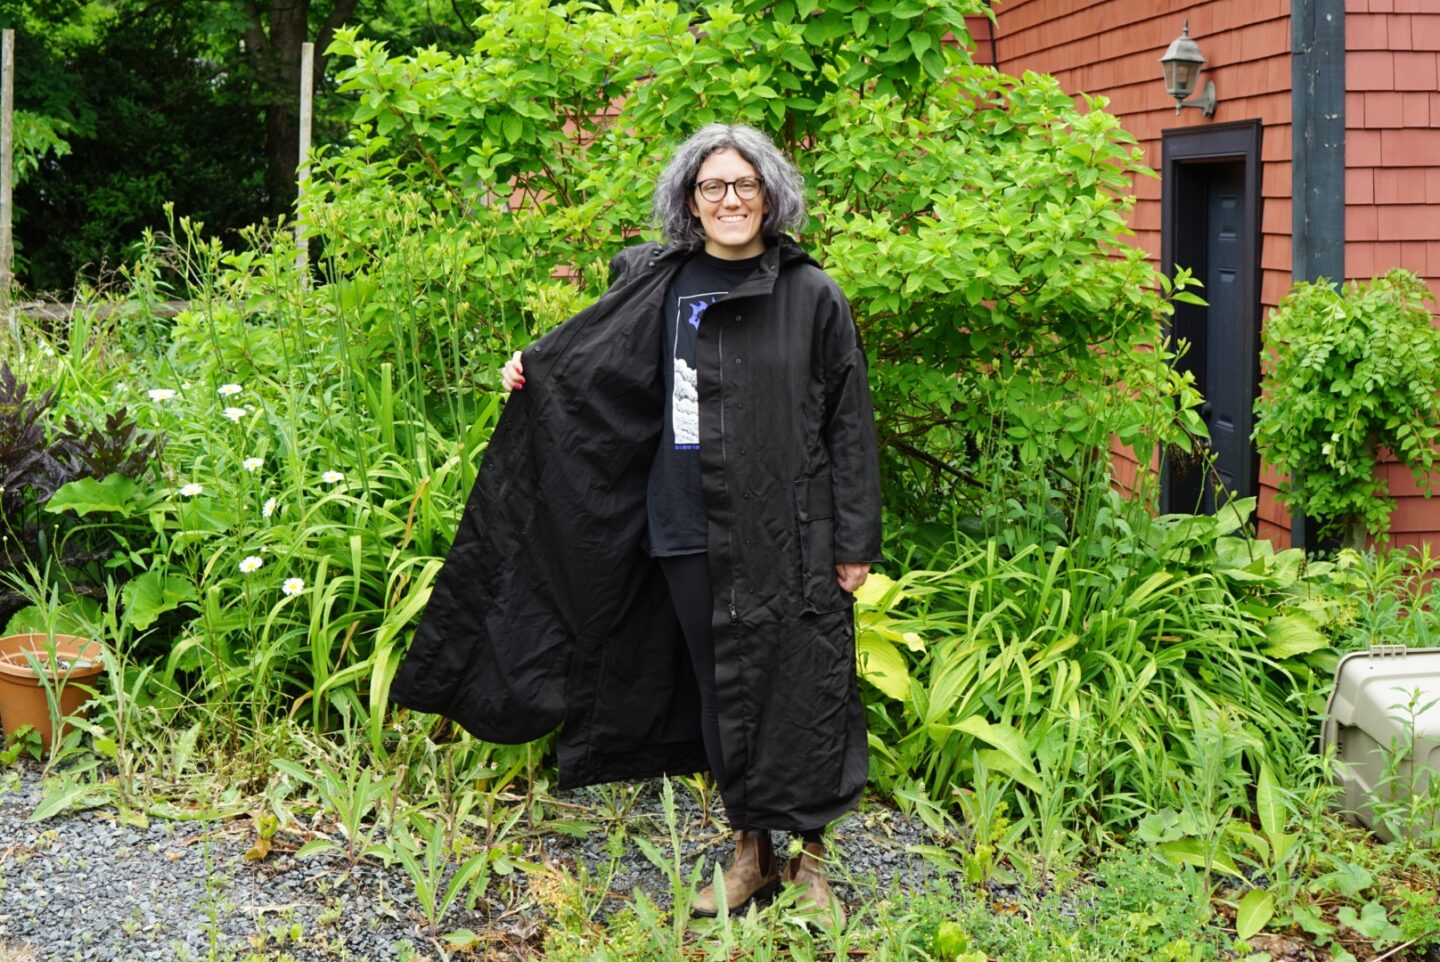
Welcome to the tale of a project that was honestly kind of the worst to make. For many reasons: the fabric, the pattern, my own folly, the existence of gravity, my incompetence. And probably other things. But I ended up with a garment that I’m very happy with! So I’m hoping that the memory of the sewing experience fades with time so that my associations with this garment are only positive. This is the Grasser Raincoat 908! Come on this journey with me!
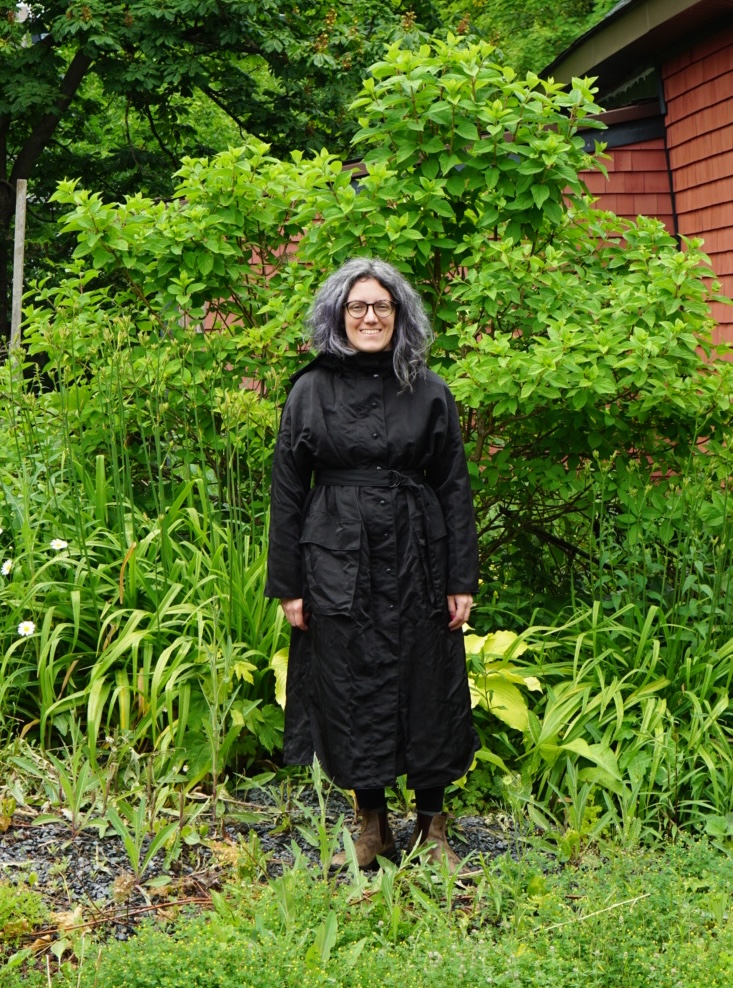

Let us start at the beginning of this story. Either for Christmas or for my birthday in April (I can’t remember), I received a gift certificate to Blackbird Fabrics from my mum. An excellent gift! I was occasionally perusing the Blackbird website because there was nothing I specifically needed but was open to inspiration if I saw something I loved. I eventually stumbled across their water resistant nylon twill. It’s not on their website anymore, but it’s 100% nylon and 56″ wide. It made me think of a desire I’d had in the back of my head to make a raincoat that was for ~fashun~ and not just for function. I have an extremely waterproof outdoorsy raincoat, but I’d always loved images of a dramatic calf length raincoat that could give a fancier touch to an outfit when the weather was wet. I found the Grasser patterns when searching for raincoats, and chose the Grasser raincoat 908. I’d never sewn anything by Grasser before, but I loved the aesthetic of a lot of their patterns. They sell patterns (or at least this one) in single sizes and heights, and I chose the size 48 in height range 158-164cm. I’m 5’4″ and my measurements are 38,5″/30.5″/39″, for reference. To align with my vision, I went with the black nylon twill. I ordered 5m of it, along with 2.5m of Blackbird’s washed cotton poplin, also in black.
The fabric arrived, and I loved the look of it. The nylon had this lovely sheen and weight, and I loved that it was twill. It really felt elevated. I was feeling fancy, feeling excited to tackle a complicated sewing project. I printed out the PDF pattern and started assembling it. It took so long because there are so many pieces. The pattern pieces are not labeled with the pattern piece numbers, just the name of the piece. The lining and the main fabric pieces were split into two PDFs, which was fine. It was just a lot to keep track of. Then, in the pattern instructions, when referring to different pieces, there was a mixture of using the name of the pattern piece and using the pattern piece number. I ended up having to label all of the pattern pieces with their numbers in order to keep things clear, because things were getting very confusing in the interfacing stage without them. After that, I got to the fabric cutting stage. Let’s pause for a brief photo break to remind ourselves (me included) of the fact that garment turned out great! Yay!
The fabric cutting took me basically two full days. I thought it would never end. The issue with the black fabric was mainly that it was very very difficult to tell which side was the right side, but there was DEFINITELY a right side and wrong side because it’s a twill. The cotton poplin was totally fine, but the nylon was a nightmare. It is very slippery, and there were so many pattern pieces, and because it was slippery, I was cutting everything on a single layer so then I had to keep track of which pieces I had cut to make sure I got mirrored pairs. Which was also exacerbated by how difficult it was to tell the right and wrong sides apart. I didn’t want to pin labels to all of my pieces because I didn’t want to poke unnecessary holes in the nylon, but also I didn’t want to have to try to figure out which pieces were which again. I used green painters’ tape and Sharpie to label everything, but the nylon was so slippery that these labels also frequently came unstuck. So that was fun. Pattern markings also basically did not stay on the nylon, so I kept having to redraw them when I got to the stage of actually sewing each piece in question. Also, a fun fact for you that I didn’t know prior to this project – fusible interfacing doesn’t stick to nylon! What joy! Also (yes, this is a whine-fest), the nylon doesn’t press well at all, so that lead to a lot of extra topstitching that was not called for in the pattern, in order to reduce the amount of poofy seams that would’ve resulted if I didn’t do it.
In terms of the sewing process, what made this project especially annoying to sew was that at all times the nylon was trying to slither away to the ground. Gravity was not my friend during the making of this raincoat. Because of the weight of the coat, literally every time I sewed a seam, I had to keep repeatedly yanking the garment back onto my lap. When I was pressing seams or pinning things, it kept falling on the ground. I cannot overstate how much time I spent preventing the fabric from sliding onto the floor. It became a comedy act, with me muttering, “Come back!”, “Stop that!”, “Stay HERE!”, “Stop SLITHERING!”, “Oh yes, I did want you to be on the ground, how did you know?” and “Nooooooooooo!” while sighing heavily, and my partner saying, “Isn’t sewing FUN!”, “I can sense that you are having a great time with your hobby.” Honestly, I consider it a huge victory that this project got finished and didn’t end up stuffed somewhere out of sight or dumped in the garbage.
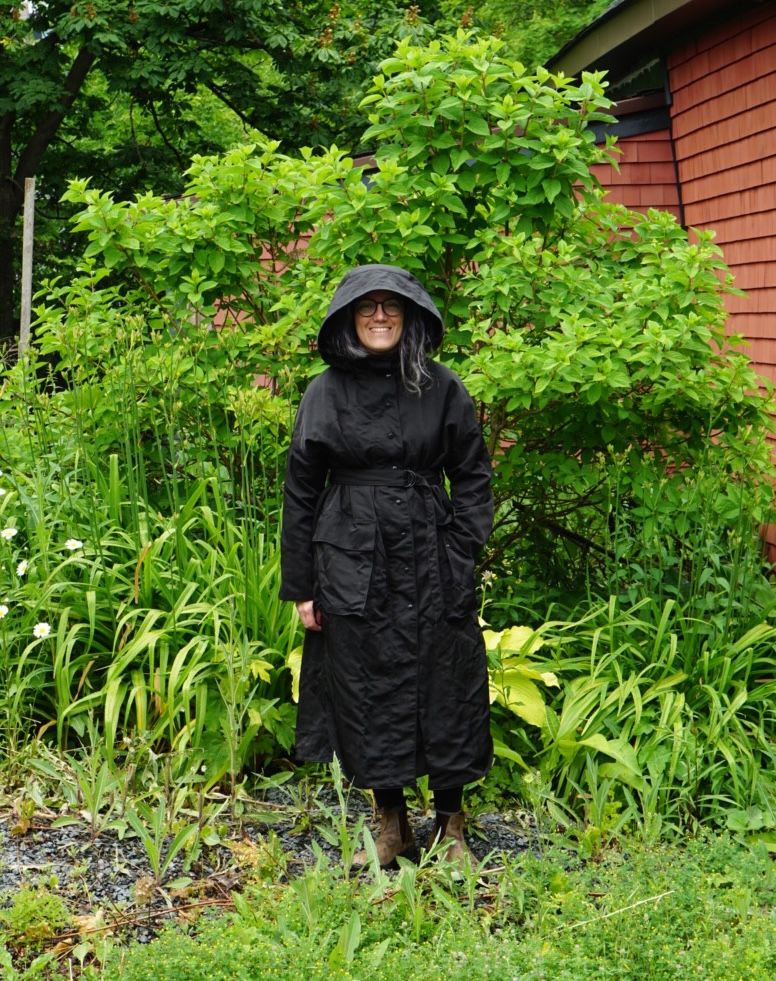
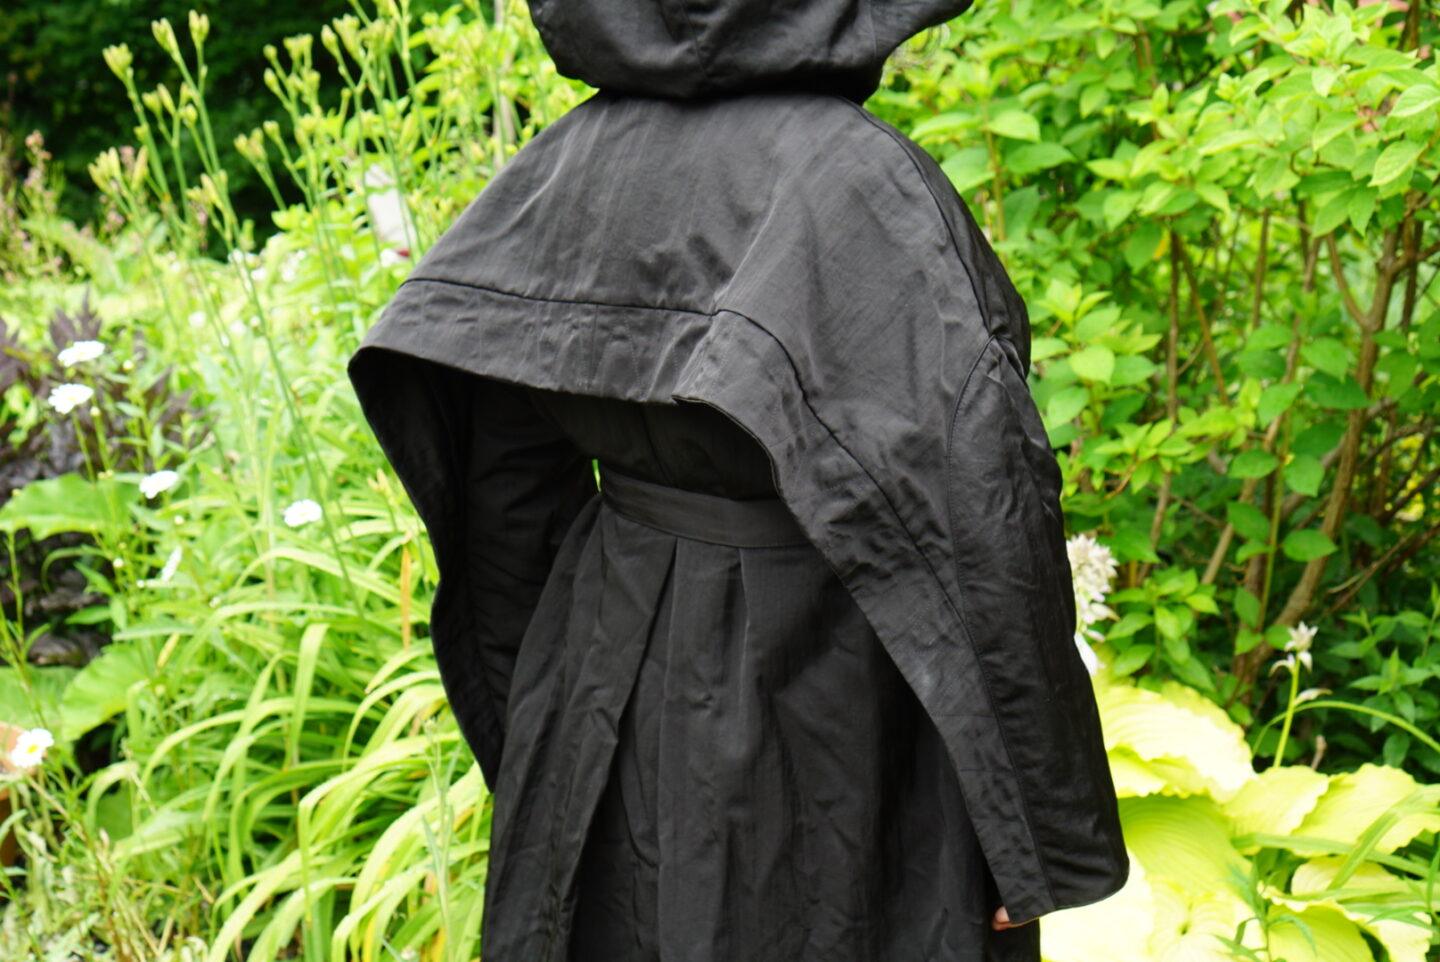
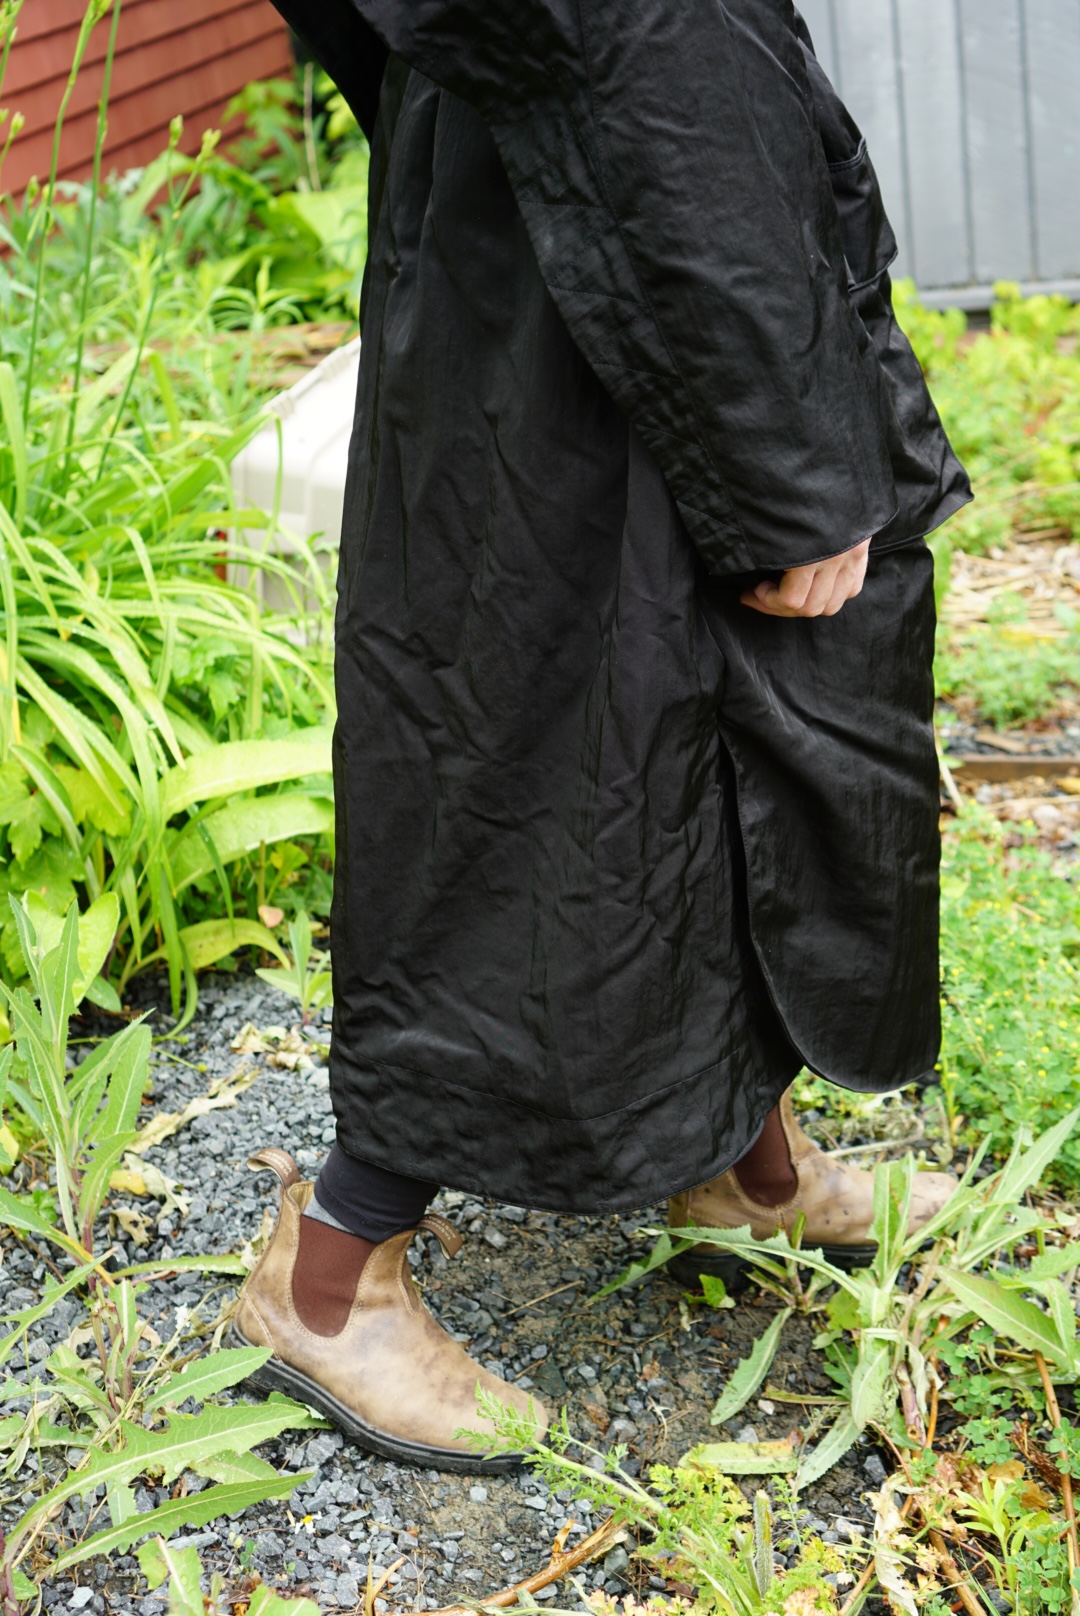
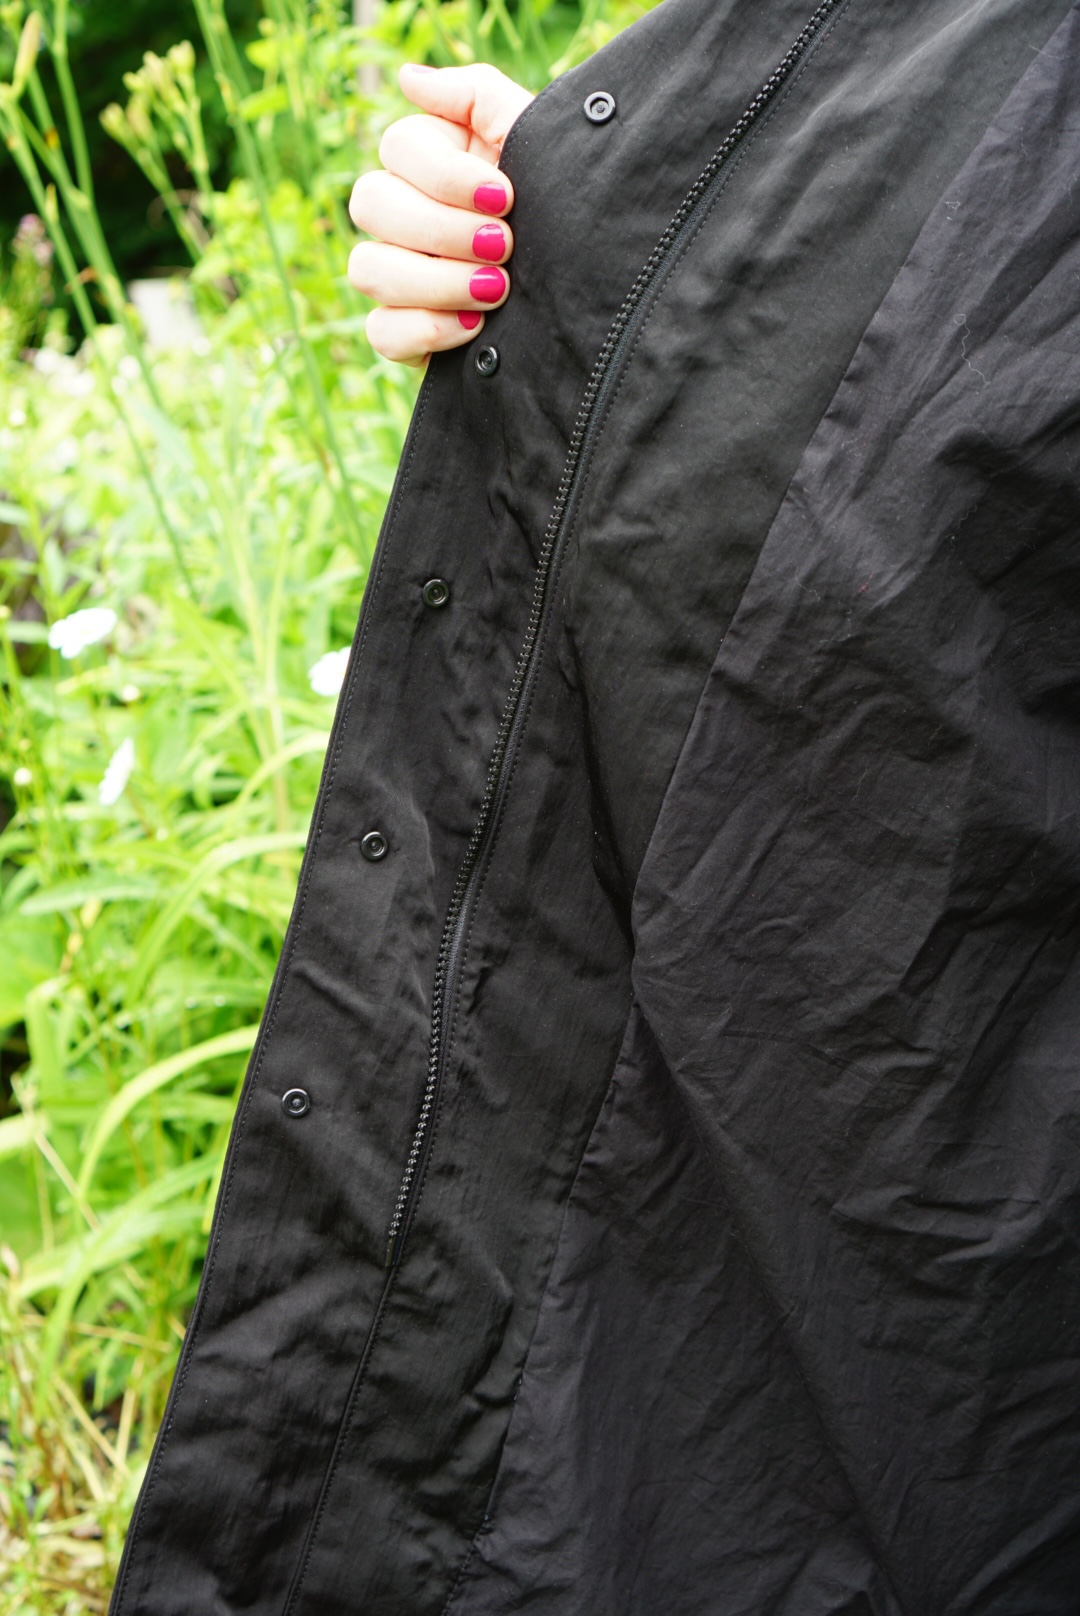
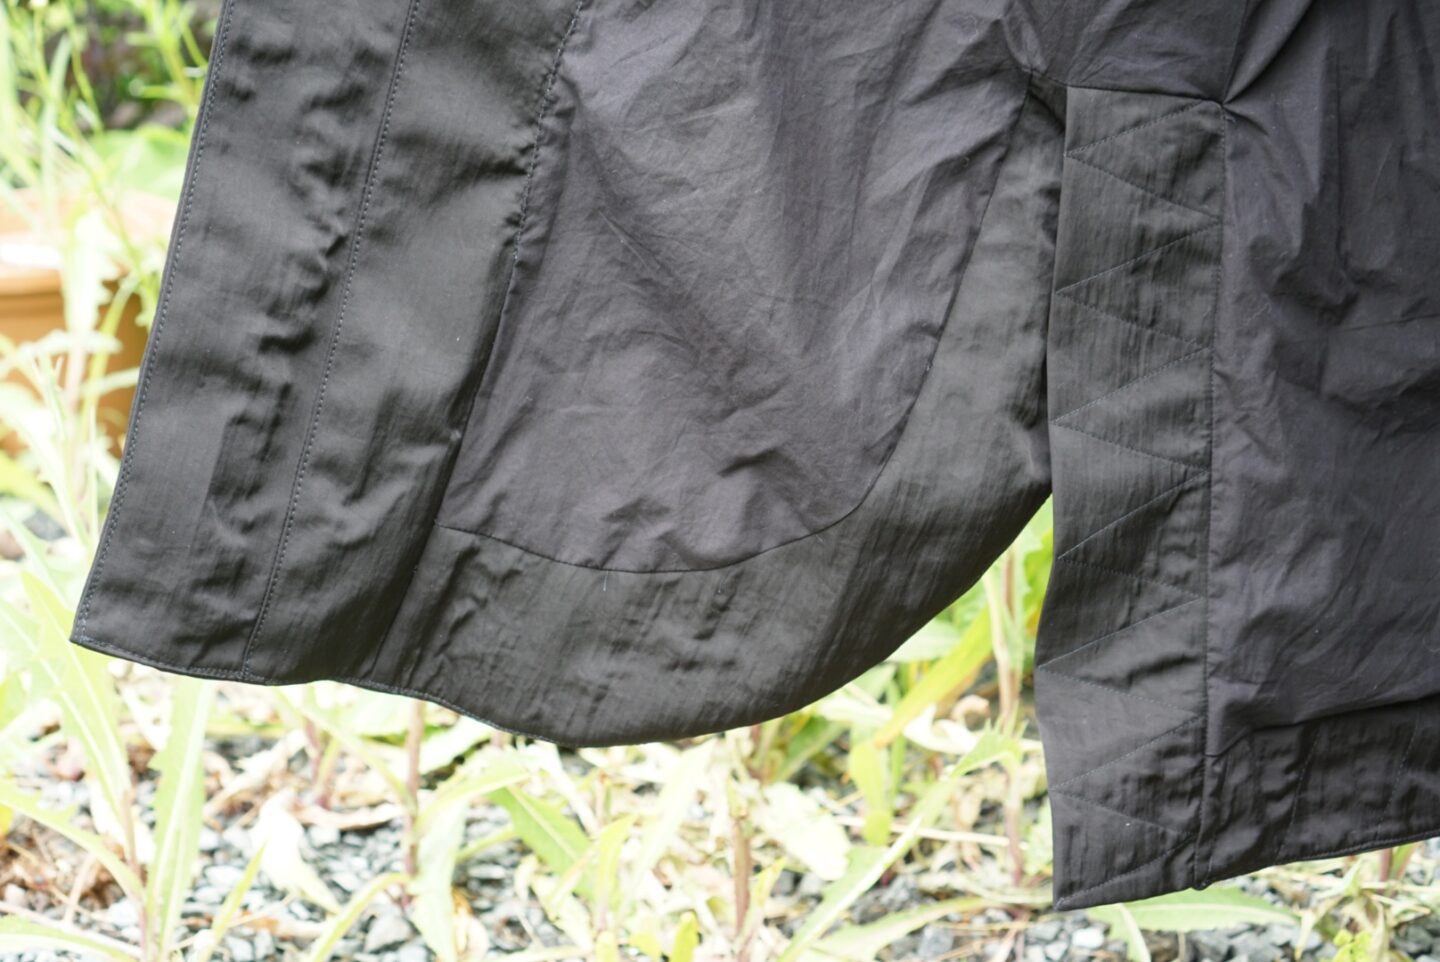
Luckily, what helped me persevere was that one of the first things that you sew is the storm flap and sleeve detail. This was one of the features that made me fall in love with the pattern in the first place, and the construction is very clever. The storm flap edge continues down the sleeves all the way to the bottom edge, and this is integrated through a curved sleeve piece on top and part of the flap itself continuing into the sleeve. I really love it, and hope you can see how that came together in a few of the photos below! Seeing this come together made me see the final vision, and helped me push through because I was motivated to have the finished garment in hand.
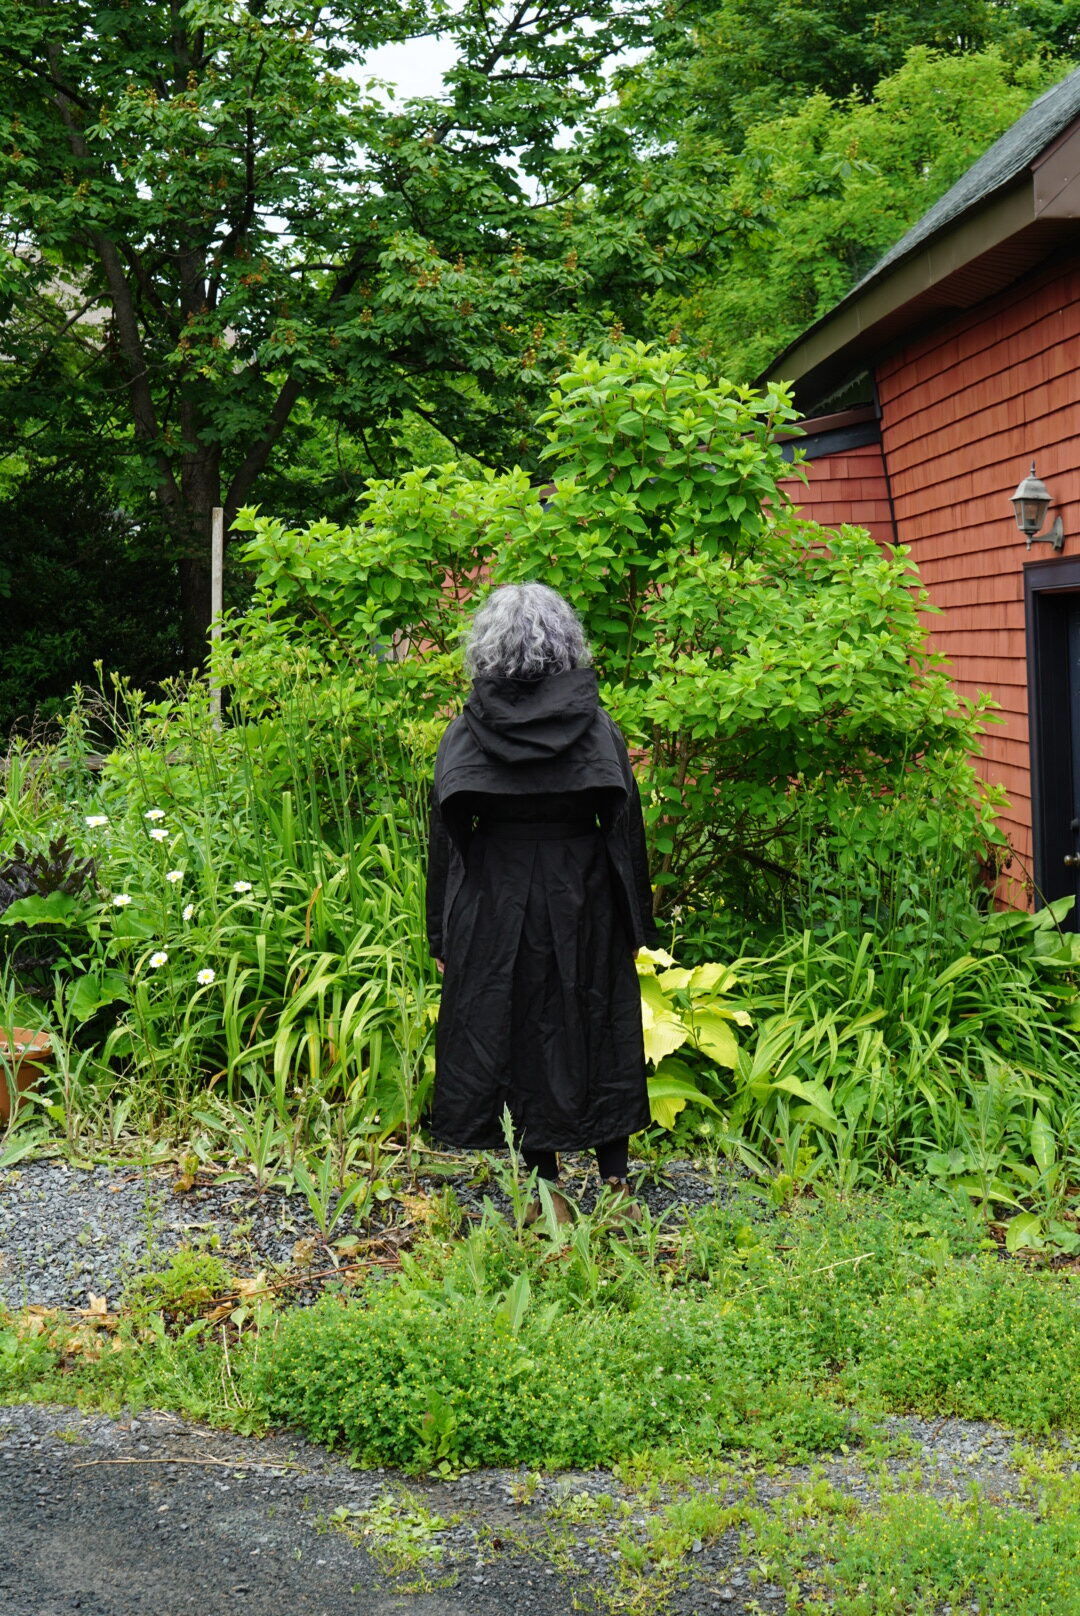

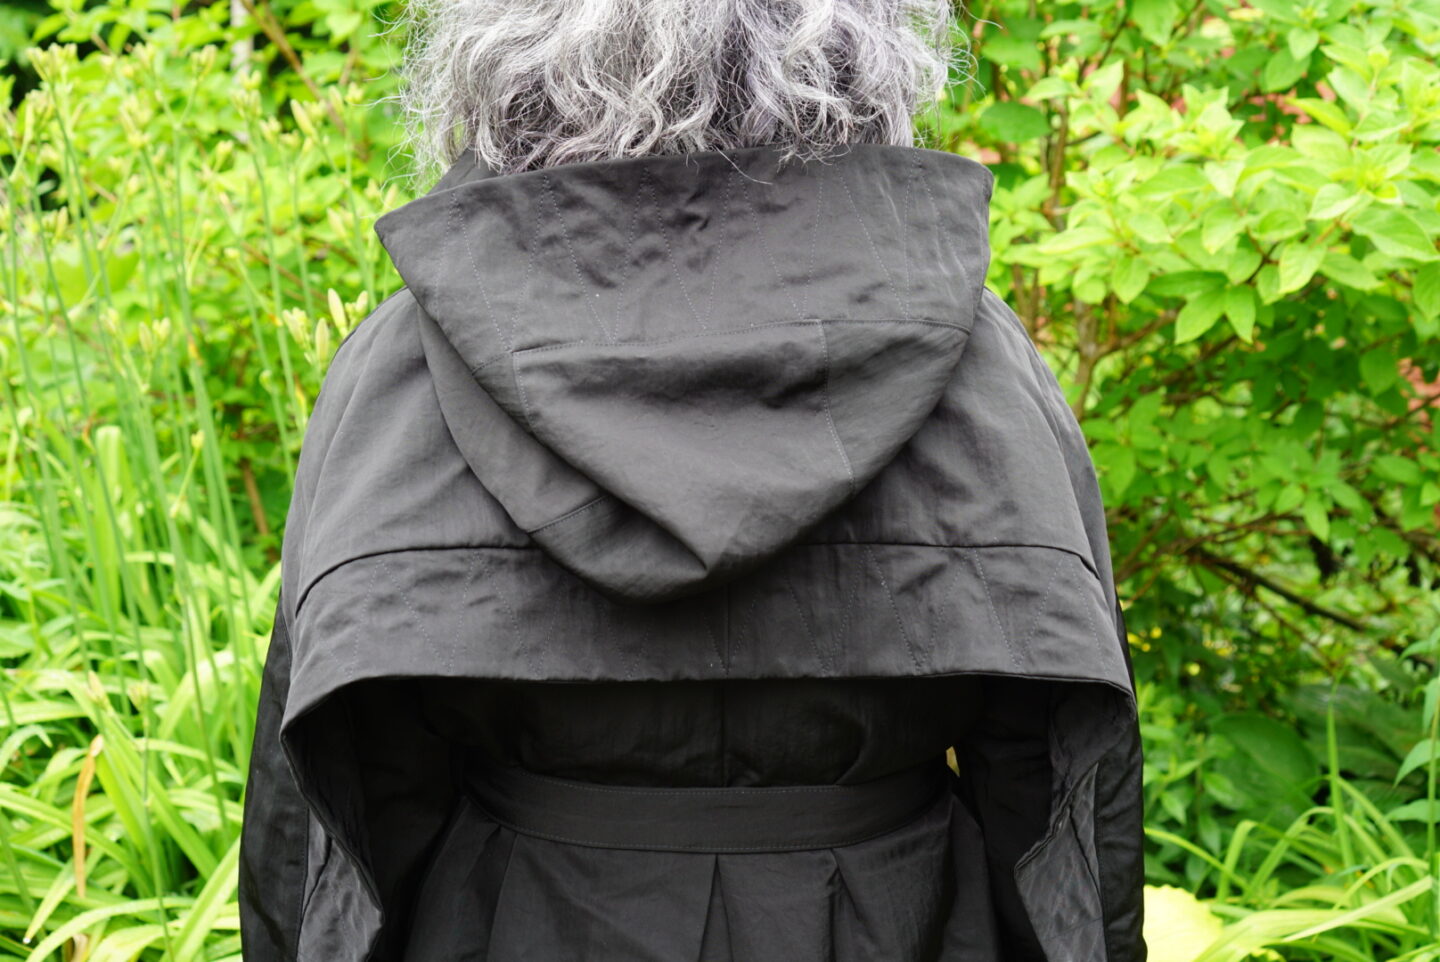
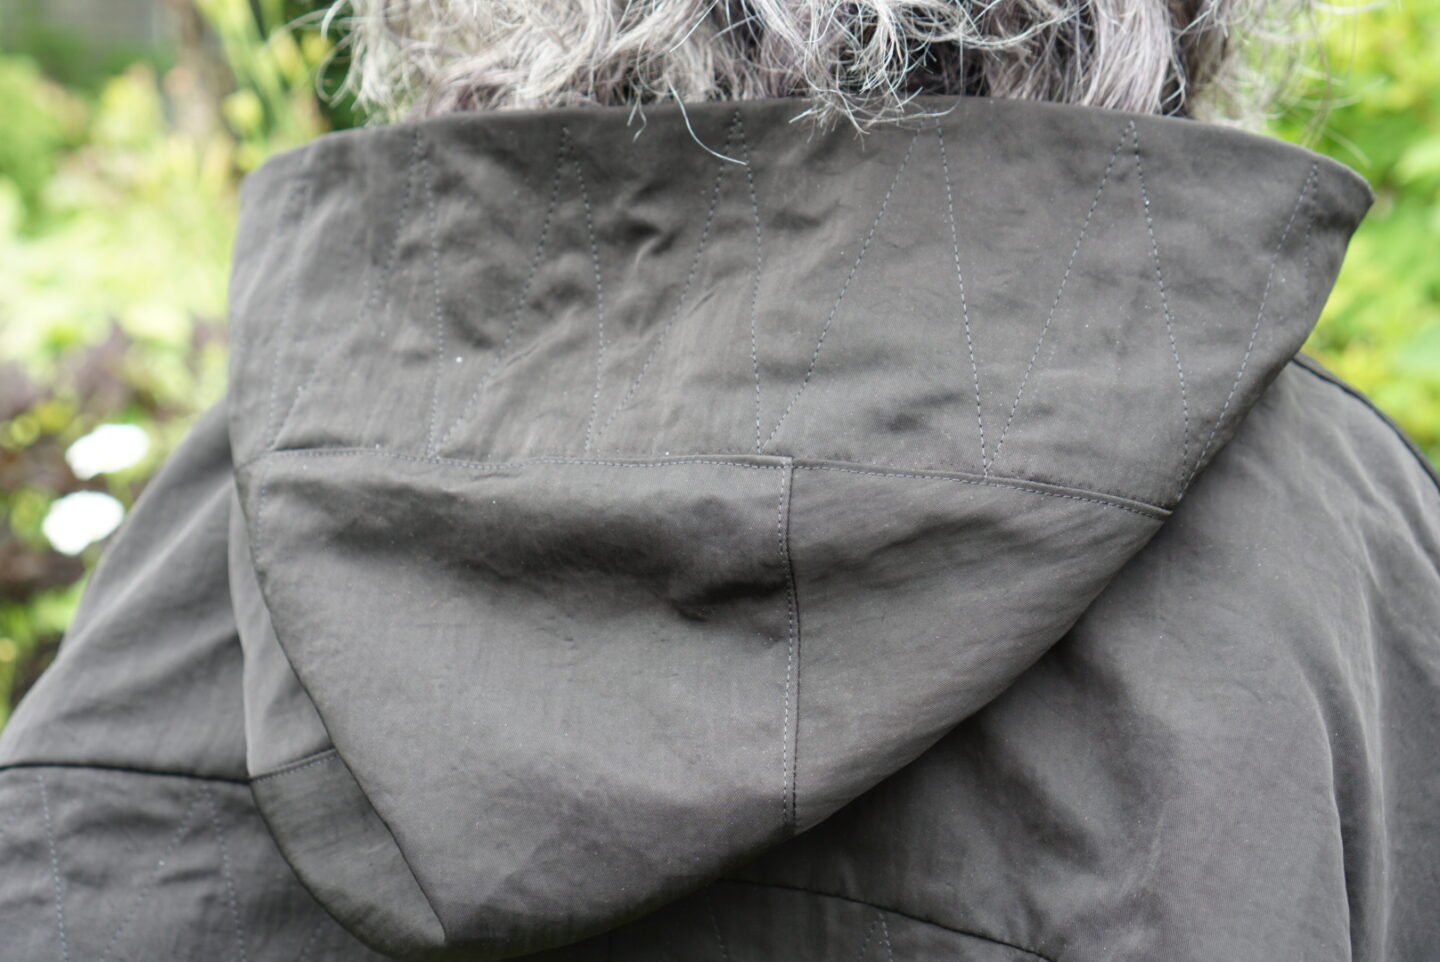
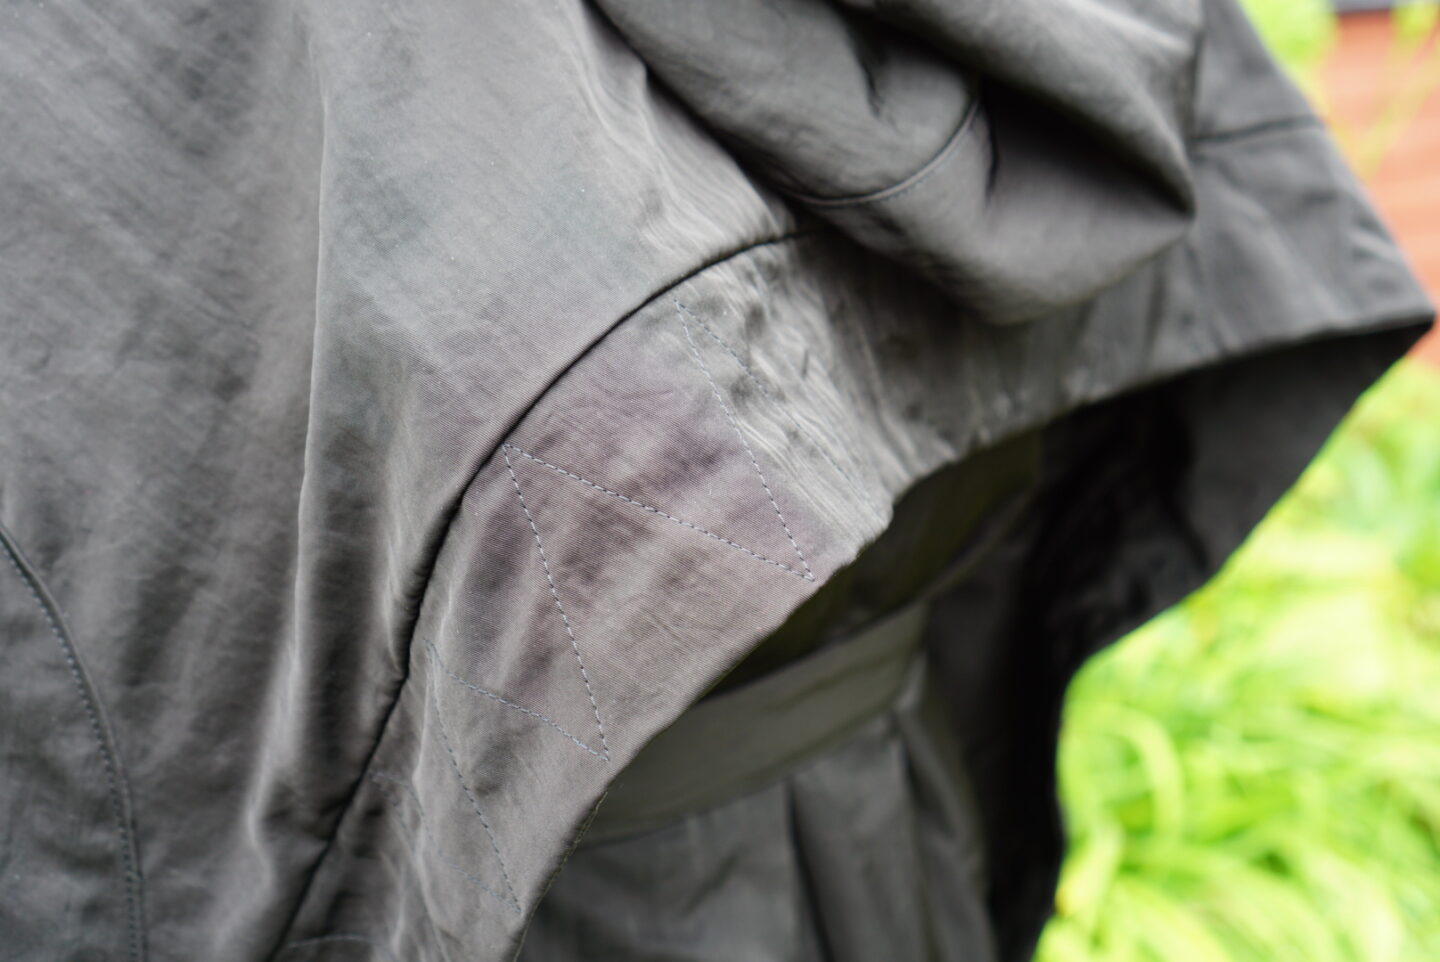
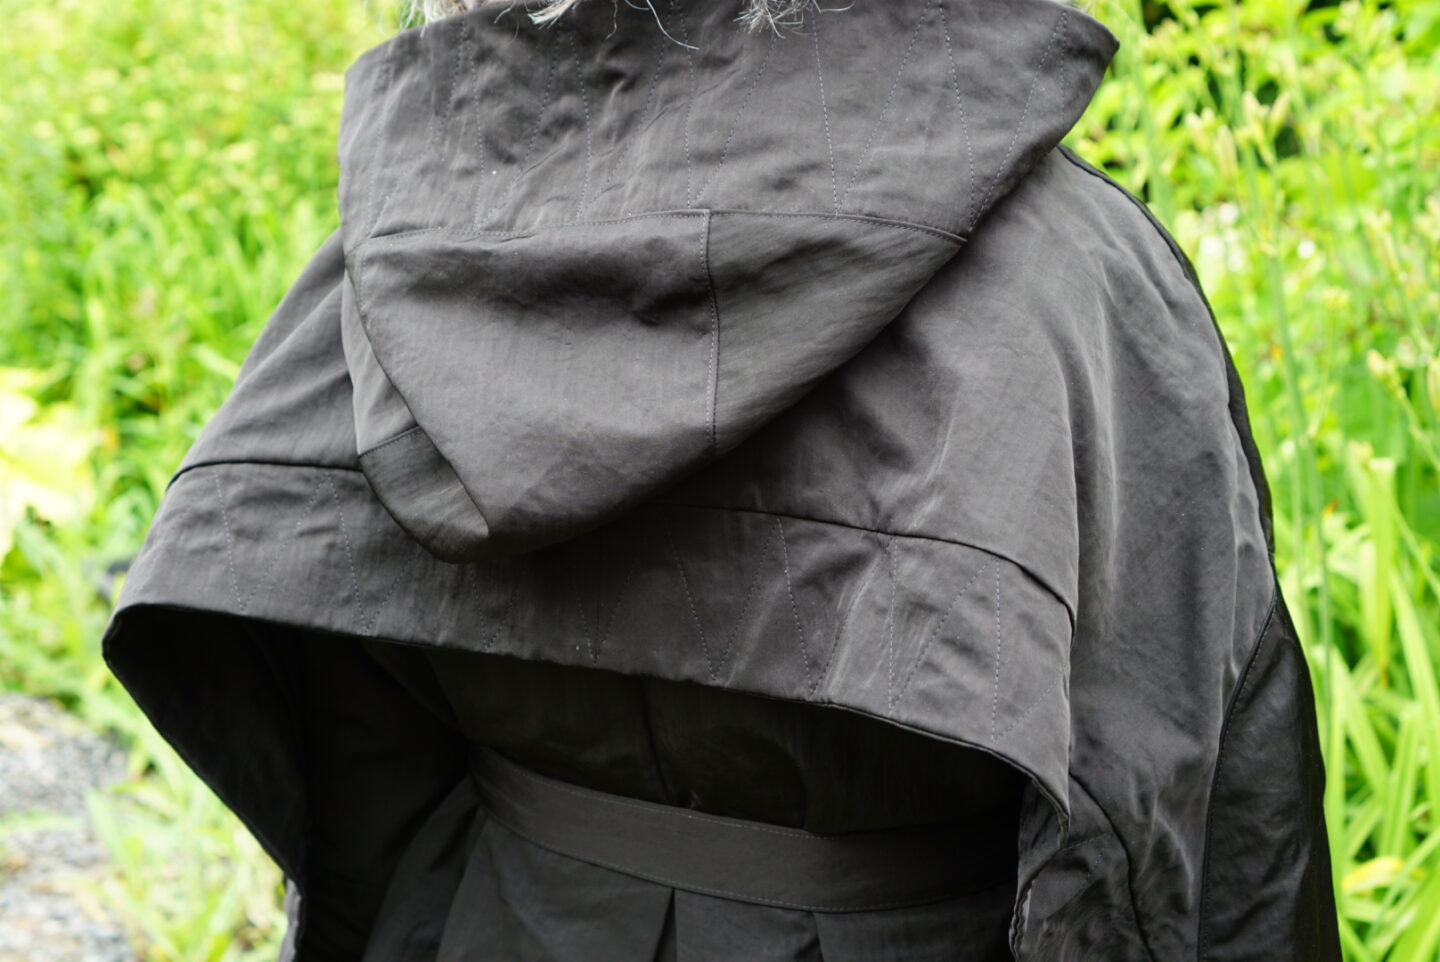
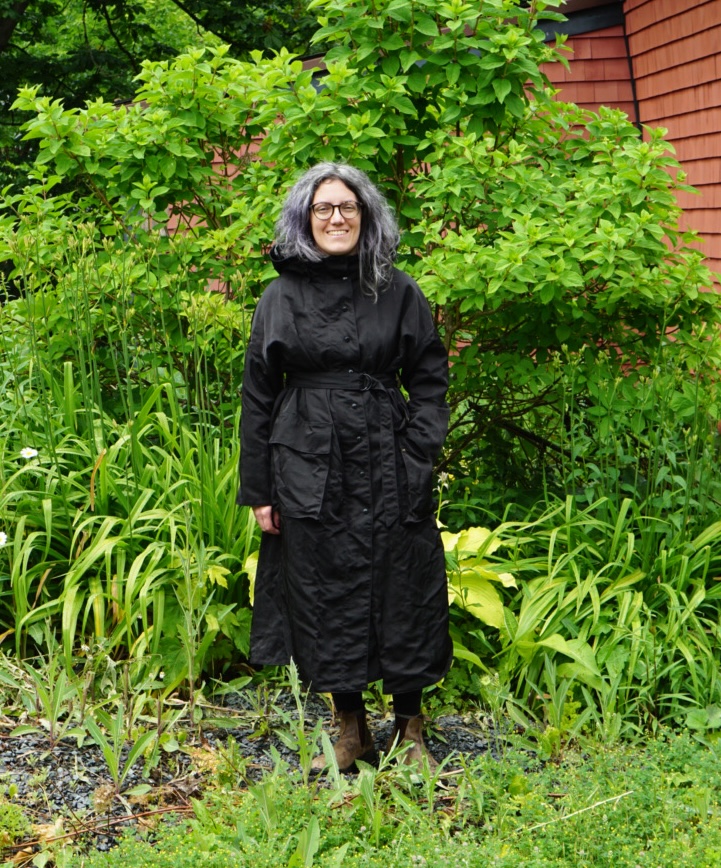
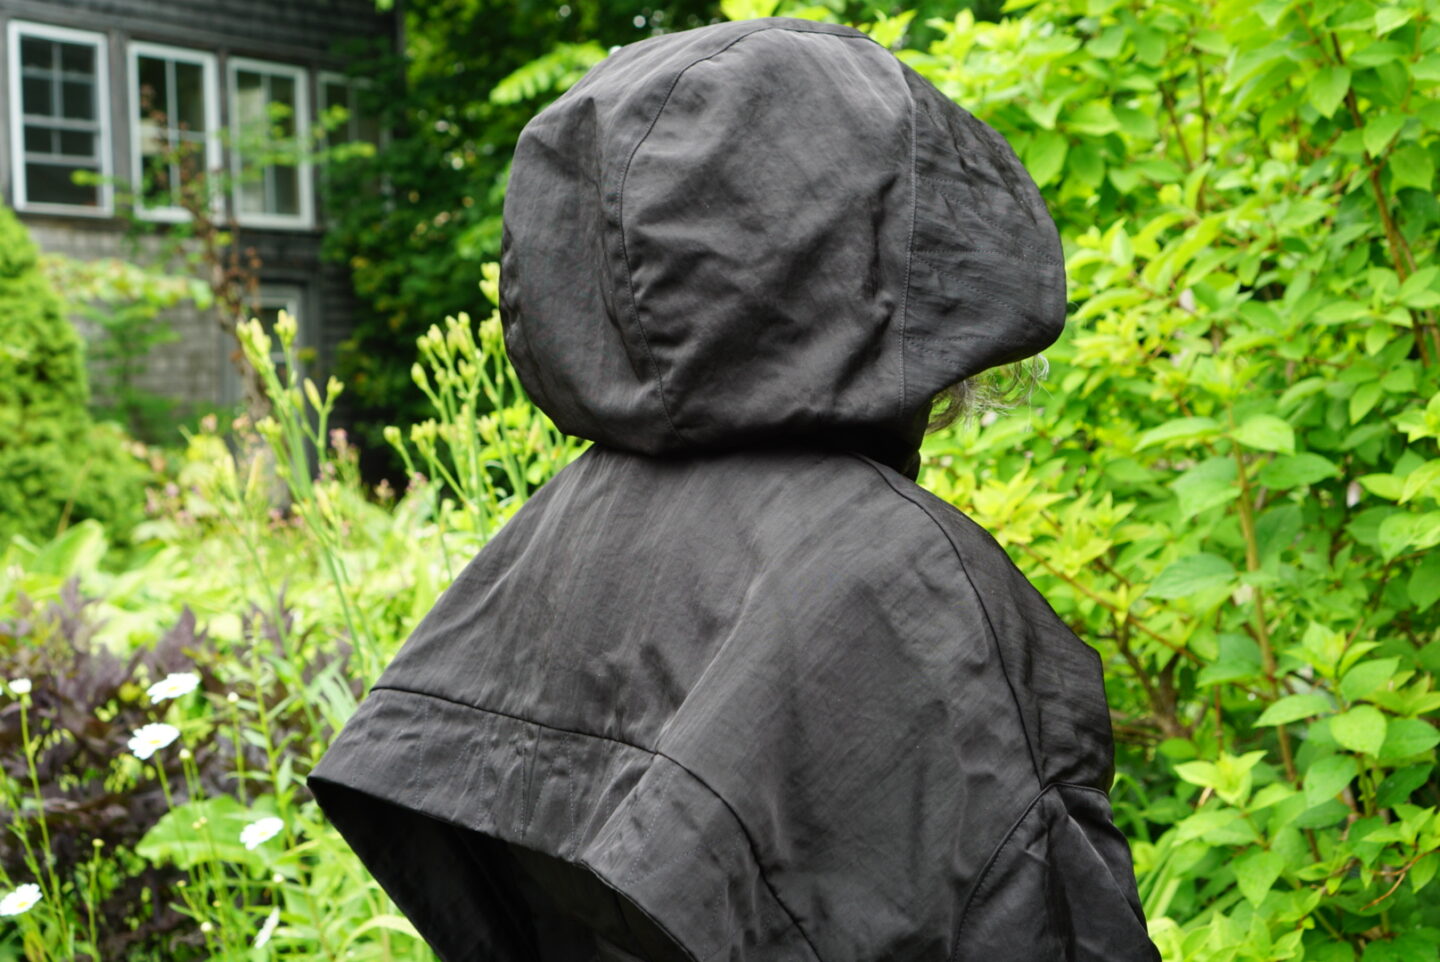
Something else that was an obstacle with this project was the pattern itself. The pattern is originally published in Russian (I believe), but Grasser also offers other languages, including English. I haven’t checked into this, but I’m pretty sure that the patterns are not professionally translated based on my experience. I found there were quite a few words that weren’t really the usual English word for a particular sewing thing, which made things tricky and took a lot more brain power to get through. The pattern also features photos instead of line drawings, which is not my preference. I kept having to refer back to the PDF on my iPad because I prefer my instructions to be printed, but the black and white was making it hard to see details in some of the photos. I am not laying all of the responsibility for the issues I had at the feet of the pattern, but I did find at least one place where the pattern steps seemed to be out of order in terms of understitching/topstitching in a way that prevented the next step from occurring correctly. I had to unpick the stitching in order to get things in order, and I think that incident in combination with the brain power I was having to expend sorting through the photographs and the translation things caused me to lose trust in the pattern. This raincoat pattern is rated as Grasser’s highest difficulty, and I do not recommend it for the faint of heart. If I did not have extensive sewing experience, and lots of experience with coats in particular, I think there would’ve been many points that derailed me. In terms of the construction and design, I think this raincoat is extremely well done. I love the styling and the details and it fits really well. It was great not to have to adjust for my height, especially with the amount of pattern pieces going on! One detail in particular that I love (outside of the storm flap I mentioned above) is that the back pleat perfectly meets at the location of the waist belt. It’s so satisfying!
Why I mentioned the fact that I lost trust in the pattern is because it brings us to the part of this process where I majorly sabotaged myself through my own folly. Which I will get to below. Let’s look at more photos! Ooh! FASHION!
Here’s where I have to tell you about the stupid catastrophically wrong thing I did. I had read through all of the instructions prior to starting, but the translation stuff and the photos were all very distracting and also there were so many pages of instructions and so maaaayybe there ended up being some parts that I just skimmed. But I had confidence (misplaced) in my abilities based on previous experience. The coat was lined and had a hem facing at the bottom, and had a cool side slit where the back hem has squared off edges and the front hem is curved. It’s really cool! I made an assumption based on all of these details and my previous experience that the coat was designed a fully bagged out lining. For those who haven’t sewn a coat, that means that all of the edges of the lining and exterior of the coat are attached together and everything is fully enclosed at the end. Coats designed with that feature have facings along the front vertical edges, along the top of the shoulder area, and at the hem. This coat has all of those facings. But it is not designed to be bagged out. In the construction of this raincoat, the bottom hems do NOT get attached together. But I didn’t realize this.
Because of my assumptions about where things were headed, I did not finish any of the interior seams of the raincoat. There were times when I was told to do so, but not always using the same wording for it, and sometimes with different seam allowances specified, and I found that confusing and felt like it was aligning with the mistrust I was already feeling toward the pattern. So I didn’t do them, because I thought it was unnecessary and fussy because everything was going to end up being enclosed. Then, I finished sewing the fussy bits with the side slit and facing and all that jazz (we’re going to gloss over the fact that I had accidentally sewed a strange mobius strip spiral on one of the sides that I didn’t notice until after I had resolved my huge “not a bagged lining” calamity and then had to fix). I looked ahead to the bottom hem stuff, feeling excited that I was nearing the end. And the instructions were telling me to hem the lining separately from the exterior shell, and to sew the turned up hem facing directly to the inside of the exterior shell. I thought I could just bag it anyway, and then tried to pin the facing edge to the lining edge, but the bottom edge of the lining was muuuch more narrow than the exterior edge. That’s because it is Once I realized what had happened, and figured out that the bottom hem edge of the lining was much more narrow than the exterior bottom edge, I almost cried. I wanted to put the project away and never look at it again. I didn’t have remotely enough nylon twill left to cut any other pattern pieces. I didn’t love the idea of going back inside the raincoat and trying to overlock all of the edges after the fact as best as I could manage. I thought it would look sloppy and I also didn’t want the lining to be free hanging, I wanted it to be bagged because that was the image I had cemented in my mind.
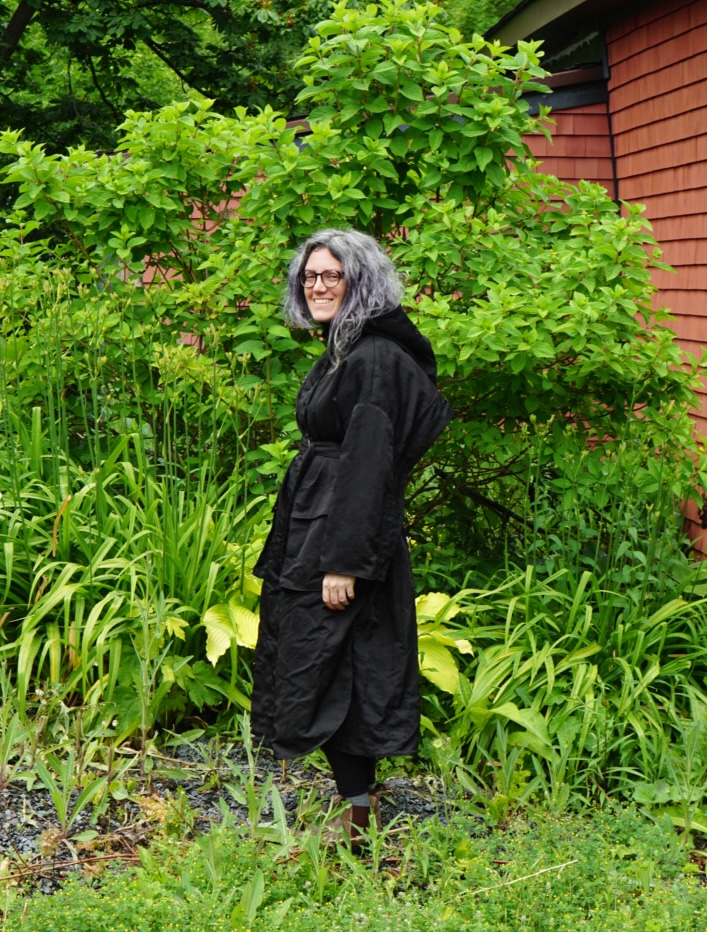
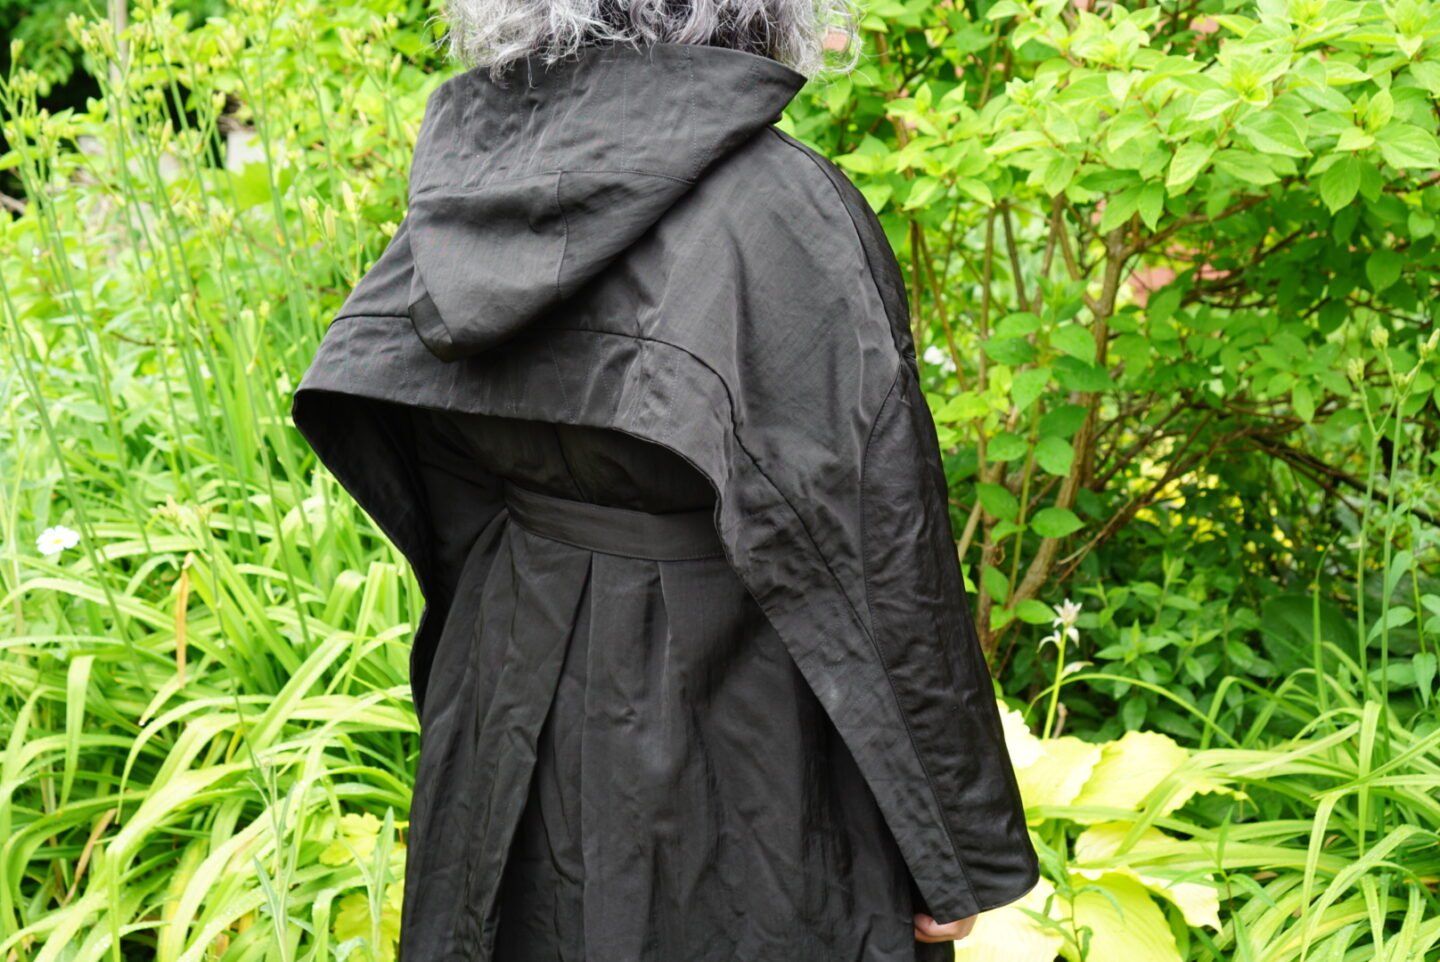
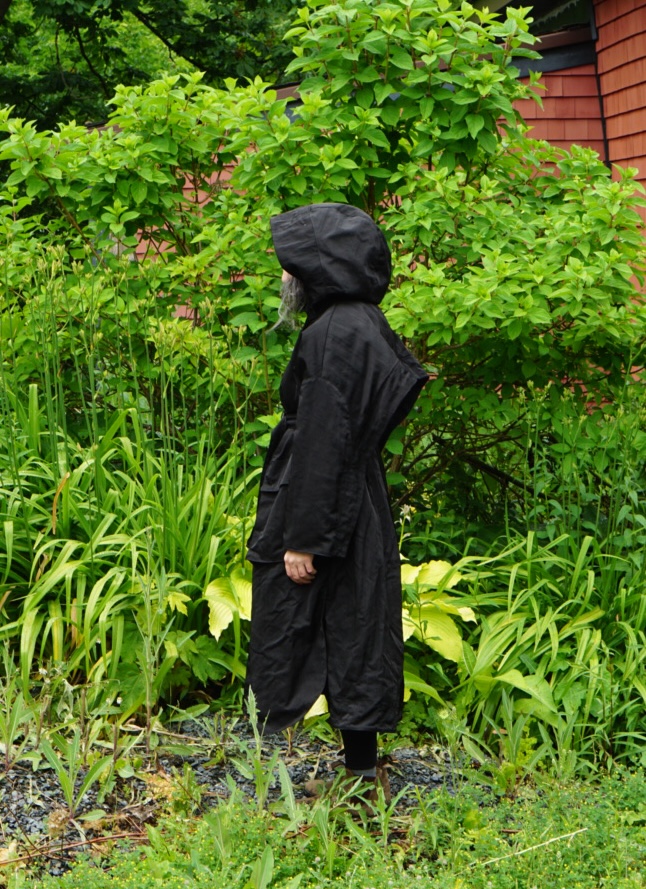
I explained all of this to my partner and showed him everything. He didn’t fully understand, but he asked the correct question. He asked me, “If you don’t go back and try to overlock everything on the inside, what would you do instead?” I honestly could not see any solution to this issue, but being asked that question forced me to try to think about it more seriously, because if I didn’t have an alternate solution, I was going to have to do the afterthought overlocking. But I came up with something else, which was only possible because of how the huge pleats are constructed and because I still had some of the cotton poplin left. I will tell you about it once you’ve taken a look at the photos below. Specifically, I want you to take a closer look at the back view and the fact that there is a center back seam on the upper portion of the coat.


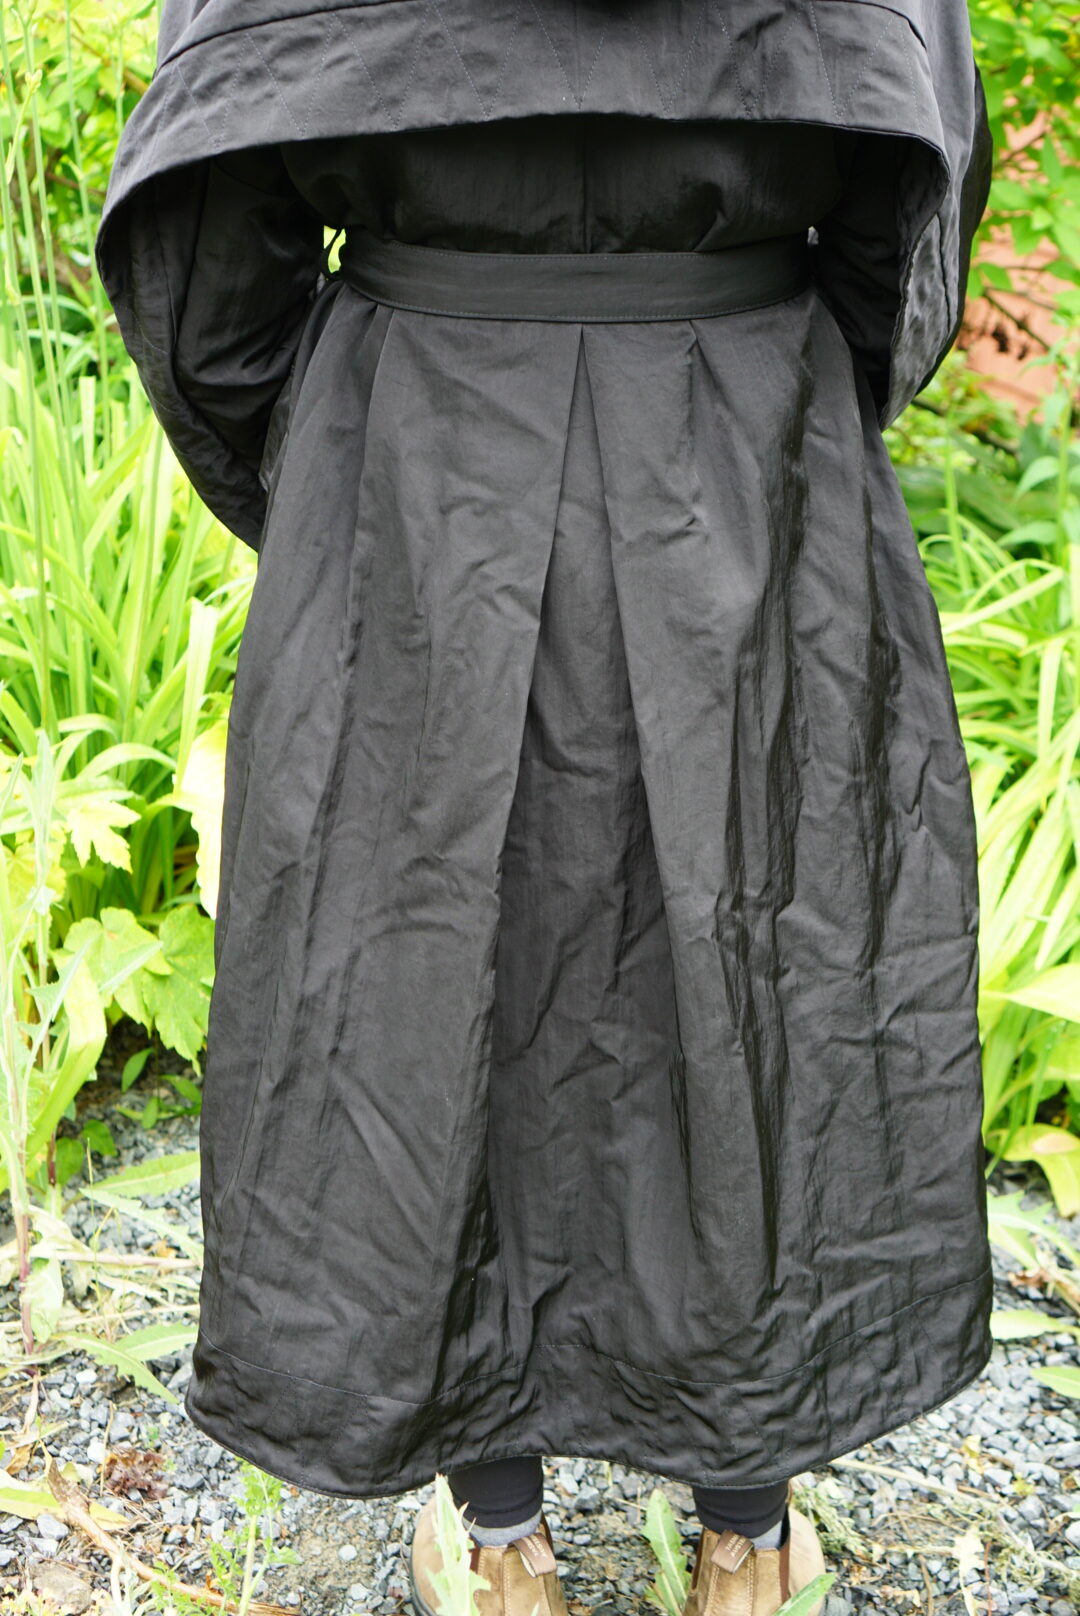
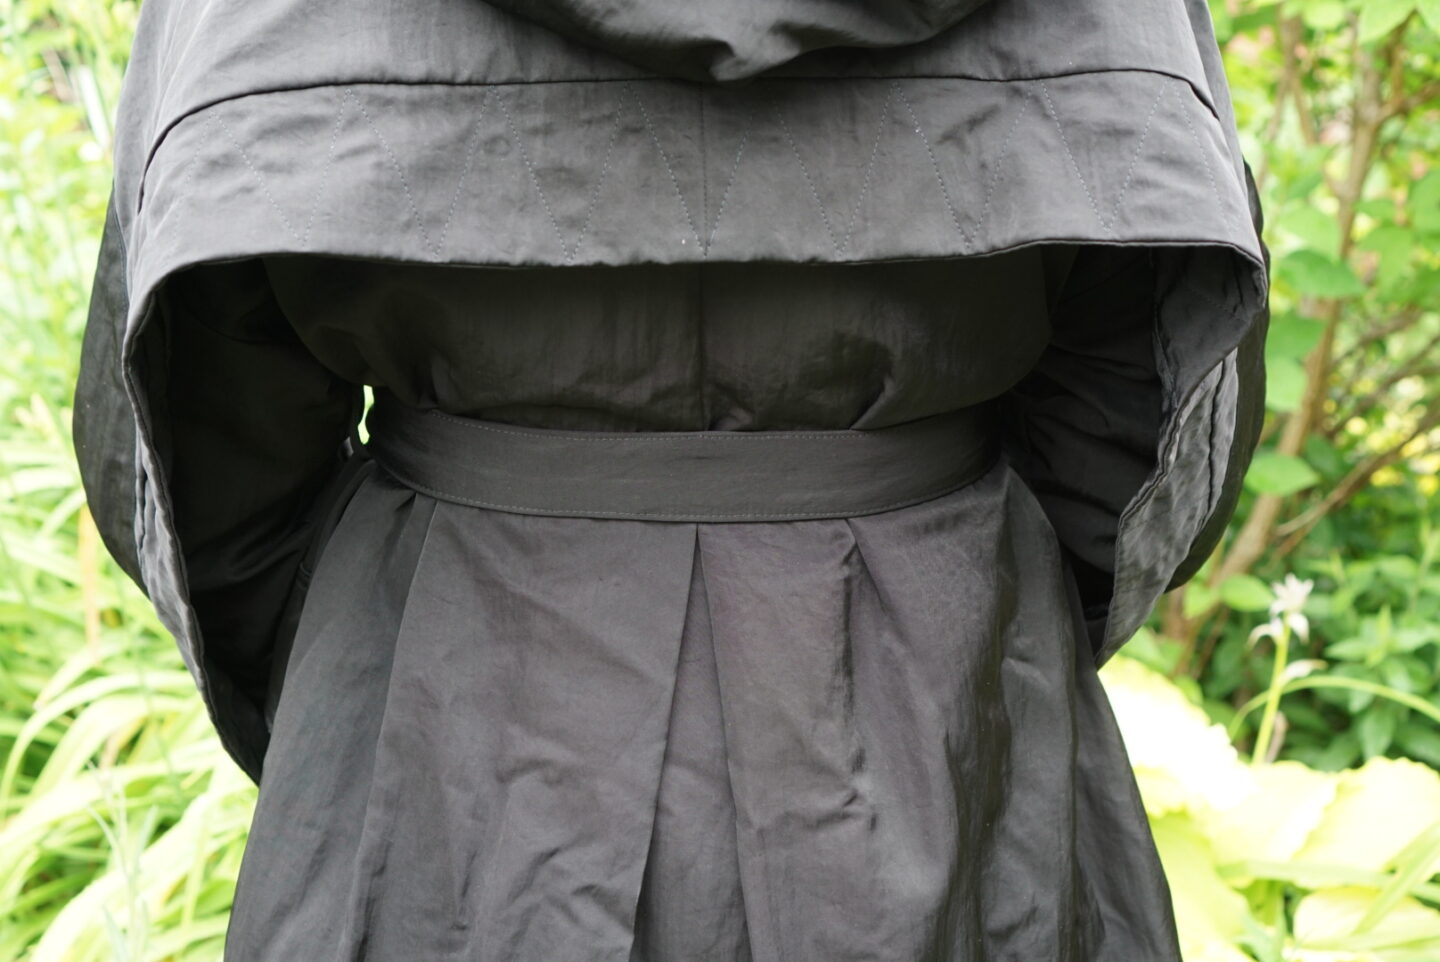
If you can see above, there is a center seam above the belt but not below. This is the same on the lining of the raincoat. That’s because the top half of the finished garment doesn’t have nearly as much volume as the bottom half, and that volume gets contained within the pleat you can see above. The pattern piece is basically a very wide full back piece with a substantial rectangle missing at the top center, with the lower edge of this cutout falling at the height of the belt. I hope that makes sense. The two vertical edges of the rectangle get sewn together to form the center seam (this brings the pieces together and creates the more narrow top width), and then the bottom half gets pleated (centered on that seam). In order to solve my lining issue, I compared the back lining piece to the back raincoat piece. The difference in widths was largely located inside that pleat; the lining pleat was not as deep. What I ended up doing was unpicking the seam anchoring the top of the lining pleat, cutting it vertically down the center, and then adding a big rectangle along that cut. This added more width along the bottom hem edge, but was not an issue at the top of the pleat because I just made the pleat deep enough to accommodate the additional volume. Obviously this changes the fit of the garment a bit on the bottom half because of the additional lining bulk, but I am very happy with this relatively simple solution! It is a big change to the design and a snafu that I take full responsibility for, and I’m also proud that I figured out an alternative solution to the haphazard results I would’ve gotten from trying to go back and overlock all of the seams.
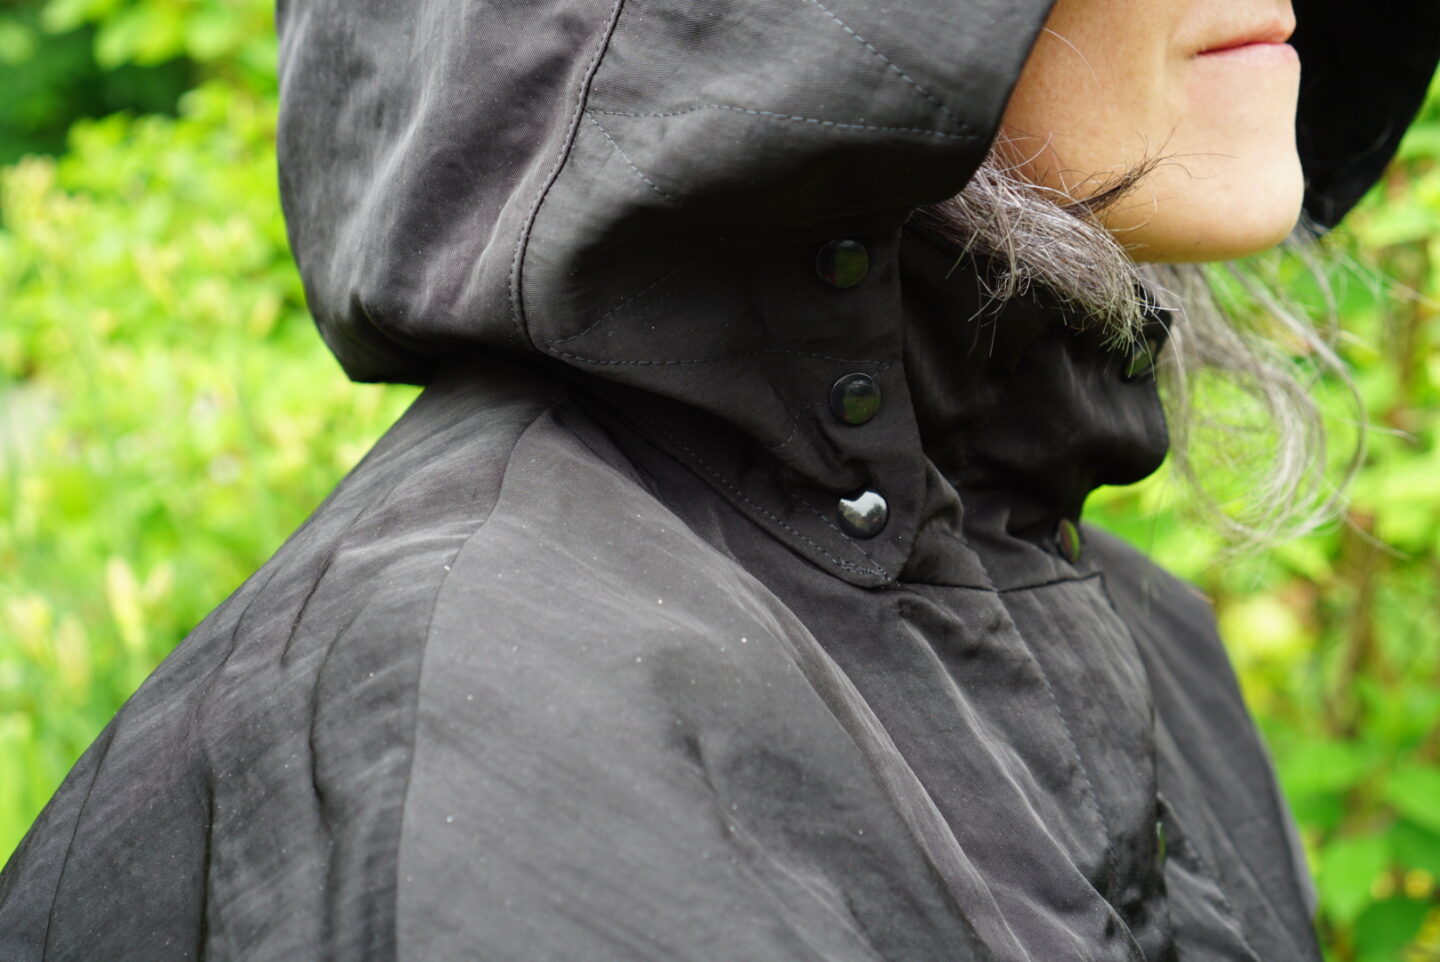
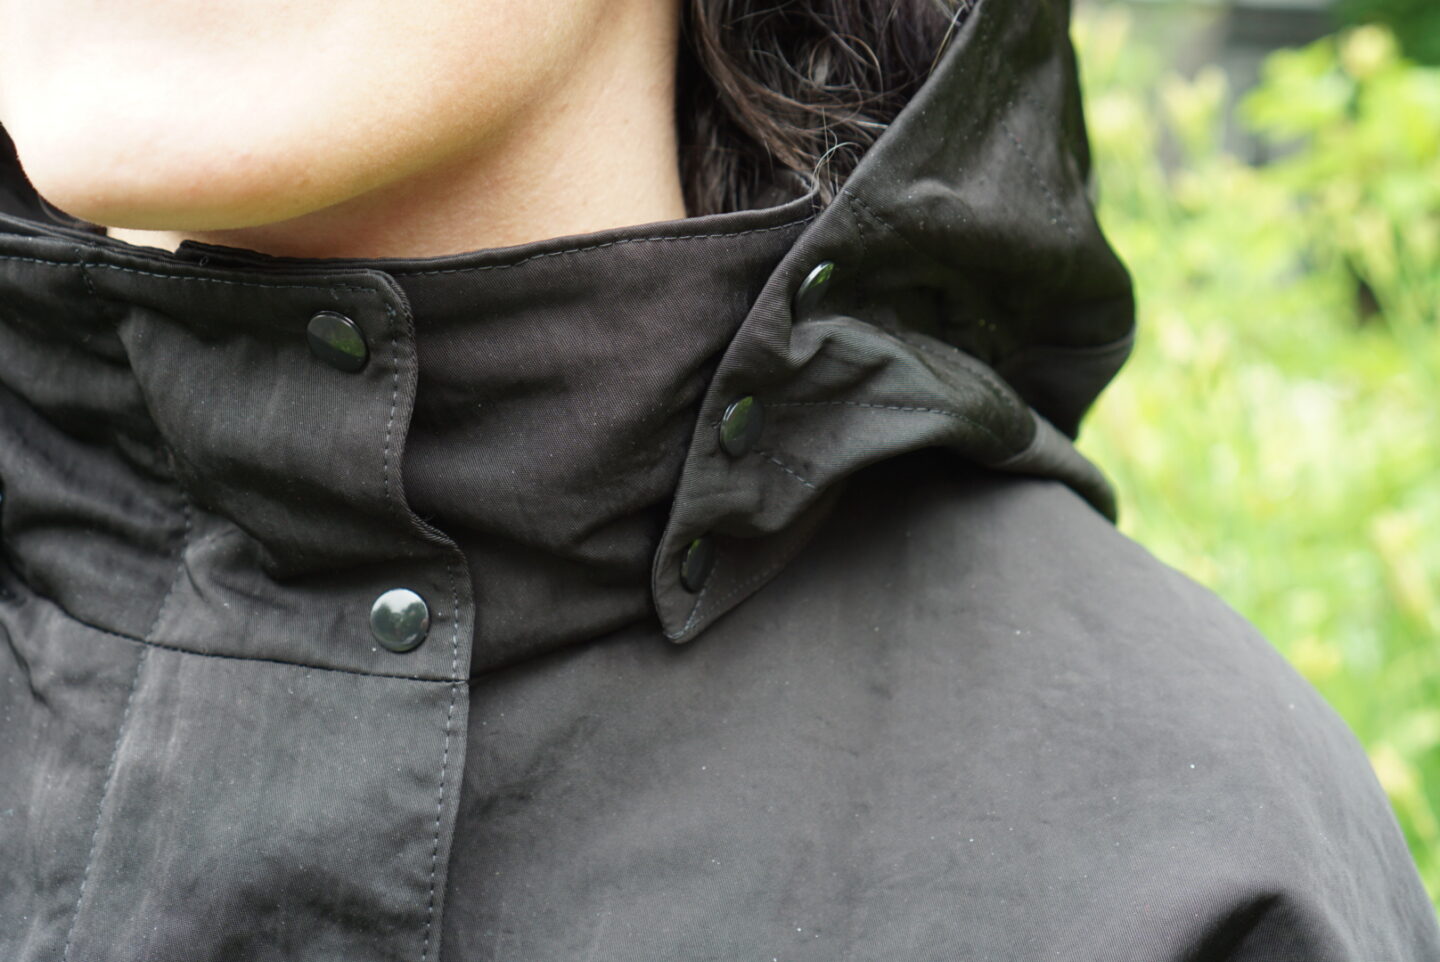
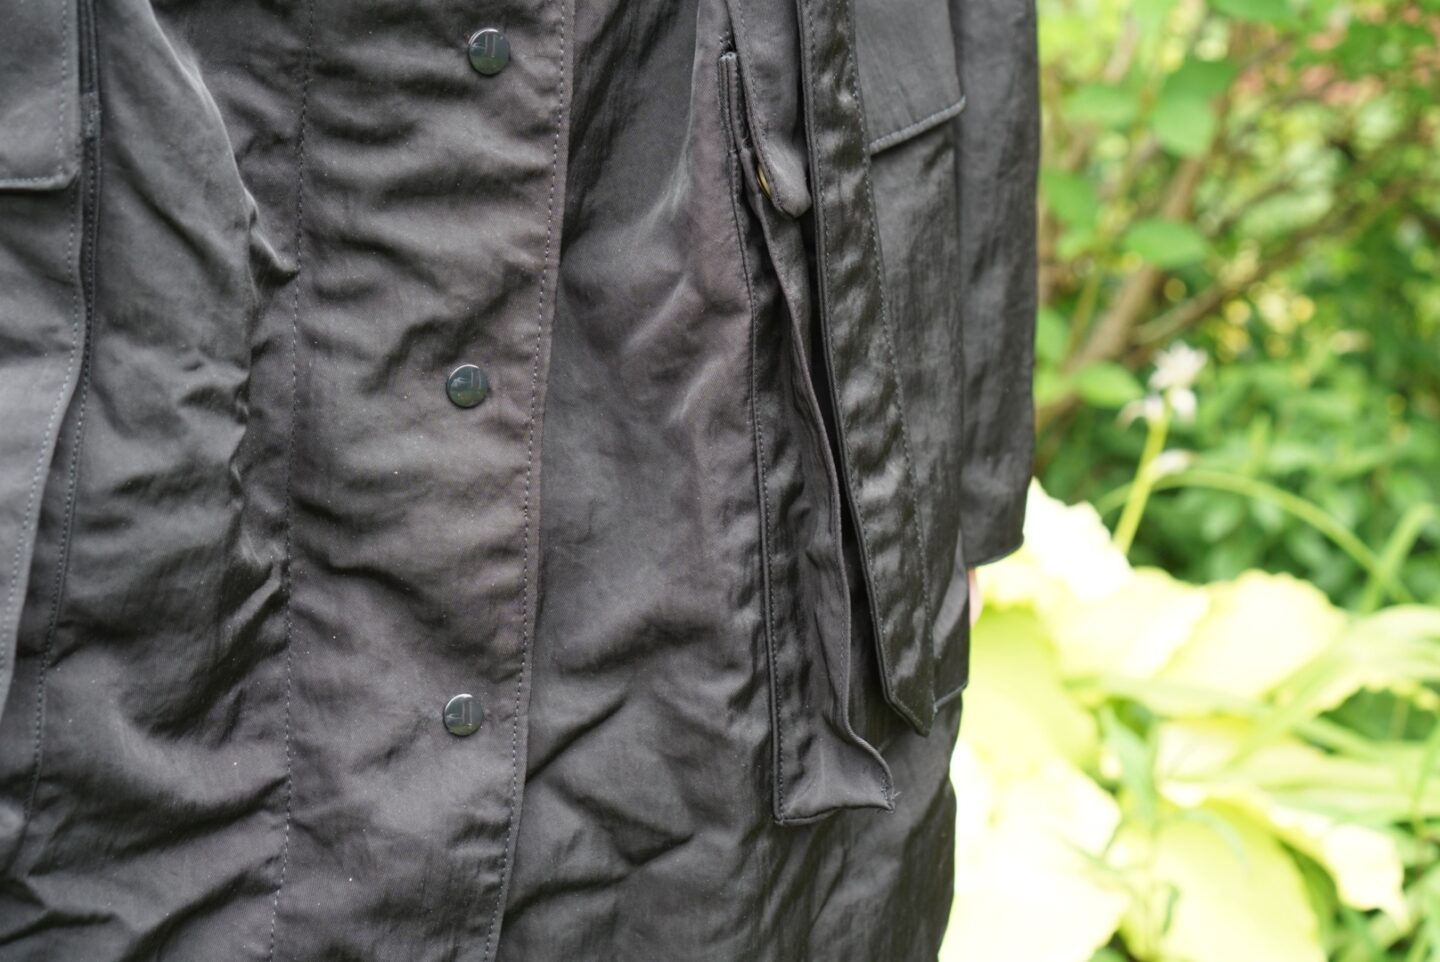
You may be thinking, great job! It must be smooth sailing from here to the end, right? Incorrect. Because I thought I had D-rings of the correct size for the belt, but it turns out I did not, and had to order some and wait for them. This did allow me to order black ones, which I like the look of better than the antique brass finish ones that I was going to use. But I did have to wait for those to come in. And I also had issues with my snaps, as I wanted to use black plastic snaps and had never used plastic snaps before. I thought the look of them would be better, but also that they would be better long-term on a garment that was destined to get wet a lot. I ordered a multipack of KAM snaps online, because the research said that they were the best, most durable, and reliable. It came with an installation tool, but I ruined a lot of snaps getting the hang of things. And I also had issues with them pulling off because the snap closures are nice and firm when they get into place, and it turns out I needed longer prong snaps in order to be able to get them securely attached to the layers of fabric in this raincoat. And there are SO MANY SNAPS on this. They run all down the front facing, plus a ton on the hood/collar because it’s detachable! I ran out of black snaps due to my misadventures and the fact that I needed so many, so then I had to order more in the long prong option. Luckily I was able to summon the energy and brain power to at least poke holes where all of the snaps on the garment needed to go so that once the D-rings and snaps arrived, I would only have those things left to install to have a fully complete garment. I was very grateful to set this project aside and know that I couldn’t do anything on it at the moment, because I was very sick of it! I needed a break! I was very happy with the look of it and how it was fitting, but I was tired of everything being so much work physically and mentally. It felt like every step encountered an obstacle, so I was very pleased to sew something that didn’t take months and sap all of my crafting energy.
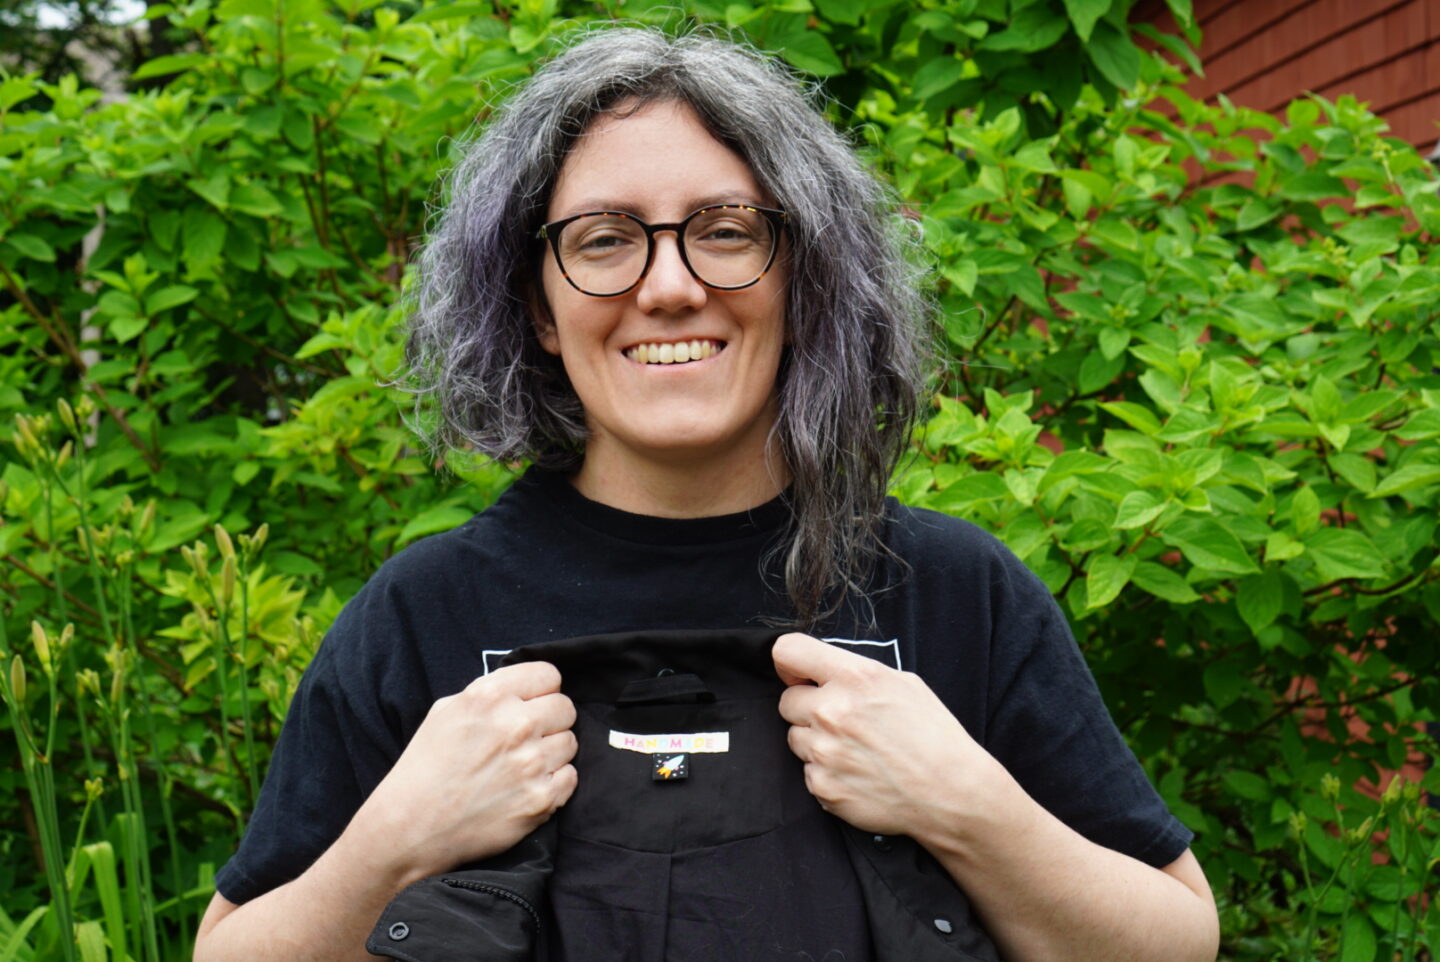
Eventually my notions arrived, and I was able to finish it! I used some really cute labels from Sarah Hearts that I got from Blackbird when I ordered the fabric. I don’t usually pay much attention to cute labels, but I wanted free shipping and I also thought these specific designs would look cute with the monochrome black. It makes me happy to look at them inside the raincoat!
If you got this far, thank you for being along for my giant complain-fest. I promise I’m done. I just needed to vent! Even experienced sewists can make bad decisions regarding fabric and pattern combinations, and do stupid things because they thought they were too experienced to do something like *read the instructions*. I will say that the fabric and pattern combo made the garment terrible to sew, but I am very pleased with how the actual garment turned out. I wore it on a damp day on a walk to a nearby farmers’ market, and it did well at keeping me dry. It’s obviously not as waterproof as my intense raincoat with taped seams and a waterproofed zipper and fancy technical fabric, especially since I had to topstitch a lot more than the pattern even called for. But I’m very pleased. It fulfills the exact function I had in mind when I came up with the plan, it fits well, and I love all of the details of the pattern. I would love to sew it again some day in a fabric that doesn’t actively conspire against me at every possible turn, and also sew it with the lining hem hanging free as intended. I feel like an ominous Carmen Sandiego in the best possible way when I wear it. I’m excited to wear it with my black concert clothing to an orchestra performance so I can feel like a character in an ominous futuristic movie, emerging from a fog or some shadowy alley. I’m very intrigued by a lot of the other Grasser designs and may try them in future, however for now I see a lot of simple knit garments in my immediate future. I need some quick wins!

What a journey! I’m impressed you persevered and it was definitely worth it because it is a beautiful garment. Well done!
Author
Thank you! 😀
Oh my goodness. Well done for getting to the end of that. It really looks excellent and there are lots of times when it’s raining and you need something a bit fancier than a casual waterproof jacket. I made a trench coat for exactly that reason and while I had some issues (mainly design changes I wanted) it was nothing like yours. I haven’t used Grasser but now I know they make patterns for different heights I might give them a go! Thanks for sharing 🙂
Author
Thank you so much! What trench coat pattern did you use? My favourite trench coat pattern is the Deer & Doe Luzerne, but that’s much different than this and not a raincoat, so that’s a side note. 🙂
Bravo, bravo, bravo Megan! This coat rocks and, I agree, it’s perfect for those damp, moody nights as you whisk yourself out of the ominous fog and into the theatre for an orchestra performance.
Author
Thanks so much Laura Beth! 🙂 🙂